Decoupage Furniture Using Fabric and Spray Adhesive
Decoupage Furniture Using Fabric
You can decoupage furniture with a variety of things; newspaper, fabric, wallpaper, wrapping paper, maps, etc. That means there are limitless designs and colors to choose from. I choose fabric with a fun design for this decoupage project. The bright colors scream “Look at me.”

Decoupage Furniture Using Fabric
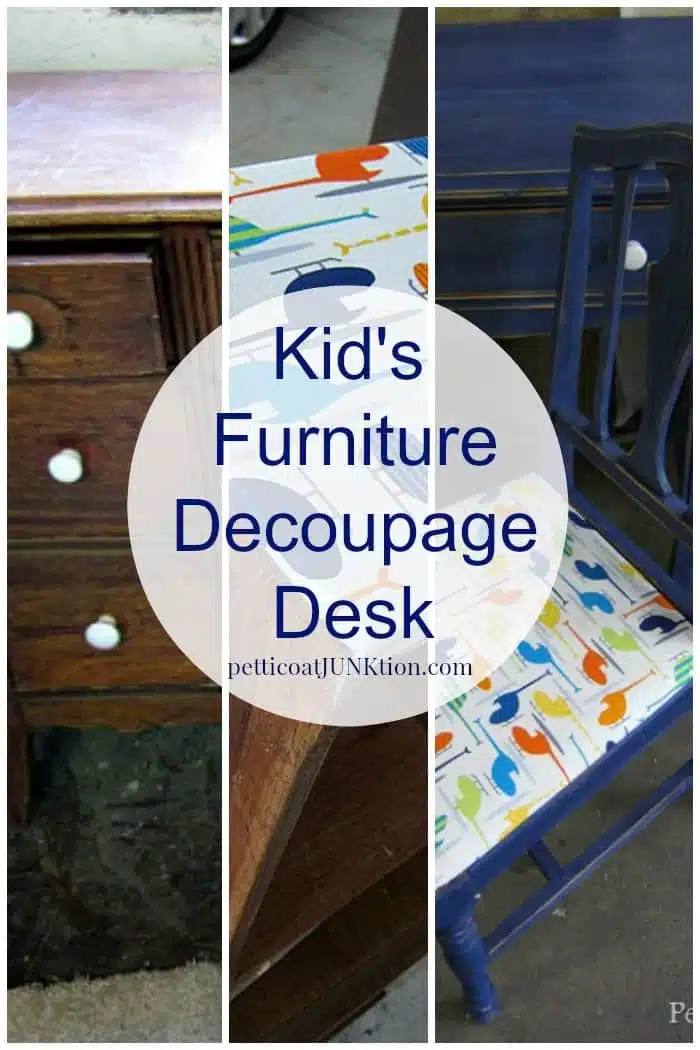
This decoupage desk is one of my favorite projects. It brings a big smile to my face and makes me do the happy dance. It’s perfect for a boy’s room or a tomboy’s room. What’s not to love about the bold color and the fabric. I wrote a tutorial on the chair makeover in an earlier post. Here’s how the desk makeover came about….

Desk before painting
I ran across this little desk and light bulbs went off……… HEY, I could spruce the desk up with fabric and paint it to match my chair….it would make a perfect kid’s desk with the decoupage helicopters. I come up with some brilliant ideas. I’m awesome like that sometimes. At least my granddaughter tells me I am and that’s all that counts.

I used Caromal Colours Textured Basecoat in Huckleberry Blue. The paint is thick and you can “mush” it on for a textured effect or just brush it on as usual. Once the paint is on….it doesn’t come off. It sticks like glue. One coat of paint is all it took. Gotta love that.

My fabric selection had a white background so I chose to paint the drawer fronts white. I did this on the off chance that the dark drawer front would show through the light fabric. You learn these little tricks from earlier mistakes!
Next step after the paint is good and dry is to adhere the fabric to the desk drawers. To make sure the drawer fronts were relatively smooth I went over them with an electric sander using 100 grit sandpaper.

I cut the fabric a little larger than the drawer front and then sprayed the back side of the fabric with Elmer’s Spray Adhesive. I coated the drawer front with the spray too. You want to get lots of adhesive on there so everything sticks good. Spraying both surfaces is important.

The fabric from AnnKelle Designs is Helicopters in Bright from the Ready, Set, Go! line. I love the colors. The bold reds, greens, yellows, reds, and blues are perfect for a kid’s room. I also like the design because when my husband was in the U.S. Military he worked on helicopters.
I placed the fabric on the drawer and rubbed over it with a soft rag to remove any bubbles or wrinkles and to bond the fabric to the drawer. I used a razor blade to get a nice straight edge on the drawer sides. After the adhesive was dry I brushed on two coats of polyurethane to protect the fabric.
I didn’t want to overdo the added designs to the desk so I only covered two drawers with fabric. There is a fine line between just right and trashy.

I distressed the desk heavily using my electric sander and 60 grit sandpaper. The distressing might be overkill for some of you but you know with kids the furniture is going to get beat up. I sanded the desk all over and it left whitish or lighter color areas on the paint but it works for the overall effect. To get rid of the whitish look you can always use clear wax.

One last look at the fabric on the chair seat. I love it. Doin’ the happy dance. How about you guys?
I will say that I think I prefer Mod Podge for decoupage over the spray adhesive. Spray just doesn’t cover like brushing on that Mod Podge. Just my tip for you.
Decoupage Furniture
Thanks for being here and have a great day, Kathy

Author: Kathy Owen
Kathy Owen is the founder of the home decor blog Petticoat Junktion where she shares tutorials on painting furniture and upcycling thrifty finds into unique home décor. Her DIY projects have been featured on the Home Depot Blog, Plaid Crafts, Behr Designer Series, and in numerous magazines. Kathy’s newest website is HappyHomeDIY.com
Wow, this looks really good! I’m amazed by the results, it looks like a whole new piece of furniture.
Wow! It beautiful. I woukd gladly use it as an adult!
That is really BLUE! It’s a little bright for me but for a kid I think it would be perfect. Especially with the airplane fabric accents. It’s a cute little set and someone smallish is going to love it in their room!
Gosh, I love this, Kathy! The denim looking paint and the adorable fabric is perfect. Pinned
Really cute and really original! Love the color and the fabric! Way to go!
Inspired choice of fabric, it ‘lifts’ the whole piece. I have never thought furniture painted this colour looked good, until now. It’s lovely. Another triumph!
That blue is gorgeous! And I love the fabric, very cute!
so cute and fun! love the color and the helicopters!
Kathy, this desk makeover is too cute for words! I especially love the blue color. Thanks for joining the DIY Talent Parade!
love how this turned out. the fabric is a really great touch 🙂
Very nice! I love that blue, and the bright pattern in the fabric is just the piece de resistance. Glad I stopped from DIY Talent Parade.
Yes, it does bring a smile to my face. Love the piece, love the color, love the fabric. I really like how you only covered two drawers. It has such a playful personality now. Nice work!
I absolutely love it! It brought a smile to my face too! Love the blue and the fabric choice!
Thanks Katie, I love this color too
This is so cute Kathy! I love that Huckleberry blue color! The fabric looks great paired with it! Great job!