The Best Way To Paint Outdoor Metal Furniture
You get the best results when using a paint sprayer to paint outdoor furniture. The paint sprayer can be used to apply primer, paint, and sealer.

I first painted this vintage metal glider using spray paint. The paint did not cover well and the paint started fading after a couple of months. So I repainted the glider and now it looks fantastic. I’m taking you through the whole process today. It’s also Furniture Fixer Upper Day and we all love that!
I spotted the metal glider with the rusty blue paint at my favorite junk shop and it was love at first sight. I keep referring to it as a glider but the bottom gliding part is long gone. The price was $25 so not a bad deal. I thought about leaving it rusty but decided it would look great covered in a bold color.

The JTS and I worked hard to remove the loose rust. The JTS used a steel brush and removed most of the loose paint. After that, I did a go-over with sandpaper.

Looking at the bottom of the glider shows me that the original color was yellow.

After removing the loose paint, I sprayed the rusty areas with RustOleum Rust Reformer. I haven’t used this product before, but I assume it does what it claims. Have any of you tried the Rust Reformer?
I moved on to painting the glider. I tried brushing on a little paint and it didn’t cover well at all and left a ton of brush marks. I decided it would be a quick and easy job to use spray paint for the makeover.

I first selected a turquoise color and then a yellow and sprayed the bottom of the glider. Not liking either color. The turquoise was too blue and the yellow was too bright.

Next I grabbed the Krylon in Cherry Red. I love this color. I’ve used it before on furniture knobs and on the Little Tikes Playhouse Makeover where I painted the door knob cherry red.

I found several ways to prop up the glider so I could paint all sides. Cardboard boxes come in handy for a lot of things. I started spraying paint and kept spraying paint. I think I was on can 3 when I stopped.

And this is what the glider looked like with the $5 cushions from Walmart. I had a problem trying to find cushions because regular bench cushions were too short and three of the seat cushions together were too long. But guess what. I found out by accident if I turn the seat cushions where the ties are facing each other then the cushions fit perfectly. Who needs to tie those things on anyway. Too much trouble.

The paint covered the arms and supporting rails perfectly but not the body of the glider. You can see in this photo how the metal grids are discolored. I don’t know if that is because they are rougher than the other metal or what.

As I mentioned earlier the glider part was missing and that made the bench set really low. We came up with a plan to raise it up just a bit. The JTS removed the glider foot/stand and cut a 2×4 just a tad longer than the foot. Next he screwed the 2×4 and the glider foot on to the glider.

As you can see the spray paint on the glider didn’t hold up well at all and we never got the wood feet painted. Just a few months after painting the glider with the spray paint it looked like this. I decided to repaint it using latex paint and apply a primer first.

The JTS gave the glider a good washing with the power washer. He loves using the power washer and it meant I didn’t have to work as hard. The weather has been so darn hot here I haven’t been able to get outside and paint. 
The hubby washed the glider a few weeks ago and it was so hot I didn’t get it painted right away so I needed to wipe it down again. There were a few areas where the paint was lifting and I sanded those areas with the power sander. I clipped the photo above from the video tutorial.
I used Zinsser Primer and Sherwin Williams HGTV Weathershield Semi-Gloss Paint – color, Agreeable from Lowe’s and the HomeRight Super Finish Max Extra Power Paint Sprayer to get the job done this time. I’m going to walk you through using the paint sprayer as I go….

This time around since there was a bit of rust on the glider and the paint wanted to chip I decided to prime it before painting. I’ve never used a primer in the paint sprayer, so this was a first. The primer I chose for the project is Zinsser and as I usually do I had the primer tinted gray. I think it’s a good color under any paint color. Easy to cover, unlike white. I poured the primer into the sprayer container. I filled it half full of primer.

Next, I added water to thin the primer. Usually, paint is too thick to work well in a paint sprayer so it has to be thinned. The primer is water based so I used water. If you use oil-based paint it should be thinned with mineral spirits or turpentine. This HomeRight paint sprayer can handle thicker paints and sealers, so your paint may not need to be thinned. I only added a small amount of water to the primer. Primer is usually a bit thicker than latex paint.

The only thing left to do is start spraying. This is the fun part. When you see the video, you will know what I mean. Watching the paint cover the surface is cool. I move the paint sprayer in a nice smooth motion from side to side and up and down. The sprayer has multiple spray settings, but I found the setting straight out of the box worked for this project. The sprayer comes with three tips for different types of paints and projects.

We set the glider on two sawhorses to make the paint job easier. I painted the bottom of the glider, let it dry, then turned it over to do the top side. When I finally declared it glider paint day …… the day was a bit windy, okay, more than a bit windy. I ended up with speckles of paint on my glasses and in my hair. And some of it is still there. Today’s Tip: It’s better to paint on not windy days!

I waited a couple of hours for the primer to dry then moved on to the pretty part, the yellow paint. I cleaned the paint sprayer in between priming and painting. I went through the same process as the primer when readying the paint sprayer. I did use less water because the latex paint was pretty thin to start with. The paint is HGTV HOME by Sherwin-Williams Weathershield Semi-gloss Exterior Paint and the color is Agreeable.

Priming and painting the metal glider took no time at all. Drying time was the hold-up. I finished the project and took all these photos in one day.

The paint sprayer should be cleaned well after each use. You don’t want to wait a day or two or even several hours before cleaning or the paint will dry and be hard to remove.
To clean the sprayer, first rinse the container really well with soap and water, then fill the container about 1/3rd full with water and screw it back on the sprayer. Spray the water until it runs clear. Take the cap, nozzle, and paint tip-off of the sprayer and clean with the brush that comes with the sprayer. Detailed cleaning directions come with the sprayer.
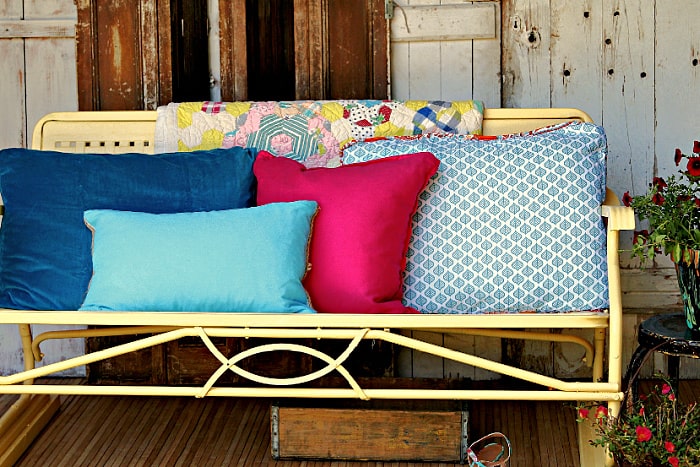
The old cushions are yucky and I haven’t had time to find new ones yet. I needed to dress up the glider for photos so I went through the house grabbing things I thought would work.
")
I have to say I like the yellow much better than the red. Makes the glider/bench happy looking.

One of the prettiest parts of the glider is the little curlicue detail on the front apron. I’m not sure what it is made of but it’s not metal.
")
I’m super happy with the new look. When selecting the paint color I pulled some really bold yellow paint chips and some mellow paint chips. This yellow is not too bold and not too soft looking, just right.

Want to see the video tutorial showing just how the paint sprayer works? Click the video below.
Prime And Paint Metal Furniture Using A Paint Sprayer

Time to take the Furniture Fixer Upper Tour. Just click the text links below…..
Furniture Fixer Upper Tour
Spindle Bed Bench – Confessions of a Serial DIY’er
Morning Sunrise Painted Dresser – Salvaged Inspirations
Paint A Nightstand White and Decoupage – Girl In The Garage
Painting Outdoor Metal Furniture – Petticoat Junktion (you are here)
As always, thanks for being here, Kathy
Shop the Petticoat Junktion Amazon page with my favorite supplies and home decor selections here.

Author: Kathy Owen
Kathy Owen is the founder of the home decor blog Petticoat Junktion where she shares tutorials on painting furniture and upcycling thrifty finds into unique home décor. Her DIY projects have been featured on the Home Depot Blog, Plaid Crafts, Behr Designer Series, and in numerous magazines. Kathy’s newest website is HappyHomeDIY.com
Thanks for the information.
I think for prepping it I would have first done the power sprayer, then applied a Naval Jelly for the rust. Then rinsed. Then come back with a multi tool with the ‘metal sanding disc on it to get down to the bare metal and be sure the metal is then dry Dry DRY before I applied a brush on Rustoleum rust preventer primer and THEN a Rustoleum top coat. This buttery yellow is gorgeous (and so was the red) but that’s a lot of work twice, that will only have to be redone again when the rust returns under all your work. 😣
Your glider turned out beautiful! Love that buttery yellow and the blues in the pillows and color mix in the quilt. Some white Mums will look beautiful sitting next to it along with some pumpkins for Fall.
Kathy, I loved the red but bummer it didn’t work out. The yellow is such a happy color. Great project, perfect to enjoy outside!
Wow! What a labor of love! I’m exhausted just reading about it 🤪. I know that at the first glitch I would’ve taken it for powder coating. Congrats on your stamina
I applaud your persistence. It sure paid off. The red was fabulous and loved the cushions. Sorry it didn’t hold up. But the yellow you went to is beautiful. Love, love, love the final look. Such a great place to sit and relax. You’ll have to post another picture once you find the final cushions.
Just like butta, Baby. That is such a pretty color of yellow. You must have the patience of a saint. It sure turned out pretty.
I love your makeovers and look forward to what you come up with next. This is particularly a favorite of mine. You are so right about the yellow.
I simply love it and the color. Fabulous job!
That was a lot of work, but I love the yellow!! What a cheery place to sit and enjoy the outdoors! XOXO
Whew that was a lot of work. I really liked the red Kathy so I’m sorry it didn’t work out. Having said that I was really hoping you where going to go with the yellow/original color. The yellow is so pretty and I think the scavenging for pillows and the blanket turned out well. How nice of your hubby to pitch in and help!
What a labor of love this all was! But you and the JTS did it! (Over and over) 😬😊 And look at that welcoming yellow bench now!! Bravo!! Thank you for sharing about the whole experience, the good and the bad!!
The yellow is so cheerful, love it! Kudos to you for taking on a project with all that rust… it turned out beautiful Kathy! XOXO
Boy, what a pain this was – good job seeing it through! I do like the softer yellow you chose. I also have a glider that is missing one metal ball which I have not been able to find the exact size to replace. Maybe I can make it NOT glide and leave it at that!
It turned out so pretty. Yellow is my favorite color. 🥰