How To Paint And Distress A Small Table
As an Amazon Associate, I earn from qualifying purchases.
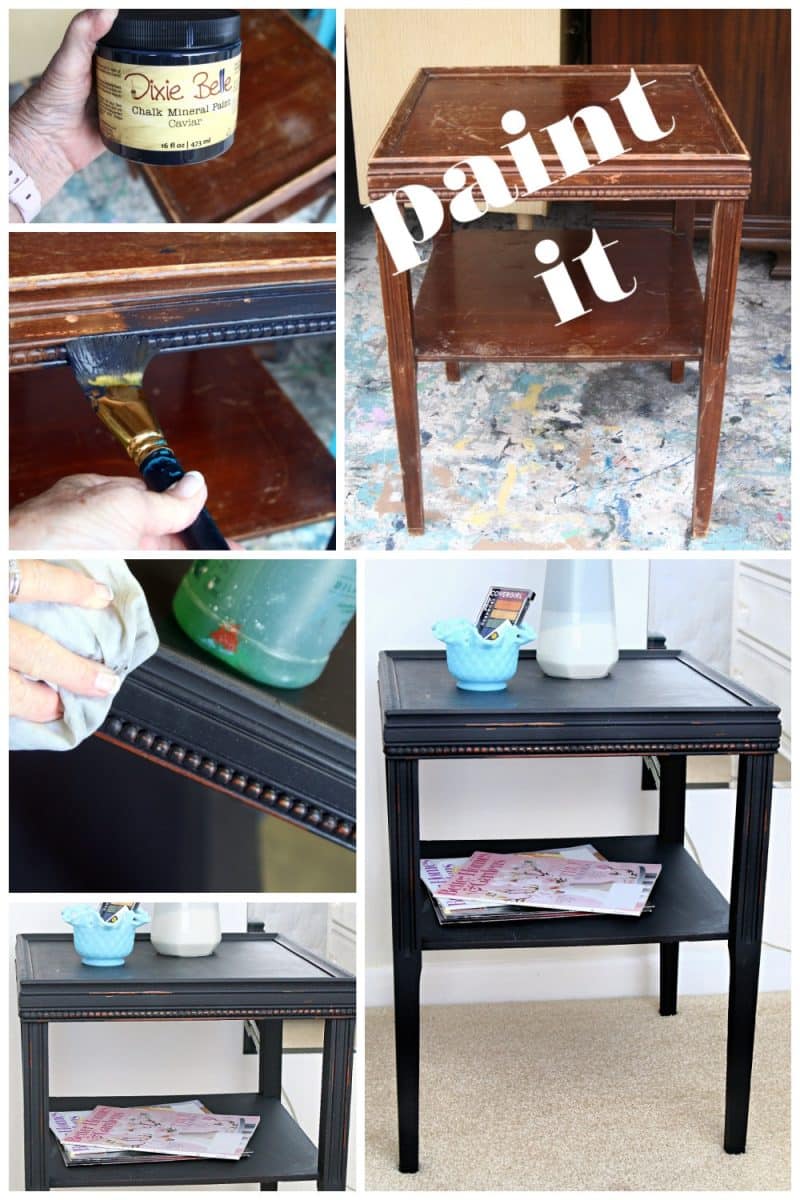
How to update a small side table with black paint and a wet distress technique that’s no-mess, no-fuss. There is a very good reason to use the wet distress method, besides the no-mess factor. I’ll tell you all about it.
Hey Friends! This project was super easy, and the tutorial is going to be super short and sweet. Got to love that.

I found this table at my favorite junk shop (of course). I think the price was $5, could have been $10 but i don’t think so.

It was pretty beat up, but nothing a little paint couldn’t cover.

You have to love the wood beaded detail and the carving on the legs. These details are perfect for distressing.

I chose Dixie Belle Chalk Mineral Paint color Caviar for the makeover. You can never go wrong with black paint.

The chalk mineral paint goes on like butter. It is sooooo smooth.
")
Sometimes you have to smush the paint into the small details. I applied two coats of paint to the table. The first coat of paint was dry in less than one hour.
")
Even though I’m distressing the paint, I covered the table completely with the two coats.
")
Now for the fun part. I use a lint-free rag for this process. I sprayed the rag with Simple Green until it was wet, not just damp. Then I wiped the rag over the areas where I wanted to remove the paint.
Dixie Belle bonds really well, and the paint had a couple of days to dry before I distressed it, so it had bonded to the table. In cases like this, I wipe the area I wish to distress a couple of times with the wet rag, wait a minute, then wipe the paint from the table.
")
You should distress areas of the furniture that would normally show wear, like the edges of the legs and any raised details. Let the distressing tell a story.

Dixie Belle Boss
Scrubby Soap
The Belle Paint Brush
Badlands Mineral Paint
Glacier Mineral Paint
Caviar Chalk Mineral Paint
Baroque Swirls – Water Slide Transfer
Roses Silkscreen, Belles and Whistles
Terra Seal Matte Finish

When I distress paint, it is not all even and matchy like what you might see at the store. I go for the perfectly imperfect look. I promise you can’t mess this up.

One more look at the distressing. Even if you don’t care for distressed paint (and I know some of you don’t, which is perfectly okay), you have to admit it gives furniture a bit of character.

I told you the tutorial would be short and sweet. A small table like this can be painted, distressed, and put back in place in just one day. Come on… paint something, then send me an email with a photo! kathy@petticoatjunktion.com
What do you think of the table? Leave me a note if you have time! Thanks, Kathy
Love it! I just painted the exact table using silk paint in a blue. My sister claimed it right away. Love this table.❤️
Also love your posts!
This table is very nice. I am not a fan of distressing, but the black with wood showing is not as harsh as light colors. The table is cute and the distressing is a welcome change from the gold or other highlighting usually done.
Thank you for sharing your talents with us and I enjoy your posts very much.
Kathy,
I love the paint job on this little table. However, I am writing regarding another project of yours that I did with my residents at our local assisted living home. We all made the valentine plaques “I Love You” – with the cabinet handle (I) the decoupaged heart (Love) and the horseshoe “You.” The background plaques were painted in various colors and the residents matched up their decoupaged hearts with complementary colors. Thank you so much for sharing your creative ideas!
I love the new look of the table and am amazed at how easy it was to do! Thanks for sharing!!
Looks great Kathy. The perfect semi-matte finish for this piece in my opinion, and it looks really classy – looked very sad and unloved until you got started on it!
It looks very much improved! I love little projects like this.