How To Restore Old Wood Furniture Without Sanding And Stripping
As an Amazon Associate, I earn from qualifying purchases.
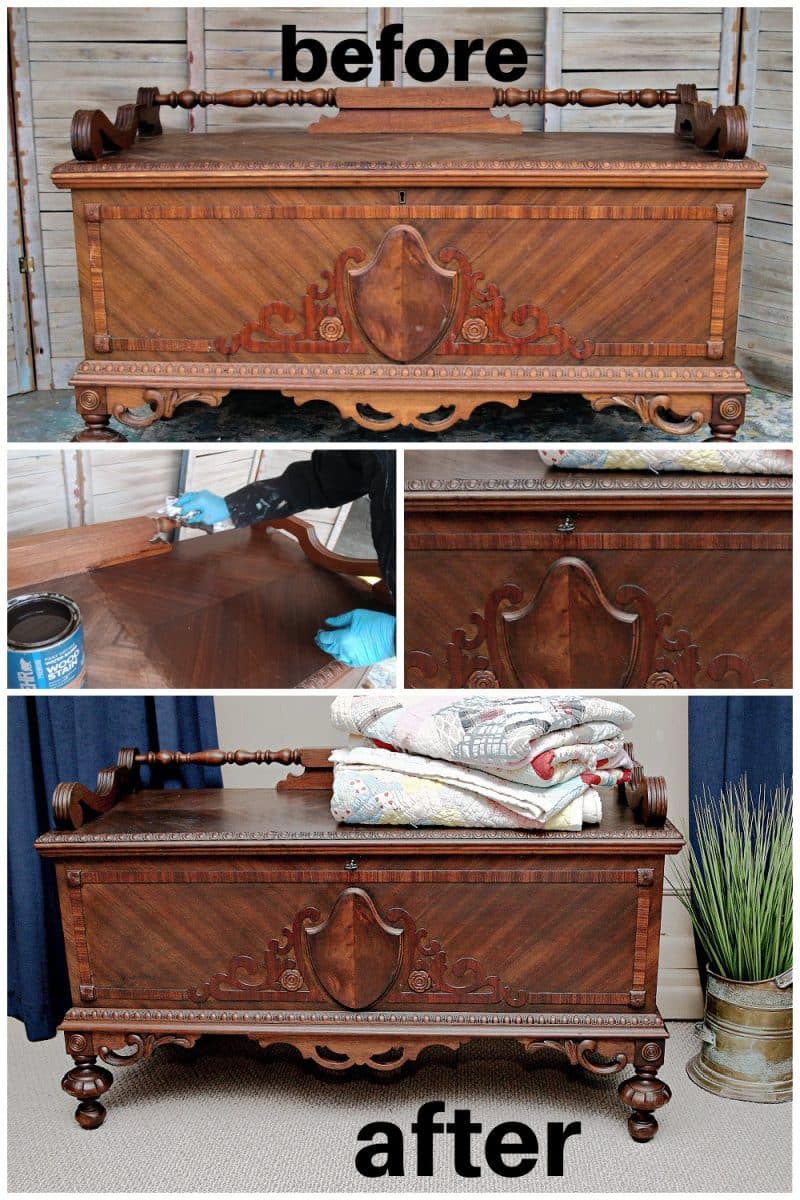
Instead of painting old wood furniture, easily refresh the stained finish with a new coat of stain and a dark wax without sanding or stripping the original stain. The goal for this cedar chest was to restore the finish and change the ugly orange colored stain to a brown tone. I accomplished my goal.
The refresh or restore process was easy, and this simple technique can be used to renew most stained furniture. I will walk you through the step-by-step process, and I also filmed a video tutorial with all the makeover details.
![]()
Before I begin my tutorial, I wanted to remind you that today is the Furniture Fixer Upper Tour. The makeovers are intense and incredible! Links at the bottom of the post.
How To Apply Dark Brown Stain Over Old Faded Orange-Stained Furniture

It was love at first sight when I spotted the cedar chest in an online auction from my favorite local auction house. I wanted it!
Have you ever seen a cedar chest like this one? I haven’t, and all those beautiful details were screaming at me.
So……I ended up paying about $105 for it after auction commissions and other addons ….blah, blah, blah. The price was okay because I planned to keep the cedar chest. Now I just needed to fix it up.
Examine Your Project Piece
")
At first glance, the cedar chest looked to be in good condition, but the cedar chest did need a bit of work. The inside was in good shape, and we will talk about that lid later.
")
The chest was made by the Connersville Cabinet Company in Connersville, Indiana. Yep, that’s a new one on me. Never heard of them.
I found this history on the company (interesting) In 1882, the Connersvilie Furniture Company built a six-story 50′ x 150′ brick building on the banks of the Whitewater Canal, the site formerly occupied by the coffin factory (destroyed earlier by a fire). During its years of operation, the Connersville Furniture Company received contracts for their products from John Wanamaker and Marshall Field.
Tighten All Attachments
")
The first thing I noticed when opening the lid was how unsteady it felt. After a closer look, I noticed the missing screws and the gap between the lid and the chest.
")
Three higes and three missing screws, one on each hinge.

I have thousands of screws, literally, but finding the right ones for a project can be difficult. I needed short, really fat screws because the screw holes were wallowed out. Found some after about 45 minutes of searching.
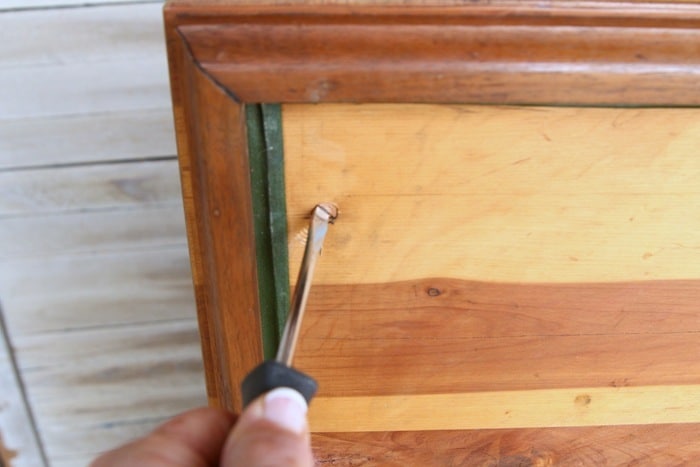
Next, I tightened all the other screws on the cedar chest. Over time, furniture screws tend to loosen.
")
I don’t know if the metal braces on the corners are original to the piece, but I tend to think they are.
Inspect The Stained Finish
")
Looking at the stained finish, I see small areas of paint drops and drips.

I removed them with a bit of Simple Green and my fingernail (lol). Free tool.
")
I did the same with the white paint drops on the spindled back.
")
When I removed the paint, it removed some of the stain and left a light spot, but I will fix that with a stain marker.
Make Necessary Repairs
")
The detailed trim on one side of the lid was loose, and it looked like someone had tried to repair it with nails earlier, but that only caused a split in the molding.
")
I used my Ryobi brad nailer to shoot a few nails into the trim piece. I love this tool, and the wood didn’t split.
")
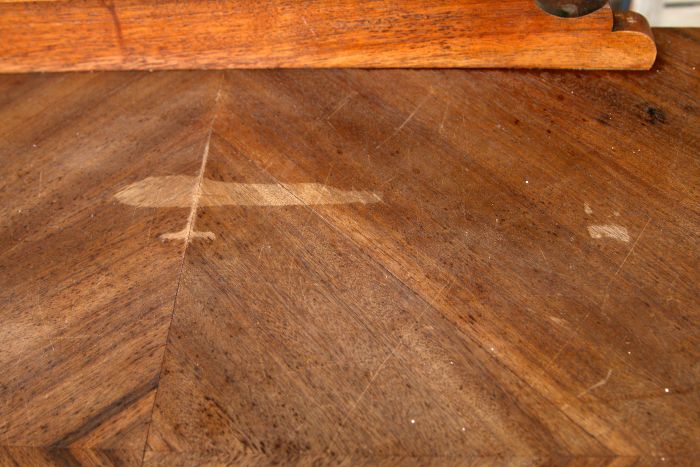
Now, to take a look at the top. Couldn’t see this damage in the photo shot of the front of the chest, could you? Me neither!
Since the stain on the lid or top is so faded, it doesn’t appear orange like the front of the cedar chest. Remember, I plan to change the orange color to a brown tone.
Cover Minor Scratches

Before tackling the large areas of faded stain, I worked on small, really faded areas with a stain marker.
")
The markers are available in various colors, and this one is dark walnut. The only one I had in my supplies.
")
Using the markers is as simple as applying the stain to the area, just like using a magic marker.
")
And then wiping over the stain a few seconds after applying the stain.
")
Wiping over the stain mark will blend it into the surrounding area.
I used the marker on this large, faded area also.
")
I went over the area twice, letting the first application dry first. Then I depended on the stain, coming up next, to cover most of the damage.
Apply a New Stain Over an Old Stain

You can see in the photo above of the cedar chest top how the stain has faded or been damaged over the years. My plan was to apply stain over the old stain without sanding or stripping. I’m a lazy DIYer.

The Behr Premium Wood Stain in color Jacobean was on my paint shelf. Perfect. The color is a deep brown.

The photo above shows where I applied the stain on the right side of the chest. The video tutorial shows the process really well, so be sure to watch it!

The stain over the faded area worked well. To be honest, I was just trying out this technique of staining over an old stain without stripping or sanding, hoping it would work. It did. Not perfectly, but close enough for me.
Apply Stain To Small Detailed Areas

For the detailed areas, I grabbed a small artist’s brush to cover all the wood with the stain.
Apply Wax For Sealing And Added Depth

I have one more step that helps to darken the stain. This Liberon wax is a dark Jacobean color, and applying it over the stained finish will deepen it slightly more and protect the finish.

I waited a couple of days to give the stain time to cure, since it is basically sitting on top of the other stain. Then, I applied the dark wax with a lint-free rag.
Once the wax dried, I buffed it with another lint-free rag. Old sheets make the best lint-free rags.

And that was it. You don’t know how proud I am of this cedar chest and the work I put into it. The process wasn’t difficult at all, just a little time-consuming.
I took a photo of the finished chest in the workshop, with the garage door open, so you can see the detail clearly.
Placement In Your Room

Then, the JTS (aka, Junktion Technical Specialist) and I moved it into the house. The cedar chest is sitting beneath the large picture window in our family room. It fits nicely in place of a chair that blocked the view out the window.
The placement means the front of the cedar chest is facing away from the light, and since the ceiling height in this room is 9 feet, the front of the low cedar chest doesn’t see much light.
The lock has been removed from the cedar chest, and I placed the key in the lock just for looks! (thank you Jeanne for your comment because I forgot to add this information!)

It was difficult to take a good photo in the house due to the lighting issue. I turned all the lights in the room on and used a light attachment on my camera. But the front of the chest was still lit from the window in the back and dark in the front.

The stain I applied to the chest worked wonders. The top looks great, and the front and sides of the chest, which were in great shape, are more brown than orange. Yay!
")
I can’t wait to hear your comments on the refresh. Do you love it as much as I do?? Watch the video to see me in action.
Now it’s time to take the Furniture Fixer Upper Tour. Just click the links below the photo collage below…..

Furniture Fixer Uppers:
Crabby Dresser – Confessions of a Serial DIYer
Walnut Bronze Table Makeover – Salvaged Inspirations
Side Table Makeover – My Repurposed Life
A Fix For The Wrong Paint – A Ray Of Sunlight
How To Refresh Stained Furniture Without Stripping – Petticoat Junktion (you are here)

As always, thanks for being here, Kathy
You’ve done a beautiful job, Kathy. I like the dark stain on it. I”m glad you’ve left it “natural.” I expected paint! It’s a treasure. I’ve never seen a hope chest like this either.
Beautiful work! Was there a topcoat on the original stain? I didn’t think stain would work over a topcoat…unless it was gel stain??
I’m all for less sanding and less work!
That dark brown stain and wax finish made such a nice difference. Thanks for sharing your process!
Thank you for showing what a lazy di’yer can do!
Recently I purchased a similar chest at auction but a Lane.
Hoped I could restaín it and now thanks to you I know I can too!
Kathy,
That cedar chest was pretty before, but you really brought out its beauty with the stain and furniture wax (who knew?).
I have a table I’ll be working on in the month or so, I may use this technique. Although, I’ll be selling mine, and I’m not sure people want wood tones these days.
Pinned!
gail
Wow, your cedar chest turned out amazing! The beautiful detail really popped with the over-stain. You make it look so easy Kathy. Love it!
The first thing I noticed in the before picture was how ‘orange’ the scrollwork around the center medallion/plaque appeared. Your restaining made the wood colors blend beautifully. The short feet on the trunk are lovely. I am happy you decided not to paint but over-stain (?) instead. Such a good rehab project! One of your best.
I love it! You did wonders restoring it.
I LOVE it Kathy!!! 😍 I would keep this gorgeous piece too! And I use my ‘free tool’ to scrape off paint as well! 😉 Pinned XOXO
Hi Jeanne, Thank you for the comment. I forgot to add the information about the lock. The lock has already been removed and I just put the key in the lock for looks! I will add that info to the post. Thanks again, Kathy
Absolutely stunning, Kathy! The details are just beautiful and I know you will enjoy looking at it every day! XOXO
Wow, Kathy, you really transformed it! I appreciate your honesty, and your desire to make something come back to life without always using the normal approach. Me too! LOL!
At first I thought it was too gaudy, but the darker stain helped pull it all together. Just a reminder, take that lock out if you ever decide to sell or if you have young kids around. Too many suffocated in these cedar chests because they got in and couldn’t get out.