How To Paint Fake Wood Furniture The Easy Way With Latex Paint
As an Amazon Associate, I earn from qualifying purchases.
You can paint and distress fake wood furniture (also known as MDF) with latex paint and here’s how you do it!
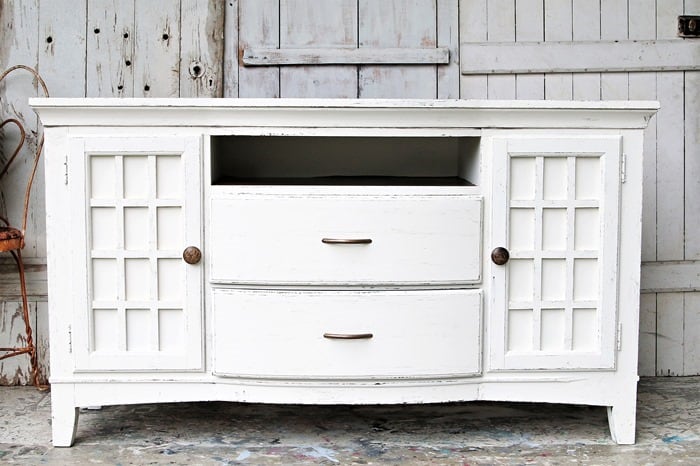
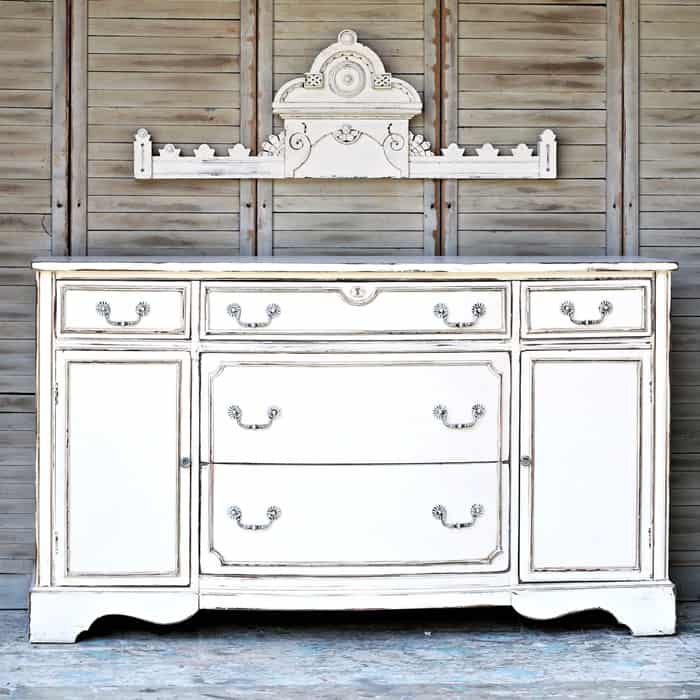
We have totally updated and re-created the sideboard, now transformed into an entertainment center. I’ll share all the nitty-gritty details with you. Today is also the Furniture Fixer Upper Tour, so you know you’re in for a treat.

Ya’ll, to see the before and after of this piece….just wait…..what a difference! The large piece was an auction buy, along with a few other large pieces, all in bad condition. I think all of the furniture pieces together were less than $40. What a deal.
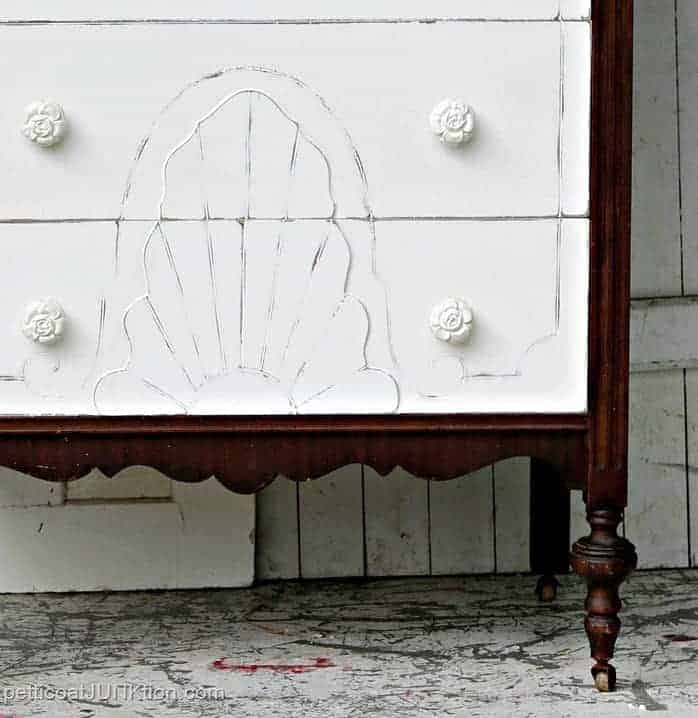
I painted the furniture with a can of oops latex paint then faux distressed the edges and details with a layering block. This is similar to antiquing the paint but without using a glaze, toner, or wax on the white paint. The paint itself stays pretty and white.

To ensure the divider between the drawers was strong enough to handle a cable box, I first removed the center runner on top of the divider. The divider was attached firmly to the back of the entertainment center but each side needed a little reinforcement.

I went to our wood stash and found the perfect support pieces for the divider. I cut the skinny trim pieces the right length the used my handy dandy Ryobi brad nailer to nail them in just the right place below the divider soon-to-be shelf.
It took some effort to get that shelf the way I wanted it without going all out, which would have been too much work for me. I’ve told you before that I’m a lazy DIY’er, and I haven’t changed.
I didn’t get any photos of me nailing the pieces into place because I had a hard enough time holding the trim in place with one hand and the nail gun with the other. I was also in that narrow drawer opening with hardly any room to navigate. Where there’s a will, there’s a way.

The piece was really dirty. I took the shop vac to it first, then cleaned it all over with Simple Green. When working on furniture, don’t forget to turn it up on its back so you can get all the spider eggs and cobwebs from the bottom of the piece.

The top also had chipped veneer on the edges and deep gouges all the way across the top. Some people sure do mistreat things.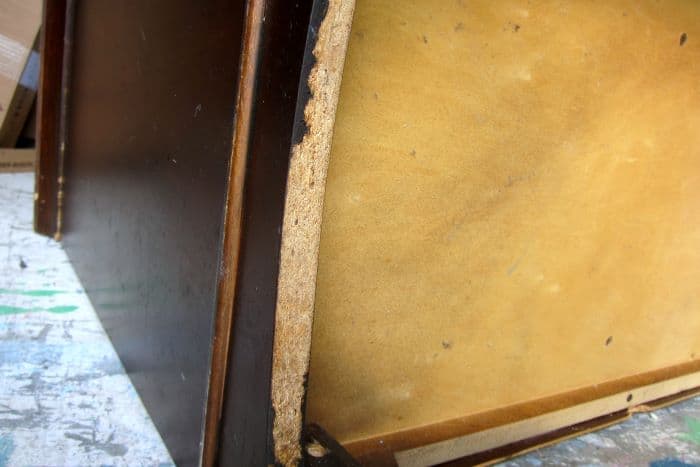
Most of the piece is made of MDF or what I like to call fake wood. Not only is it impossible to distress fake wood furniture, but it makes the furniture soooo heavy!
But no worries about the distressing. I have a special technique for distressing fake wood furniture, and it’s easier than traditional distressing.

You may have noticed in the earlier photo that one cabinet door had the original plastic insert, while another cabinet door had no backing. We removed the plastic insert that resembled frosted glass, and the JTS cut replacement pieces for the doors. Again, we used scrap wood from our stash.

We checked to be sure the fit was good. It’s easier to paint the insert before nailing it to the door, and that’s just what I did.

I removed the drawer pulls and the cabinet door knobs and got ready to paint.

I decided on a can of oops paint for the makeover. I found the paint a month or so ago at Home Depot, and the price was $2.10 for the quart.
The color is a nice off-white, and it’s a flat paint and primer all in one. I love flat finishes…..or glossy finishes. Everything in between is okay too, but those are my favorite sheens right now.

I use a good-quality paintbrush instead of a roller to paint furniture. Someone emailed me with that question, so just thought I would mention it here. (I replied to the email also)

This is how the entertainment center looked after one coat of paint.

I applied a second coat of paint and nailed the wood inserts to the cabinet doors. Again, trying to work with two hands and one foot. I was holding the panel with one hand and the nail gun with the other, and my foot was wedged between the garage door and the front of the cabinet door for leverage against the nail gun, which was pushing against the back side of the door. That’s how I roll.

I wanted to change the drawer pulls, but nothing in my hardware stash fit the holes in the drawers. The pulls were definitely an odd size. I found two wood knobs for the cabinet doors and spray paint the bunch with Rust-Oleum Oil Rubbed Bronze.

The dark color didn’t look right, so I repainted the knobs and pulls with Rustoleum metallic antique gold. I put the pulls back on the drawers. Next, I went on a hunt for screws of the right length and width for the wood door knobs.
After hunting for over an hour, I gave up. When looking through my new knob stash, I found just the right knobs, so everything worked out perfectly. The knobs have an animal print look in brown and black with gold around the side.

I planned to paint the shelf divider white, and that’s it. Well, I started looking for scrapbook paper to lay on the shelf, and nothing I had worked. I found the wood-look adhesive paper with the drawer liner stuff, and it was perfect.

I cut it to size and rolled it into place without any trouble. If the new owners don’t like it then they can take it out. I think it looks pretty good.

You might have noticed the distressed-looking areas around the drawer edges and the cut details on the doors. That is faux distressing using dark paint and my FolkArt layering block. I shared a video on the layering block distressing last week. I will add that video below in case you need a refresher or missed it the first time.
How To Use A Layering Block To Faux Distress Fake Wood Furniture

I am so happy with this makeover. I’m just ho-hum about some of my projects, some I like, and some I really like…..like this one.
You notice as I went, things changed with the knobs, pulls, and adhesive liner. Those simple changes made all the difference. Don’t be afraid to deviate from the plan.

How To Paint And Distress Fake Wood Furniture
Time to see what my friends have for us today. I know their furniture makeovers are all fantastic! Just click the text links below the “before” makeover collage. Leave a note before running off please.
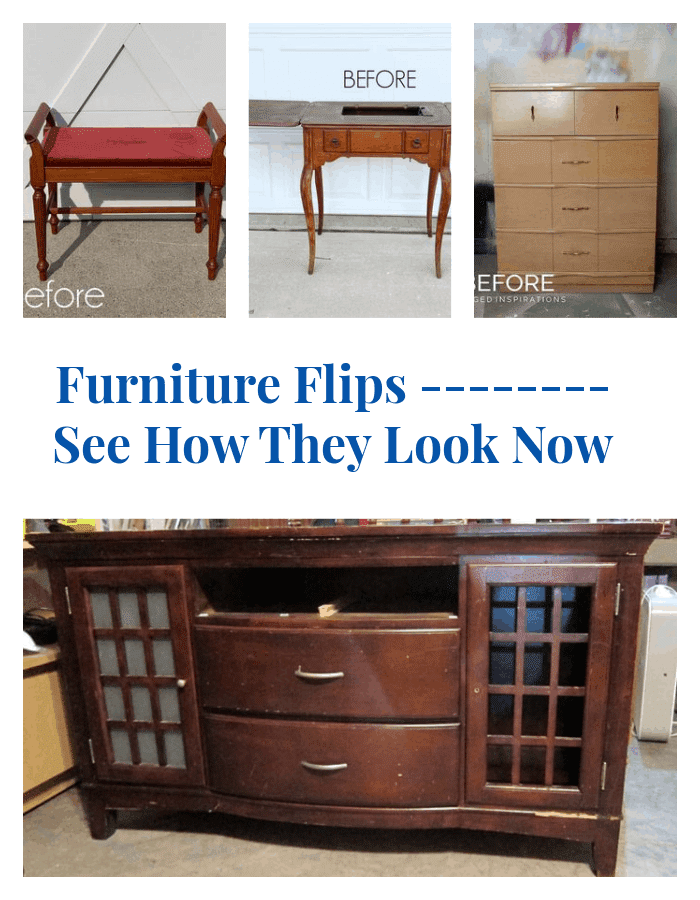
Painted Dressing Table Bench – Confessions of a Serial DIY’er
Fall Paint Colors – Salvaged Inspirations
Repurposed Sewing Machine Table – Girl In The Garage
Paint And Distress Fake Wood – Petticoat Junktion (you are here)
As always thanks for being here, Kathy

Wonderful transformation. Pretty amazing to take an old piece and transform it into something pretty. Thanks for sharing at Love Your Creativity,
If you would like the piece to be the same original color I would try just using the layering block over the details as they are. Let me know if it works!
Hi Kathy! I watched your video where you “distressed” a little white chest using the FolkArt Home Decor Layering Block. I have a new white (high gloss) furniture piece (I think it’s MDF) that I would love to do this to. Do I need to sand the glossy coat first? I want it to be glossy when I am finished, but with the details being brought out like in your piece. I am so excited with what you have done! Thank you so much for sharing your experiences and knowledge!
Thank yo so much Marie!!
Wow, what a difference Kathy! I can see why Christy picked it as her favorite FFU of 2021. You remain my go-to resource for distressing.
Yay!
This was such a timely post! I have an old TV console that needs some help. Gives me inspiration to get that project going!
You always do such a great job! You have wonderful artistic vision….
Kathy, this is a fantastic makeover. It really is a night and day difference! And cute photo with your foot… at least your toes and shoes were camera-ready! Haha
Great makeover! I tend to stay away from fake wood, but this goes to prove that it can turn out amazing if you know what you’re doing.
Once again you gave new life to an old piece. Bravo!
Great transformation! The new wood inserts were a game changer.
Hi Kathy, I bought one of those after I saw Christy use it, but I haven’t used it very often. Great makeover
I can see why you’re so excited about this one, Kathy! The before and after are like night and day…what an amazing difference! It looks SO good now! And I love the photo of the foot wedged to against the garage door lol! XOXO
This piece turned out AMAZING Kathy! $2.10 Oops paint and faux wood adhesive paper… brilliant! XOXO
Wow! That turned out great! Most of the time I do not buy anything made of MDF but this might change my mind.