How To Re-Cover A Lane Cedar Chest Seat With New Fabric
As an Amazon Associate, I earn from qualifying purchases.
Re-cover a Lane cedar chest seat in a matter of minutes. I will show you how the padded seat is attached to the hope chest and how easy it is to remove. Once the padded seat is removed from the wood top you can attach the new fabric to the seat. This is a nice way to refresh your cedar chest without painting the wood.
Lane Cedar Chest Makeover
In 1930, one of the Lane managers came up with the idea of offering free miniature cedar boxes to high school graduates. The marketing idea seems to have worked because many parents bought full-sized Lane hope cedar chests for their daughters. I didn’t get a miniature or full-sized cedar chest when I graduated from high school.
My Lane cedar chest was a birthday gift from hubby and kids a long time ago. Several years ago, I re-covered the original padded seat on the chest with blue fabric. When I was cleaning my workshop out recently, I found a thrift store treasure. The treasure is a remnant of upholstery fabric I bought a few years ago. I fell in love with the design and the colors.
Time to do something with that beautiful fabric. If you’re like me your home decor style changes over the years and the old fabric cover on the cedar chest needed to be updated so finding the fabric in my stash was fate.

Cedar Chest Project
This is how the cedar chest looked with the blue fabric cover from years ago. The chest sits behind our sofa, and we use it to store quilts. I’ve painted about 18 cedar chests, but I’m not painting this one.
The blue fabric is pretty, and I love the texture (texture is my thing), but the blue is outdated and doesn’t match our decor. The nice thing about changing the fabric is the change is not permanent. I can remove the fabric, and the cedar chest will be back to the original look, or I can keep changing the fabric to match my decor or just for the fun of it!

My sweet hubby even had the chest inscribed…With Love On Your Birthday…Jason, Tammy, & Ray. Something to be treasured.
How To Recover A Lane Cedar Chest Seat

Fabric For The Hope Chest Project
This is the fabric for the makeover. It has a raised design and almost looks like cross-stitch. I remember even the remnant piece I bought was pretty pricey, but I couldn’t resist the colors and the beautiful texture.

1. Remove the fabric seat top from the Lane Cedar Chest
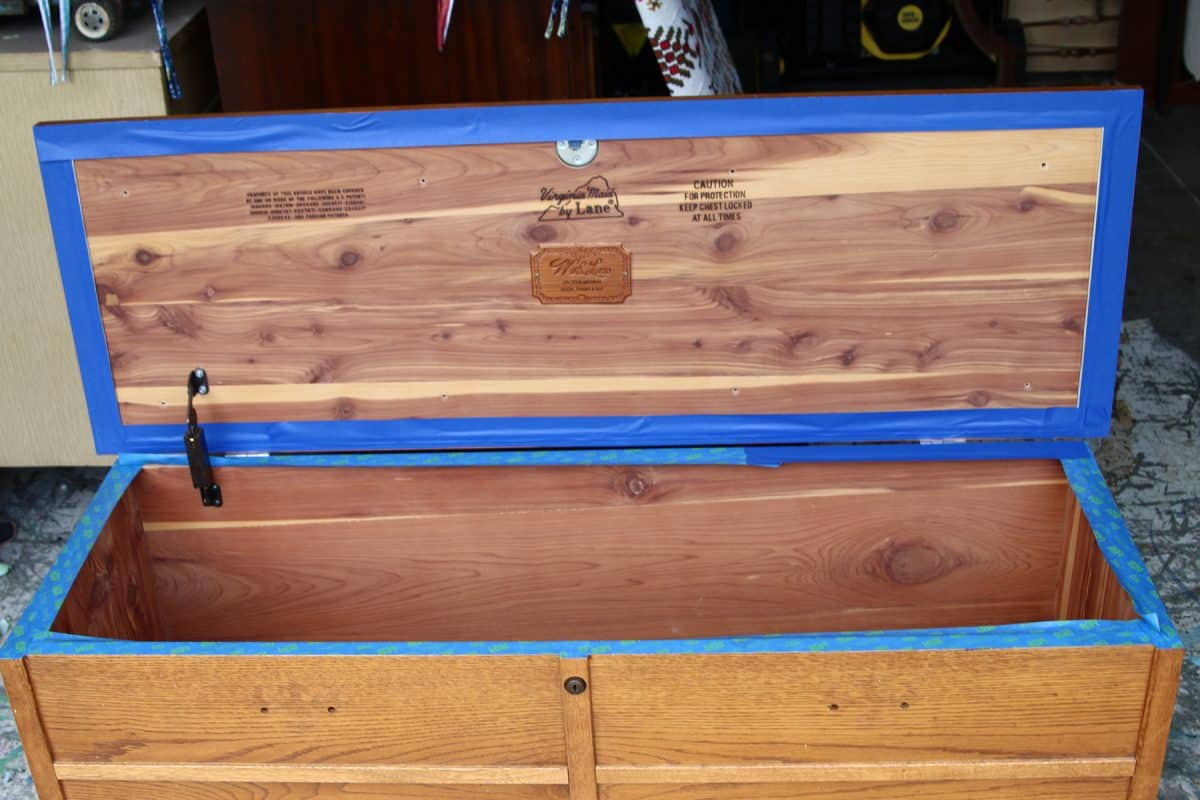
The top of the chest is two pieces: the padded seat and the wood top. The base or the part that the fabric is attached to is not made of real wood. I believe it is MDF (medium-density fiberboard). I used a drill to remove the eight screws holding the padded seat to the wood top.

Just lift the lid of your padded cedar chest, and you should see the screws. We’re talking about a 5-minute job to remove the padded seat from the top. Using a screwdriver would take a bit longer, but not much.
2. Remove The Old Fabric Cover

The first time I re-covered the seat I left the original fabric in place and just added the layer of blue fabric. Unless you are using a really thick fabric to re-cover the seat leaving the original fabric on the seat isn’t a problem.
I did decide to remove the blue fabric since it was not original to the piece. The JTS used a pair of pliers to remove the staples holding the blue layer of fabric to the seat.

3. Recover the fabric seat.
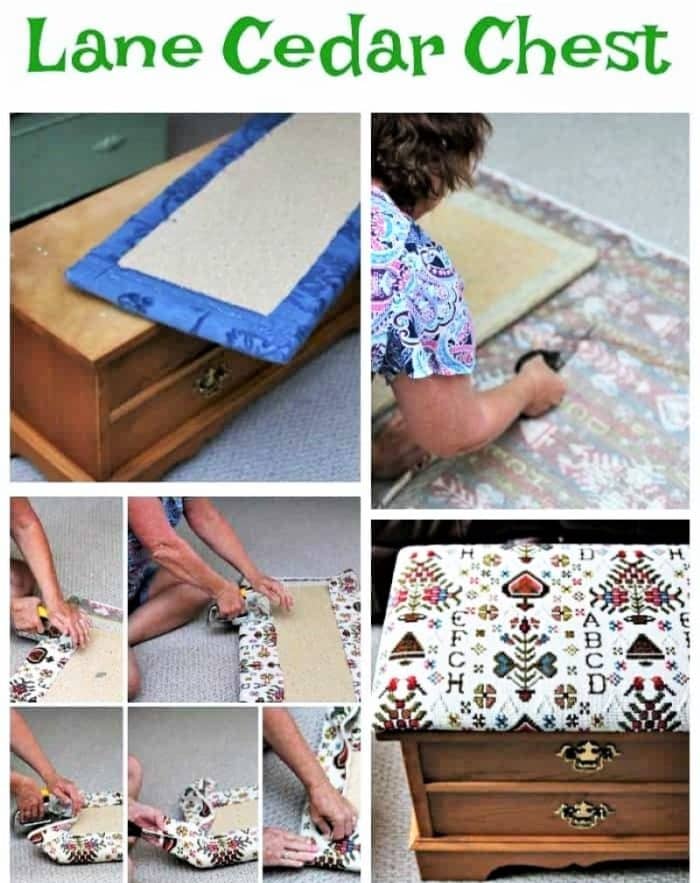
Lay the seat upside down on the wrong side of the fabric and cut the fabric. Cut the piece of fabric large enough to fold it over the edges of the seat and staple it to the backside of the seat.
I worked on this project on the living room floor. That’s where the chest was, so no need to take it to the workshop. The project is simple and takes no time at all. I work on the floor often, even in the workshop, because my workshop tables are usually covered with junk and partially finished projects.

Cut the fabric to size.
I usually cut a much larger piece of fabric than needed. It’s better to have too much fabric than too little. It’s easy to trim the excess fabric later.

Staple the fabric to the seat
Using a heavy-duty stapler, start on the long side of the seat and staple the fabric to the seat. Next, staple the fabric on the opposite side….pulling it taught as you staple.
When stapling the fabric on the two short ends of the seat, start in the middle and work to the outside. Cut away any extra fabric at the corners. If the fabric is heavy and thick it is necessary to remove as much fabric as possible at the corners.
You don’t want a big wad of fabric because the padded seat will not lay flat against the top of the cedar chest. Work the fabric at the corners with your fingers, smoothing and pulling until there are no creases or folds to be seen from the top or edge of the seat. This is just something you have to work with. There is no one way to do it—staple until secure.

4. Re-attach the seat to the top.
Replace the eight screws to re-attach the seat to the top using a drill or screwdriver. That’s all there is to it.

Ta-dah! How nice is that? The fabric is snug all the way around the seat. No creases or folds in the corner either. That’s what I call a professional-looking job.

5. Repurpose the Lane Cedar Chest as a coffee table
The colorful design on the fabric livens up the cedar chest. I wish I could find more of the fabric. I’ve searched and searched on the web, Googling everything from sampler fabric to alphabet fabric, and no luck.

Can you see the texture in the photos? I don’t know what type of design this is; I just know I love it. It’s Folkart-looking but also looks Amish. I don’t know. Do you have any info on the fabric or design?

The newly recovered chest is sitting in front of the sofa for this photo but will have to return to its place behind the sofa. We bought new/used coffee table at an auction for $50. The upholstered top of my cedar chest might not hold up well to drinks and food.
I often paint cedar chests because the ones I find at the junk store or flea market are in bad condition. This is one of my favorite cedar chests. (click here)

What do you think of the change? Do you like the fabric? Would you paint the cedar chest? How about changing out the hardware? It really dates the piece. Maybe stain a dark walnut color and replace the pulls with modern pieces?
This is a safety alert from Lane…..Since many of our cedar chest products have withstood the test of time and have been in homes for decades, there have been cases where children have climbed inside chests with old-style latching mechanisms and locked themselves in. There have been incidences of suffocation inside chests. As a result of this important and urgent safety concern, Lane has launched numerous successful programs since 1987, all concentrating on lock replacement. Please click here for more information

Refresh A Lane Cedar Chest
If you like this cedar chest makeover, see how I painted another vintage cedar chest in the short video below….
[adthrive-in-post-video-player video-id=”goZGkX3f” upload-date=”2020-04-30T00:45:16.000Z” name=”How To Color Wash Painted Furniture” description=”Add depth to painted furniture with a color wash” player-type=”default” override-embed=”default”]
Turquoise Cedar Chest
Find 18 more of my painted cedar chests makeovers here…..18 Wood Cedar Chest Makeovers Using Paint
[ez-toc]
More furniture projects for you….
13 Dreamy Bedroom Furniture Makeovers
13 Outdoor Furniture Makeovers
13 Bar Stool Makeovers With Paint, Fabric, Napkins, And Stencils
How To Paint A Metal Locker Using A Paint Sprayer
Decoupage Furniture Using Fabric and Spray Adhesive

Leave me a note if you have time and have a great day. Thanks for being here, Kathy
Thank you for these instructions. I have been putting off covering my Lane hope chest because it seemed complicated. It wasn’t at all thanks to you!
Good Luck! It is really an easy project
I’m so excited to try this! Now the hunt for fabric begins…..
I use a heavy duty Stanley Stapler and staples. Find it on Amazon here.. https://amzn.to/3Z2w6Qn (affiliate links) https://amzn.to/4fnnBFq
Great job on bench. I am trying to recover my bench but the staples aren’t going into the wood. What kind of stapler and staples did you use?
I will try contacting Hancocks. Thank you.
Thank you! I Have also found my Lane cedar chest at a thrift store and will be found the same thing. I appreciate the suggestion for wishing the corners, makes total sense. I want to paint mine as well so I will be going to your article on that as well. That fabric is wonderful I can appreciate why you were looking for more. Have you reached out to Hancock fabrics in Arkansas. Just a thought. Have a great day 😀
If it is upholstery fabric the width should cover the length of the seat so I would say one yard would be plenty. Just take measurements of the seat and ask the fabric clerk.
I’m in the process of recovering my cedar chest and wondered how many yards of fabric would I need to get and is it upholstery fabric?
Thank you,
I love it! Thanks for letting me know!
I followed your instructions exactly and successfully re-covered the bench seat on my 35-year-old cedar chest. It was as easy as you said it would be. Thank you very much for this tutorial! [3-June-2023]
That sounds lovely. I really like the Caviar color!
That sounds lovely. I really like the Caviar color!
I got a Lane Hope Chest in 1979 for my 18th birthday. I had already recovered the top with tapestry fabric and my sons cat had destroyed one corner completely. I did not want to get rid of it so I used wood putty and repaired the corner, sanded it all down and painted it Dixie Belle Caviar and recovered the top with rustic black leather. I am now going to put sunflower and peony transfers on the front then apply a poly sealant to the paint. I am so excited to see the finished product.
I have a cedar chest that I want to replace the cushion. But I want the thick almost carpet like material it had before . It looks like what you have on yours. Where did you get your material from ? I love how your cedar chest came out .
I have never replaced the foam because it is still in good shape. I’m sure it would be easy to change out but foam is expensive!
Have you ever replaced the padding/cushion? Mine is very worn and I’m not sure what type, size or density to use.
We all got one of those small cedar chests for graduating high school too! I wish I knew what happened to it. It got lost through the years. I graduated in 1975 in Northern New Jersey…I think at the time, there was a Lane factory in the area.
You are right. Mine is a little too oranges. I’m so glad to hear you are going to redo your mom’s cedar chest. What a nice piece to have! Would love to see a photo when it’s done.
I love your tutorial. I have my mom’s cedar chest. It must be more than 70 years old. It was painted at one time (maybe lead paint even?). The cushion, while intact, is filthy. It’s been in our attic forever, I’m going to restore it to its original wood finish & put a new cushion & fabric on it. I can’t wait! It’s going in a cabin we’re restoring.
Your fabric is beautiful, but for my personal taste, I’d restain it to get away from the “orange”. No matter what it’s beautiful.
I too have a Lane chest. My husband bought it for me before we got married. He worked at a furniture store at the time. I have fabric to recover mine too, so thanks for the tutorial! I’m debating about painting it too, but haven’t made the final decision. Love all your makeovers!
The fabric looks like a Scandinavian design.
It’s a nice fabric, but I’m surprised you didn’t paint this one.
I got the little cedar chest when I graduated, although I don’t actually remember receiving it. I’m glad you got one from your loving family!
Best wishes in the new year!
very cool fabric! Unless the finish on the chest is damaged, I wouldn’t paint it myself. I know that’s the trend nowadays, though. I have a cedar chest, don’t know the manufacturer, but it has no cushion on top and is huge. It lives in the garage as there is no place to put it! I have a quilt rack so I can see the quilts all the time. Nice job on the cushion!
The sampler fabric is the perfect choice and you have done an absolutely perfect job on the recovering too. i wouldn’t paint this chest either you can’t improve on perfection!
When i graduated high school the whole class received the little lane chests. I gave it to my son to put his pictures in when he graduated and searched for one for my daughter with no luck. So my son passed it along to his sister. I love the new fabric and i paint everything , so your beautiful chest would be a bright color.