Stenciled Designs Look Best When Distressed
As an Amazon Associate, I earn from qualifying purchases.
Three Best Stenciling Tips And A Cool Sign
Along with the project today I’m sharing some of my best stenciling tips. Stenciling is easy once you know the proper technique. Once upon a time I was horrible at stenciling. I would have globs of paint where there shouldn’t be any globs of paint. And the finished project would be so flat….or one dimensional.

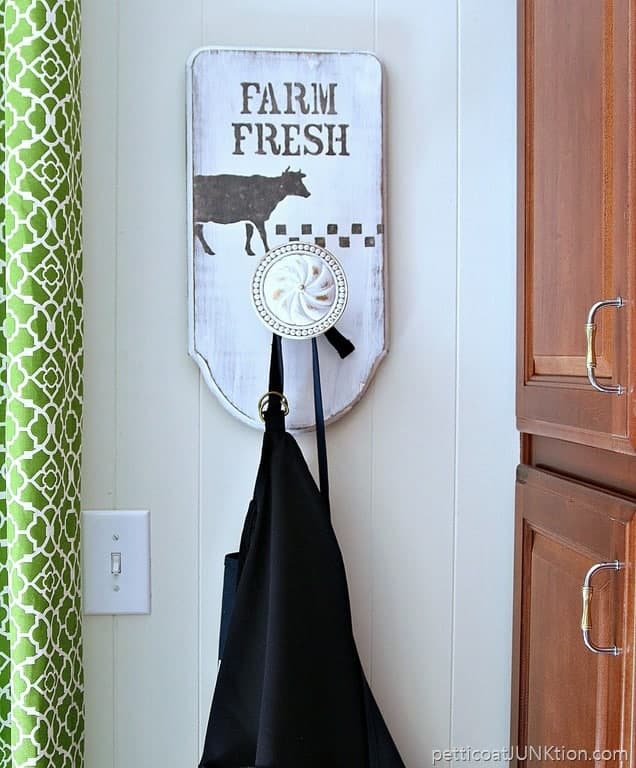
Farm Fresh Sign And Stenciling Tips
I had to learn through trial and error and searching the internet for tips. Now I”m going to hopefully help you guys with these tips. And if you have any tips I’m all ears. Never stop learning is my motto.
This project just makes me smile. The cow is the cutest. You guys know I stencil because I can’t draw a stick figure….much less a cow. That’s why I had to become a pro at stenciling.

The project came together with two things from my junk stash…a sign and a curtain tie back thingie…….

….and a big value pack of stencils.

I took the metal front off of the thrift store sign and painted the wood white with FolkArt Decor Chalk. I love the flat look of this paint.

Then I did a little distressing with a sanding block going around the edges of the wood and then all over the board.

It was difficult selecting the stencils for the project. There were so many to choose from. I finally decided on a mix of two…the Farm Fresh text…and a cow….and a block design.

Three Best Stenciling Tips
1. Tip number 1 for stenciling….use a very, very, very, dry brush.
You can click here for a full stenciling tutorial. I centered the words Farm Fresh on two lines.

The cow I decided should be…not all there. It looked a little too structured with the cow centered under the Farm Fresh. Does that make sense?
2. Tip number 2…. change it up, don’t do the expected.
I needed to add a little something else on the right of the cow for balance. You want to keep the design simple but also eye-catching.
3. Tip number 3….distress it, you don’t want the design to be perfect….trust me.
It will look like a budget buy home decor item if you don’t distress it.

Stenciled Designs Look Best When Distressed
Neutral wax pretties up the raw distressed wood and the paint. I screwed on the curtain tieback for the finishing touch.

Makes a great apron hanger. And that cow is darn cute too
The FolkArt Farm Life value pack stencils are made of thick, firm, paper. I have to admit I was a little leery when I saw they were paper but I shouldn’t have been concerned. I will be able to use them over and over…no problem. If you want to check out the stencils you can find them on Amazon by clicking here FolkArt Farm Life. You can also find the FolkArt Decor Paint on Amazon too. (read Amazon affiliate link disclosure here)
If you liked this project you have to see the tile stencil I used and the bold colors here….Stenciled Tile Design.
What do you think? Would you have placed the design a little differently? Let me know and I’ll see you next week!

I love how this turned out — super cute! Thanks for sharing at Merry Monday. 🙂
I agree, when in doubt, always distress 🙂
Really cute farmhouse apron holder, Kathy and great stenciling tips. Pinning to share 🙂
Your projects are so inspiring! That is lovely. Thank for all you share.
Thanks Vera! Glad you like it.
Thank you Susan!
Love it! Excellent re-use!
Kathy, you are so creative! The stencil is just perfect. I love the position of the cow, the checks carry the farm theme and the curtain tieback made it. Thanks so much for all your wonderful ideas.
I am having trouble accessing the emails you may be sending me thru your link to your website,. If you have any more comments would you send them to me at Effie.carroll@ncagr.gov. Thanks.
Love it!!
Great idea. Pinned. Thanks for writing about paper stencils.
Joy
Would you suggest painting the gray first with a dry brush and then using the sandpaper? I’ll try doing this on the seat first?
Good Morning Effie, I’ve never distressed wicker. Could you very lightly dry brush it? That might work.Or you could get some 150 grit sandpaper and lightly distress in an inconspicuous area…like the bottom of the seat, to see how that would look.
Your sign is adorable!! Love it!
Love the sign and the links to the stencils and paint. Now can you give me some suggestions as how to distress wicker? The color is beige and I want it to look like weathered driftwood. I saw the writeup on reclamation gray paint. Can you give me some suggestions? Thanks.
Yes! Brilliant to have the cow in that position. I think I get unhappy with some of my stencils because I “picture” using them “planted smack dab”! :o) I like this idea! (((HUGS)))
Really cute! I think you placed it all perfectly. Thanks for the many inspirations!