Technique To Refresh Old Wood Furniture
As an Amazon Associate, I earn from qualifying purchases.
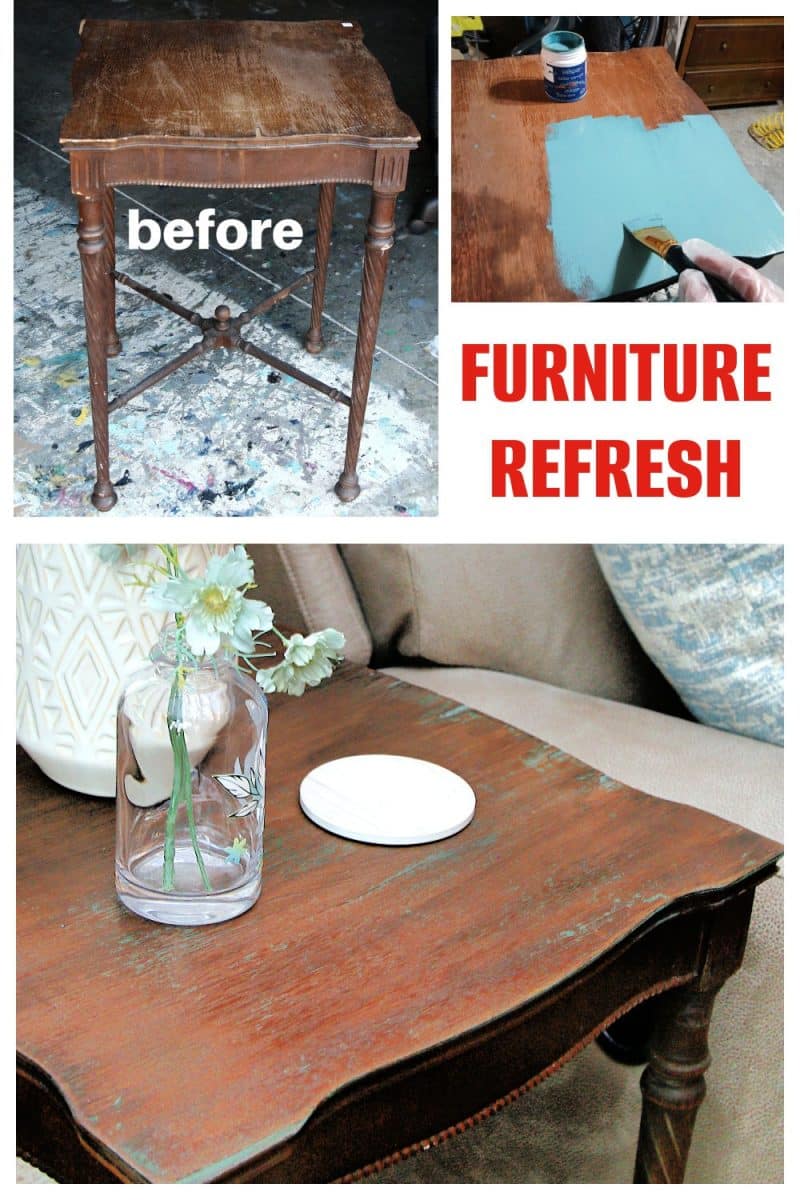
Hey Friends! Today is Trashy Treasures Tuesday, and I wanted to show you how I refreshed an old wood table. You can use this technique on any piece of wood furniture.
The tabletop on this inexpensive find was a mess, and my first thought was “paint”. Did I use paint? And did it work? Read on to see what happened.

The links to the Trashy Treasures Tuesday posts are after my tutorial. You don’t want to miss these fabulous makeovers!
")
I paid either $5 or $10 for this end table (old lady brain). The table was definitely sad looking, but there was no way I could resist those legs.
")
And look at the base of the table. The leg stretchers with the knob detail in the middle are so pretty. I think these are called x-stretchers, and their purpose is to stabilize the table.
")
There were a lot of dings and dents on the edges of the tabletop and the legs. Those are easy fixes.
")
Also cracked and missing veneer on the tabletop. Not so easy to fix.

To adhere the veneer back in place, I chose white glue.

I didn’t set up my tripod, and I couldn’t take a photo while pushing glue between the veneer and the top of the table with a toothpick.
The lip of the table was not wide enough to clamp the glued areas, so I set a long board across them and weighted it down with full paint cans until the glue dried. I didn’t replace any of the chipped-off veneer.

Once the glue was dry, I checked all of the joints and tightened all the screws. The table was sturdy with no wobbles.

Next, I cleaned the table from top to bottom. My cleaning rag shows how dirty the table bottom was. If you are going to bring a piece of furniture into your home, it should be clean all over!
")
For the most part, the table’s base and legs were in good shape. Instead of painting, I shined them up with Howard’s Feed-N-Wax (on Amazon).
I love this stuff. A lint-free rag is perfect for applying the Feed-N-Wax, and for the small, detailed areas, I use an artist’s brush.
I don’t really consider Feed-N-Wax to be a wax, but this is the description of the product: “Polishes all wood surfaces to a soft luster with a protective coating of Carnauba Wax and Beeswax. Introduces conditioning oils that ‘feed’ the wood, helping keep it from drying and fading.”
")
The legs are going to look awesome! The product will soak into the wood, but if the finish feels a bit slick or damp the next day, wipe it over with a dry, lint-free rag.
")
Now, for the tabletop, which was in dire need of help. I had a sample of Valspar paint that had been on my paint shelf for a while. and really liked the color. I brushed on one coat of paint.
")
The big ding on the table edge and the chipped top needed attention.

I used a walnut colored stain marker to cover the areas. When using a stain marker, I let the stain dry for a few seconds, then lightly wipe over it with a dry rag. This blends the stain from the marker with the original finish.
Now, I have to tell you that I didn’t notice an odor to the paint when I brushed it on the tabletop. But the paint had a distinct odor, and it wasn’t good.
The odor was definitely noticeable the next day. I guess as the paint aged, the mixture turned a little ripe! I did go back and look at the date. The paint sample was a couple of years old.
")
What did I do? I sprayed the tabletop heavily with Simple Green and used a sanding sponge to remove the paint.
")
The paint had settled into the damaged areas of the top, and I thought I could work with that little detail. So I didn’t repaint the top.
")
Instead, I pulled out an old, trusted friend. Caromal Colours Toner. The toner gives paint and wood an aged look, what I call an antiqued finish.

I rubbed the toner all over the tabletop. You don’t have to worry about applying it with the grain of the wood. I let the toner set on the wood for a couple of minutes, then wiped it back.
The longer the toner sits on paint or wood, the more it is absorbed. For a light aged look, wipe it back just after applying. For an intense aged look, wipe it back after several minutes to leave more toner on the paint or wood.
You can see a good example of the toner technique here… How To Antique Painted Wood Furniture

The toner “tones” the paint down, making it look like it’s been on the tabletop for ages. As for the wood, the toner adds more color and refreshes the stain.

Yes, the top is still damaged, and it shows, but I like the way the table looks now. Much better than the before.

Just cleaning and waxing the legs and stretcher pieces was all it took to bring them back to life.
What do you guys think of my attempt to revive this piece without an all-out paint job or refinishing it? Do you think I should have painted the whole thing? What about the toner?
Leave me a note if you have time before heading out on the Trashy Treasures Tour Just click the links below the photo collage to visit my friends and see their fabulous treasures…..enjoy……

Trashy Treasures Tuesday:
How To Update A Shelf – Confessions of a Serial DIY’er
Half Moon Table Makeover With Paint And Stain – Artsy Chicks Rule
How To Clean And Fix A Torn Canvas Painting – Salvaged Inspirations
Antique Table Refresh – Petticoat Junktion (you are here)
 My most popular furniture refresh….
How To Refresh And Restore Antique Furniture Without Refinishing
As always, thanks for being here, Kathy
Love the table very good choice no paint I think the wood is beautiful nicks or not
Love the table. Great job, as usual. One quick question What primer are you using.. I see gripper has been discontinued. Thanks
Your table really turned out nice, I think the top is much cooler now that you removed the paint & used the wood toner. Just that tiny bit of color in the grain makes a big difference. Perfect!
Love what you did here. A refresh is a great idea! So going to do this in the future on one of my storage pieces!
I actually love your paint, then no paint with leftover paint in the crevices look, Kathy!! xo
I really like the table details. I don’t see tables like this anymore !
She does look refreshed now. I also don’t mind the faint blue poking thru.
Nice refresh !
I will take some and post them. Out of town now. I took the photos after moving the table into the house, no extra lighting or staging. I didn’t plan to post the makeover so never took more photos. Thanks for the comment.
I love what you did with the table!!
The painted top was ok, but I don’t think it had the character that your finished table has, even with its slight imperfections.
I like it .. wish you’d posted a couple of pictures of the table by itself
I like the way you did it – it makes the table look like it has a story to tell. I love that!
omg I LOVE THIS! I’m so glad the paint stunk, because I did not care for that so much. This is perfection. It looks like it has aged naturally. Yep fabulous
This table is so darn sweet Kathy! You really brought it back to life to with this refresh and I love the blue peeking through the top cracks/grain! And thanks for the heads up on the wood toner – now I want to try it! Pinned XOXO
I love the refreshed look in your space, Kathy, and I don’t mind the aqua bits peeking through at all. I think it as some lovely character! XOXO
I love the table and would’ve been drawn to the details as well. I like what you did…just enough.