How To Make Rustic Garden Art
As an Amazon Associate, I earn from qualifying purchases.
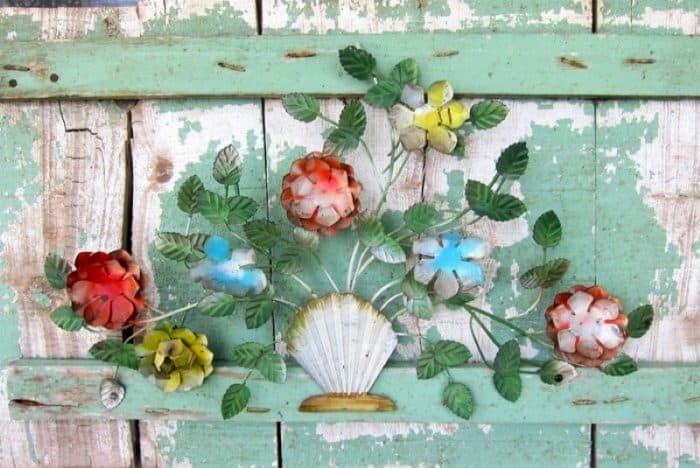
This rustic garden art project came about because I had a piece of vintage metal floral piece in my booth that I could not sell. It was in my booth for years, and no takers.

I bought the colorful metal flower wall art when we lived in Florida. It moved back to Tennessee with us, and I hung it in the house for a while. Then I got tired of it and took it to the booth. The price was only $28; sometimes it was even on sale. What’s wrong with it??

I brought it home, and it’s been in the workshop for a few weeks. I love this piece and decided to remake it in some way. I searched my stash of wood and came up with a cabinet door.
I laid the metal flower piece on the cabinet door and it didn’t do a thing for me. It was too blah or too sterile-looking.

Then I remembered this really old, rustic-looking (probably antique) wood cabinet door that has been in my stash forever. So it was probably meant to be, a match made in Heaven.

The other side of the door was antique white and had hinges and a door latch still attached. You can see where the wood has dried and split in places.

The green paint was really chippy, and I used a stiff bristle brush to scrub off the loose pieces, then finished brushing it off with a large paintbrush. Next I used a little Simple Green to clean the door.

The green-painted side of the door was the prettiest, and the flowers looked best against the green, so that’s the side of the door I attached them to. The top of the metal flower art had a loop for hanging, so I just used a drill and screw to secure the top in place.

On each side of the floral piece at the bottom, I used the drill and screws to attach one of the metal leaves to the board. Two screws, two leaves.

The screws are hardly noticeable, and it took me about 3 minutes to attach the flowers to the wood. Cleaning the antique wood and putting together the garden decor “art” took about 20 minutes. A DIY project doesn’t have to be difficult or time-consuming.

The two pieces look like they were meant for each other. It’s funny that neither of the pieces were great by themselves, but put them together, and they really make a statement.
It’s kind of like when I put those two metal hamburger and hot dog signs on a piece of painted wood; what a difference. You can see that piece here……DIY Kitchen Sign

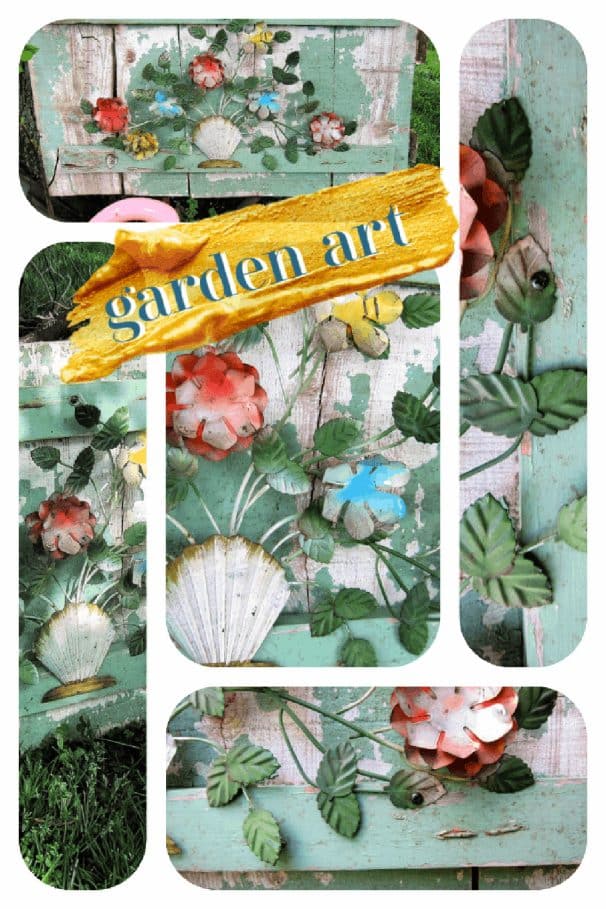
This piece would look pretty hanging on a porch or in a sunroom. It would also look nice in a garden or a lawn spot.

Or you could lean it against a tree like I did for this photo. I moved it all over the place to take a few photos for you guys.
This piece will be going to the booth to sell. Do you think someone will buy it now? The price is going to be a lot more, and if it doesn’t sell this time, I guess I’m meant to keep it.

That’s okay because I really love the new look. I’ve always liked the metal floral piece but I replaced it with other decor in the house.

That’s all it took to make this unique rustic garden decor. What do you think? Should I keep it or sell it. Not sure where I would put it but those are my colors!
If you liked this project I promise you will love my recycled movie reels. Watch the video tutorial below….
[adthrive-in-post-video-player video-id=”Eafed30r” upload-date=”2019-07-22T03:07:43.000Z” name=”DIY Idea For Old Movie Reels” description=”How to upcycle old movie reels into fun home decor” player-type=”default” override-embed=”default”]
Making Succulent Flower Displays
Leave a note if you have a few extra minutes. Have a great day, Kathy
I love it. Keep us posted when it sales. I am sure it will.
Love it. thanks for the idea.
great pairing!!
Kathy: I absolutely love the metal/wood combo. It is so pretty and I would, indeed, hang it on my porch. It just has that “it” factor. Personally, I would keep it but, of course, that’s up to you.
At any rate, enjoy it while you can. The color combo is really nice, too. Love your site.
Jackie
Love what you have done with this piece Kathy. I would have bought it before but really love it now.
Kathy – I bet it doesn’t stay in your booth for very long. Something about old chippy wood is a huge draw. This would look lovely hanging on a wood fence in the garden. You have such a good eye for “treasures”!