Cut A Beadboard Table Top And Paint It Pewter Gray
As an Amazon Associate, I earn from qualifying purchases.
Good Morning.
Remember the table from last week…the one the JTS cut a new table top for?
Well, I finally got it painted.

Beadboard Table Top Painted Pewter Gray
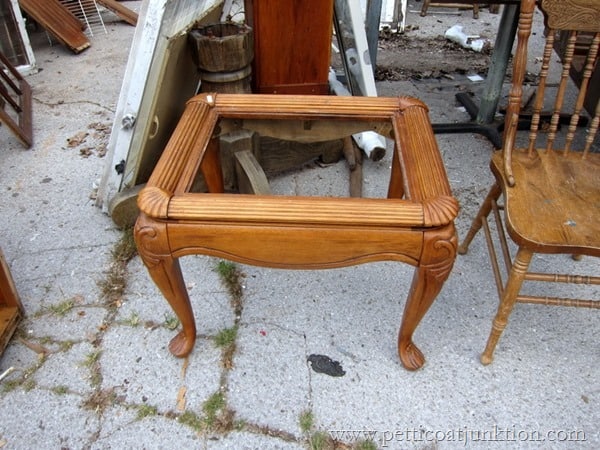
When I spotted the table (without top) at my favorite junk shop, I fell in love with the detailed legs and the scroll work on the top.
I used to pass on pieces like this.
I’m not crazy about using an electric saw.
I still use a small handsaw, and believe me….a small handsaw=small project.
When the JTS retired he started volunteering to help with my projects and the rest is history.
When you guys leave comments about the JTS, I always read them to him.
He gets a kick out of them.
The star of the show today is the JTS.

For you newbies here, that’s short for “Junktion Technical Specialist”…aka hubby.
He did some work on a project for me back in November.
In this photo he’s getting the nail gun ready.

It’s ready!
I bought the table minus top at My Favorite Junk Shop….$5.
It had a glass top at one time but it was either broken or lost.
That’s okay because I’m not a fan of glass top tables.

The JTS cut a wood replacement table top for it but as often happens…I missed that photo opportunity.
Here he’s running wood glue along the rim where the wood top will sit.

The wood we used is really fake bead board.
The panel comes in 4ft.x8ft sheets and we got it at Home Depot.
We just happened to have a couple of sheets on hand for projects like this one.
I also use them for photo back drops.

For double insurance he nailed the top in place using the nail gun.

The JTS cut a top for the table from fake beadboard.

I decided to paint the table with Reclaim paint in Mocha, but I was out…..so Pewter Gray it is!
I think that was a wise choice because gray is a really popular color right now.

I wanted a little of the white beadboard to show in places so I…..

distressed the grooves in the beadboard using a very small piece of doubled up 150 grit sandpaper.
The electric sander would have been overkill on this piece.
A little tip for manual sanding……
double your sandpaper and use a small piece.
It’s easy to handle and control.

Doesn’t that bit of white add drama to the table.

You guys know it’s been really cold here and the second round of snow in a two week period left us with 9 inches on the ground.
So not photos outside in the carport.
I staged these photos in the kitchen on a dreary, cloudy day.
Photo quality is very very important in the blog world.
But you guys know that.
Since I’m short on talk and big on photos I try to get a few decent shots of my projects for the blog.
The color scheme in our home leans towards browns and earth tones ….not grays…..so I just work with what I have.
Hope you enjoyed the project.
I’m spending some time with my granddaughter this week since we’re both on Spring Break!
Her birthday is this week also so that means spoiling her even more than usual
Have a great day,
Kathy
hey Kathy!! Love all the Reclaim pieces!!! Well- love everything all the time 🙂
the reclaim looks so smooth in your pics- did you brush it on? thin it? so smoooooooth and exactly what I want!
Thanks!
I have impatiently been waiting for this post. I love it. It is such a deep gray and so striking. I can’t wait for your next painting/ up cycle project.
repurpose at it’s finest!
Good Morning. Love the table style.
I have a question: Is it best to stick with one color of “painted furniture” in a room, or choose a variety. I am loving chalk paint and have painted my headboard murmur by American Deco (not certain of the name, I’m not home to look), but how many different colors in a room? I love the red radio/quilt cabinet you did.
Thanks.
Love the makeover you guys gave this table Kathy. Your pictures look fine (coming from someone who lives in a Canadian climate who has no choice but to take pictures indoors). Enjoy your time with your granddaughter!
love this color…i am in the process of redoing my bedroom with greys and this would be a lovely accent color, i love this table too wtg team pj xx
Kathy, I think your little table turned out great. You have given me a great idea for a little hutch top I bought at my favorite junk shop.
We got 21 inches of snow last Wed. and we still had some snow from the last snow, but with the warm temps it has been melting pretty quick, and with the rain today it will be gone and I really hope that is it and we get to enjoy spring.
Happy Birthday to your granddaughter, have fun with her this week.
I really like the table,, bit with all the carving on the legs and side I would have gone for a dark stain over the gray…but that’s just me. It’s a lovely piece.
Like this piece with the white accents. Wonder if you distressed the edges at the top of the legs how this would look as well.
It turned out really well. I think any color of paint would have looked good on this piece, especially with a little white peeking through on the beadboard top.
This is so nice! Love the color and bead board.