Painting A Lane Cedar Chest | Before And After
As an Amazon Associate, I earn from qualifying purchases.
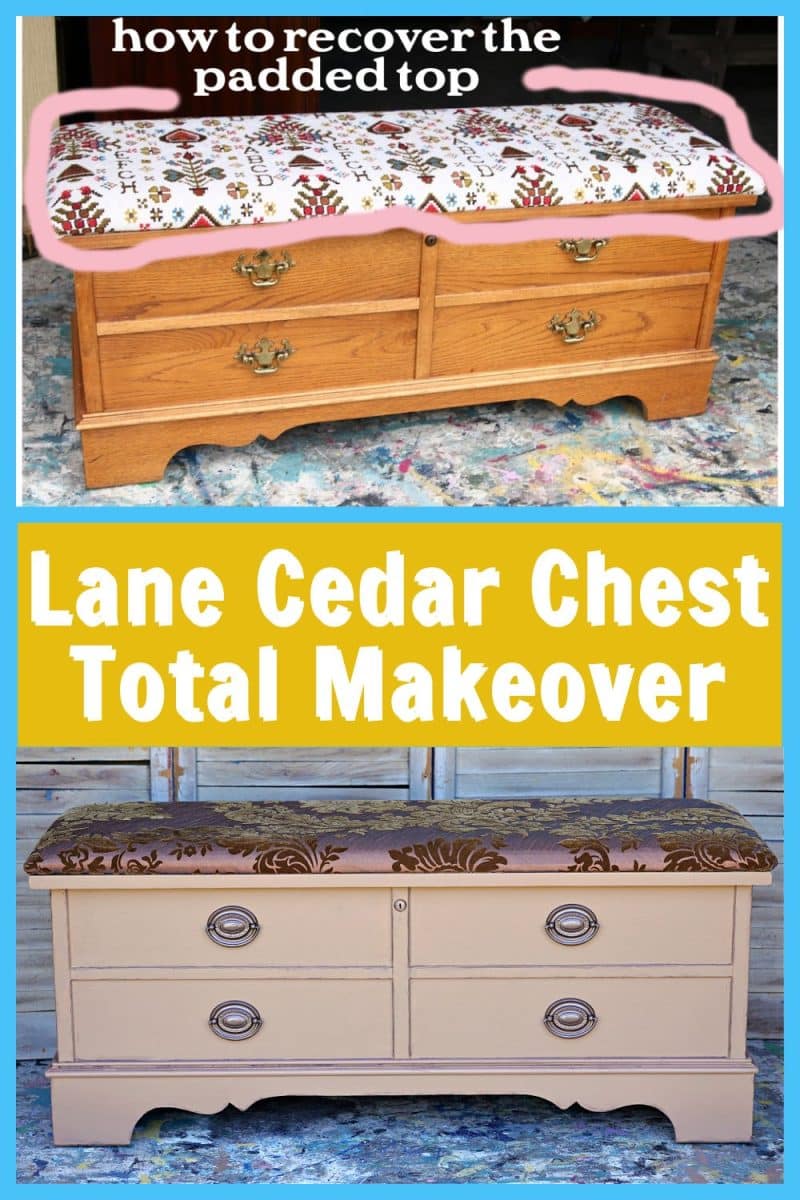
I painted my Lane cedar chest. It was a gift from my husband and kids for Mother’s Day a long time ago.
")
I’ve changed the fabric on the chest several times, but never painted the orangish-stained oak. I wasn’t sure how the hubby would feel about it. But when I mentioned it last week, he didn’t say anything.
![]()
So, for the Furniture Fixer Upper Tour today, I’m sharing how I painted the cedar chest and covered the padded top with new fabric.
I mentioned to my tour friends how I went through several paint colors before I landed on the right one for this project. They answered that it is always harder when painting our own furniture. I think that’s true!
")
Ray and the kids ordered the leather tag to be placed inside the top of the cedar chest. Sweet.
")
It is not difficult at all to cover the seat and I have a video tutorial for you.
There are 8 screws attaching the padded top to the cedar chest which makes it easy to remove and the technique to recover the top is simple.
")
Once I removed the padded top I applied painter’s tape over the lip of the chest and the lid just to keep the paint neat looking.
The front of the chest is designed to resemble four drawers, hence the furniture pulls. I removed the pulls and placed painter’s tape over the screw holes on the inside of the chest. We don’t want paint leaking inside.
")
Our bedroom walls are brown, and the furniture is off white with light distressing. I decided to go a little bold with yellow paint. This one is Daisy from Dixie Belle.
")
I love their silk mineral paint because it goes on so smoothly and the matte finish is perfect.
")
The first coat of paint was very, very yellow. Too yellow for my room, so I added white paint to the yellow to tone it down.

The photo above shows the lighter yellow color.

I applied two coats of the light yellow paint and then removed the painter’s tape. I love that part!

I found the French Provincial drawer pulls in my stash, and the center-to-center distance was the same as the original pulls. Yay! That means I don’t have to fill screw holes and drill new ones.
I spray painted the pulls a deep yellow and I thought they looked pretty good.

Next I went through my fabric tote looking for material to match the yellow. I had several options but didn’t really like any of them with the yellow.
In fact, I didn’t care for the yellow at all for my brown bedroom. Why did I choose that color to begin with? Who knows. I think I just wanted something different.

My next plan was to paint the cedar chest with the leftover latex paint we used on the bedroom walls. It was a custom brown color.
You can read how I mixed and mixed colors here….How To Create A Custom Brown Paint Color For The Bedroom

This is how the Lane chest looked after one coat of brown paint.

While the first coat of paint was drying, I searched my stash for more drawer pulls with the same center-to-center distance. I found two different styles.

I decided on the oval pulls, which are called various names…… English, Hepplewhite, and Bennington, to name just a few.
The style is not ornate, and I like that. I spray painted them with Rustoleum Hammered paint, color brown.

I applied a second coat of brown paint to the cedar chest, then decided to do some faux distressing.
Black paint was too dark and i didn’thave a dark brown, so I added terra cotta and blue paint colors to the black to create a dark brownish hue.
Don’t be afraid to mix paints if you don’t have the color you need. I first mixed white paint with the black, but that made the paint gray. So I Googled to find which colors to combine to make brown.

To faux distress the brown paint, I dipped a sponge brush into the paint and ran it over the raised edges and deep grooves along the bottom of the chest.
If I got a little heavy-handed with the dark brown paint, I used a damp rag to wipe it off.

Now it’s time to cover the padded top with new fabric. I removed the staples holding the current fabric in place.

The original fabric is still on the padded seat. I just place the new fabric over it.

I chose the brown brocade curtain I purchased at the thrift store many years ago to cover the seat.
I used this same fabric on a stool..How To Spray Paint A Vanity Stool And Recover The Seat

The first step in covering the seat is to cut the fabric to size, leaving enough fabric to staple it in place on the backside of the seat.
I have several tutorials on recovering bench and chair seats, and I also made a video for you.

Now the cedar chest is finished, and I love it—it has a totally different look.

The faux distressing is very minimal but keeps the paint from looking so one dimensional.

And the oval drawer pulls look much better than the original batwing drawer pulls.

The photo above shows the Lane cedar chest in place in our master bedroom, and you can see it matches the wall color.
I may need to buy new curtains. When we first painted the bedroom, I had a difficult time finding curtains I liked. Maybe I can find some now.
I hope you enjoyed this makeover. What do you think of all my changes? Don’t be afraid to experiment or change plans when painting furniture.
Leave a note if you have time before heading out on the Furniture Fixer Upper Tour. Click the links below the “before makeovers” photo collage…….

Furniture Fixer Upper Tour:
Painted Vintage Mahogany Dresser – Confessions of a Serial DIY’er
How To Paint A Leather Table Top – Salvaged Inspirations
Painted Sewing Table Makeover – My Repurposed Life
How To Restain A Dresser – A Ray Of Sunlight
Painting a Lane Cedar Chest – Petticoat Junktion (you are here)

My Favorite Dixie Belle Products:
Dixie Belle Boss
Scrubby Soap
The Belle Paint Brush
Badlands Mineral Paint
Glacier Mineral Paint
Peacock Chalk Mineral Paint
Baroque Swirls – Water Slide Transfer
Roses Silkscreen, Belles and Whistles
Terra Seal Matte Finish
As always, thanks for being here, Kathy
Kathy, your chest really turned out nice! It doesn’t even look like the same piece of furniture. The minor distressing really made it pop.
Looks great! I’m glad you ended up with the brown, the yellow was okay but maybe not for that project!
Thank you for sharing
I’m glad you didn’t “settle” with your first choice since you weren’t happy with it. These cedar chests last for years if properly cared for. Mine is a waterfall lane from the mid 40’s.
Great job Kathy, Pinned
Gil
It looks so elegant now – beautiful Kathy! The icing on the cake is that sweet leather tag on the inside of this chest! Pinned XOXO
I love the color you ended up with! It is definitely more difficult when it is for your own space, and even harder when it is a treasured piece like this one! Now it will fit in seamlessly in your bedroom! XO