How To Paint A Wood Wall Clock
As an Amazon Associate, I earn from qualifying purchases.
It’s easy to paint a wood wall clock and cover up the ugly yellow-toned stained finish. This clock makeover tutorial is super simple.
My parents gave me and the JTS a pendulum wall clock for Christmas, oh…… about 35 years ago. That’s an estimate but pretty close. It was nice then and it’s still nice but needed an update. The new paint finish is so much better than the golden oak of before.
How To Paint A Wood Wall Clock
I could have gotten rid of the clock and got a new one but then there goes the memories. Plus it was a fun update and I was able to change a few things I didn’t plan on just by taking a chance.

This is how the clock looked before the makeover. Notice the yellowish oak wood and also the gold trim. Pay close attention to the gold-striped design on the glass window over the pendulum.

No more gold striped design and no more shiny in-your-face pendulum. I debated a while before taking on this clock makeover. Should have done it sooner.
1. Take the wall clock apart.

I took the clock down to the workshop and gathered paint supplies, tape, etc.

The Junktion Technical Specialist (aka The JTS, aka hubby) removed the glass cover and the backplate from the clock. The screws for the face were easy to get to and the back was stapled on so that wasn’t a problem either.
When you’re working on a project that has a lot of parts and pieces store the small pieces in zip lock bags and the large pieces in grocery bags. You don’t want to lose any parts (voice of experience).
2. Clean the clock.
I used Simple Green to clean all parts of the clock. You should always clean your project as part of the prep for painting.
3. Use painter’s tape to protect the glass and brass parts.

I applied Frog Tape around the gold rim of the clock face then stuffed bubble wrap under the tape. I usually use newspaper but the bubble wrap was handier. It’s really hard to tape around a circle. Do any of you guys have a good tip for that? I’m sure there’s a really simple trick, but I don’t know.
4. Spray paint the clock trim.

I could have left the pendulum and clock trim shiny gold but why not do a complete makeover. I had some Rust-oleum Metallic Spray Paint in Antique Brass in my paint stash and decided it would be perfect.
I’ve used this spray paint on furniture pulls and things like door hardware and metal stands. Spray painting the gold trim took about 2 minutes.
5. Paint the wood around the clock face.

I decided to give the clock a two-tone paint finish with the wood adjacent to the clock face one color and the rest of the body a contrasting color.
I started painting around the face with Beyond Paint color Latte. I looked at it for a couple of days and decided to go with a lighter color. No need in using a brownish color when I’m trying to cover the yellowish/brownish wood.

I had just a bit of CeCe Caldwell Clay/Chalk Paint in Vintage White. It was perfect. Not to white-white and no yellow tint.
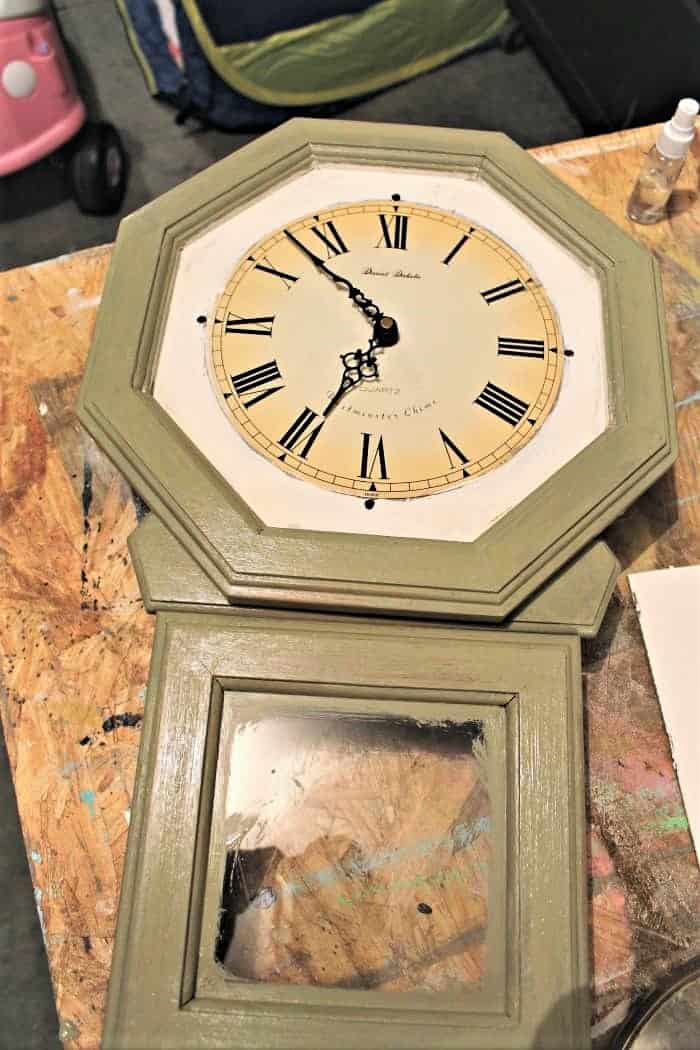
For the rest of the casing, I used Beyond Paint in Sage which is a pretty green color, not too yellow and not too gray.
6. Remove outdated gold design on the glass.
Next is the cool part. I took a razor blade and scratched off the gold diamond design on the glass. I wasn’t sure about that but it was easy to remove. I removed the gold trim on a glass display piece I bought at the thrift store here.
7. Put the clock back together.

And you guys know me well. I distressed the paint by hand using 100-grit sandpaper. To darken the raw look of the wood from the distressing I rubbed on a layer of Howard’s Wax in Walnut.

update: I repainted this clock in 2026 see it here… How To Repaint A Wood Wall Clock To Match Your Decor Style
The clock has an updated look and I still have the clock my parents gave us. I think it was okay for me to make changes to the clock. How do you guys feel about stuff like that? Do you have a piece of home decor that needs updating? It doesn’t have to be a clock.
Find another of my clock makeovers here…Thrift Store Clock Update.
As always, thanks for being here. Kathy
Thanks!
Electrical tape is your friend when doing round items. Stretch it as you go.
Perfect timing for my ‘spring better get here quick’ mood. Like it very much!
SO much better! I’m not a fan of orangy oak either. Really nice work.
I saw a you tube video the other day where the person used contact paper to cover the round back. You can get it at Dollar Tree so that’s not a big expense. Johnnie
I think the table would be pretty in light gray or off-white either one. Consider just painting the table top and leaving the base the original finish. I always enjoy reading your comments Naomi, keep them coming!
Yeah, I think I do like it, but I don’t know if I would have trusted myself to embark on the process. It is a more modern color so I think it turned out okay. The most important thing is that you like it, though, right?
In reference to that goldish-yellow oak color, I have a dining room table and chairs that are that color and I am kind of getting sick of the hue. I have my grandmother’s oak buffet which I refinished that is not quite as goldish in color and which I probably wouldn’t paint but I’m thinking that with the table and chairs is just too much yellowish color in my small dining area. So I might consider painting the table. What color would you suggest? I somehow feel like white would be too stark but maybe a light grey. I have one other oak piece in that room–a commode, which I might consider painting, too, perhaps a moss green or soft blue-green. Those are the colors I accent with in the rest of the house here and there. I just really need a lighter look in that room. I wish I could send you a picture but I don’t have my ancient computer set up to do that.
Anyway, I will probably not get at these projects until Spring at the rate I usually go! But I like considering them ahead of time.
Thanks for sharing your unique up-dated clock project.
Soooooo much better!
Kathy-What a brave person you are! I don’t think I would have ever deciced to do that to a clock, The upclose picture shows the color very well while the farther off one I cant tell the color as well. Sage green is a fav color. And painting the brass-well! that is the topper. Wonderful job.
Much nicer! Lovely job!
My hubs made me a clock case and fitted it with electric works when we were first married and right out of cash to spend on frivolities! I painted flowers on the face and marked the hours with map pins. But a good many years later the pine had gone orange (hate that!) and so I did what you did, Kathy! Gave it a makeover, changed the map pins for red buttons, the case is now distressed cream and the face lime green.
you’re welcome! thanks for commenting
I love what you did with the clock. It really did update it. The green color is really pretty. Don’t you just love the CeCe Caldwell paint!!!! I did a makeover of an older oak clock I had with milk paint as well….it was actually my first piece to use the CeCe Caldwell paint on, and I just love it. I think you should be very proud of your “new ” clock. 🙂
Hi Kathy,
Love your work and all your “flea” pics! I like to use Glad Clingwrap on stuff – sticks like crazy as long as what you are sticking it to is completely dry. Sometimes there is a little residue when you remove it but that comes right off. Great for covering jars of paint too! I have a clock I picked up at Goodwill and have been kicking around what to do with it, thanks for the inspiration!
Thanks Debra, I think it’s perfect for Spring now!
oh I love this, it turned out great! It’s such a hard decision to paint a clock, but it’s beautiful!