Distressing And Antiquing White Painted Furniture Tutorial
As an Amazon Associate, I earn from qualifying purchases.
This is the best way to distress and antique furniture painted white.
If you are here, it’s because you love the look of white furniture with distressed paint and an antiqued or aged look, right? Great! I will take you step by step through the painting, distressing, and antiquing process.
Follow this easy tutorial to make your furniture look like that in the stores, only better. I worked out a process to get this look and just went for it. My technique worked!
")
The antiqued paint finish is very popular and you can see it in furniture stores and online. The faux distressed furniture looks old or aged around the raised details. That furniture is really expensive, and a lot of the pieces aren’t even made of real wood.
I bought this piece at my favorite junk shop several months ago. The price was $60 or $65. Awesome deal. It’s hard to find sideboards or buffets like this one. And when I do, the price is usually over my budget.
The vintage sideboard had issues, like a scuff on top and a few deep gouges. I don’t strip furniture or sand the stained finish down to raw wood and restain. I paint furniture because it’s easy.

One of the sides had a hole that went all the way through to the inside. You can see where the wood is splintered on the inside in the photo above. Repairs like this usually aren’t hard to do but they are time-consuming. 
The JTS and I filled the hole with wood filler. We applied a thick layer over the hole because wood filler tends to shrink as it dries.
The next step after the filler dries is to sand it flush with the surrounding area. Too little filler may result in a sunken area, which means I have to repeat the process until the damaged area is flush with the surrounding area.

For this big problem area, we had to figure out a way to keep the inside where the wood was split as flat as possible. To ensure there was no big bump inside or outside, we used a two-by-four and wedged it flat against the inside wall.
The sideboard sat this way for months while I worked on other projects. I usually have a shop full of furniture waiting to be painted, and I was in no hurry to finish this piece.

When I resumed work on the sideboard, the first thing I did was sand the wood filler smooth so it was flush with the surrounding wood. I used my Ryobi battery-powered sander—no cords to pull around.

Next, I pulled out the silverware drawer, and that felt lining was so ugly. I left it in place for now but what I did later has to be seen.

The bottom of this drawer was rippled where it had been damp or wet at one time. Even though it was rippled, the bottom was still firm, and I decided to nail the drawer bottom to the runner in several places.
This firmed up the bottom and straightened out some of the ripples.
There was a buildup of dust on top and bottom, on the dust boards, and in the cabinets. The furniture repairs and cleaning to get furniture ready for painting is the most time-consuming part of a furniture makeover. Very seldom do I work on a piece that is in perfect condition.

Before cleaning up the sideboard, I removed the drawer pulls and put them in a plastic bag. I learned the hard way to keep it all together. This is one of the few pieces I’ve worked on that had all of the original hardware.
Next I vacuumed up as much of the dust as possible then cleaned all over with Simple Green.

Last thing before painting is to place painter’s tape in areas that might get painted and you don’t want them to get painted.
I always tape over the screw holes on the inside of the drawer to keep paint from leaking inside. Then I tape the sides of the drawer next to the drawer front so the paint line is nice and neat.
Next, if there are cabinets, I will tape the interior about an inch or so in or wherever the lip is so the paint doesn’t look messy inside. You will need to paint some of the inside area if you are painting the outside, as you can see a small area of the inside cabinet under the door and around the sides.

I applied a light coat of Glidden Gripper white primer just to give the sideboard a uniform color before painting. Remember how the top was discolored in places?

The paint for the project is Beyond Paint which is a primer, paint, and sealer all in one. Yes, it’s not necessary to prime before using this paint but I like to start with a primer when the furniture finish is uneven.
I applied two coats of the Beyond Paint in off-white then I waited overnight for the paint to cure before moving on to the next step.

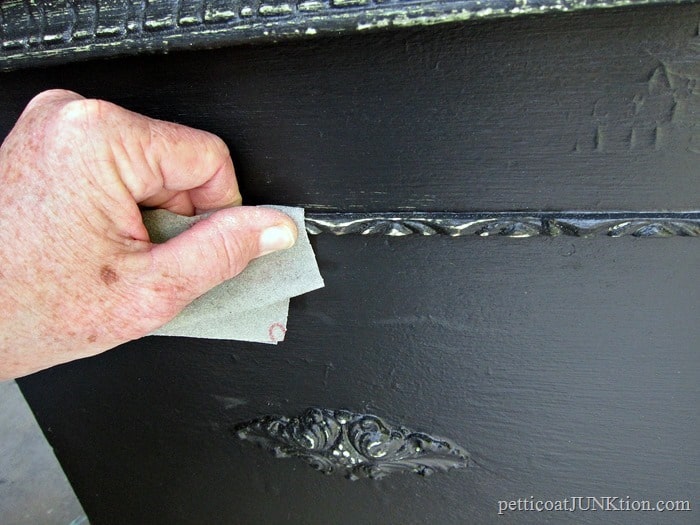
Now, we come to the special antiqued paint process. You can see in the photo above that the drawer on top has been distressed with a power sander and “antiqued” with dark paint.

This is how the drawer finish looks compared to the rest of the piece that hasn’t been “antiqued” yet. All of the raised areas on the drawer, the edges of the drawer, and the area in between the two are now aged or antiqued.
I’ll try to walk you through the process, but please watch the video, as seeing the process is much more effective than reading about it.
To get the antiqued look I first distressed all of the edges and the raised details on the drawers and the body of the sideboard using my Ryobi power sander with 100 grit sandpaper.
Next I mixed equal amounts of water and Miss Lillian’s No Wax Chock Paint in French Roast (dark, dark brown) for the antiquing process…..the dark color around the details and edges.
You can use any dark brown color for this except for maybe those little bottles of acrylic paint. Some of these paints wash off easily.

I used a small brush to brush the thinned paint around the raised drawer details and all of the distressed raw wood areas. (I clipped two photos from the video and they are blurry because of the movement)

Then I wiped the paint off with a really damp rag until I got the look I wanted. It’s best to work on small areas at a time so the thinned paint doesn’t dry on you in the process.

Time to paint the furniture pulls. I laid out all the hardware and went to look for two knobs for the cabinet doors. The two small knobs on the doors were two different sizes. I mentioned earlier that this piece had all it’s original hardware but I forgot about the knobs. That’s me.

I dry brushed the drawer pulls and knobs with the same paint as the sideboard. The pulls looked a bit rough and flat after painting so I sealed them with General Finishes Sealer in Satin. That added a little shine and also made the pulls feel smooth instead of rough.

The drawer pulls look great with a bit of the original finish shining through. They blend well with the dark paint around the details.

If you try this technique don’t use black paint for antiquing. It will be way too dark. Depending on your home decor style you might use a dark, dark, gray for the antiquing.

Remember that sad looking felt lining in the silverware drawer? I couldn’t stand it. I pulled it all out. There was a piece of really thick cardboard between the felt and the wood drawer bottom. That didn’t look good. I couldn’t cut out the cardboard so moving on to another idea.

I found some pretty fabric in my stash, cut it to size, and used double sided tape to stick it to the drawer.

It’s not really straight and even, but it looks so much better than the felt. The fabric is upholstery fabric, so it’s nice and thick, and I also used it on the door front of a vintage wardrobe, you can see here.
Take a look at more of my Beyond Paint furniture makeovers.

As I mention in the video, don’t try to make the distressing and the antiquing look all perfect and matchy matchy. For one thing you will drive yourself crazy. For another having everything uniform is not going to make the piece look better. It might make it look too manufactured.
Read my tips and tricks for distressing furniture here… What You Should Know About Distressing Painted Furniture And Home Decor

Distressed Antique White Furniture
The middle of the sideboard is slightly curved and it’s so pretty in person. It’s hard to see the curved front in the photos.

And that’s the story of the painted white furniture with distressing and a little antiquing. Do you guys like this antiqued paint finish? Time to watch the video. This one is longer than most of mine because I wanted to cover the whole process so you guys can do the same technique….
How To Create A Distressed Antique White Furniture Finish

Do you like the architectural piece hanging over the sideboard? I painted it to go over the bed in the master bedroom after we repainted and added all new decor.
Leave a quick note if you have time. I would love to hear what you think of the painted sideboard.
Supplies used in this project:
FrogTape
General Finishes Sealer – Water Based Topcoat
Beyond Paint – Off White
Ryobi Battery Sander
Time to see what the other furniture fixer uppers have for us today. Just click the pink text links below the “before” makeovers photo…..

Furniture Fixer Uppers Tour:
Thrift Store Dresser With Transfer from Confessions of a Serial DIY’er
Refinished Card Catalog from Girl In The Garage
Bathroom Vanity Makeover from Salvaged Inspirations
Antique White Furniture from Petticoat Junktion (you are here)
As always, thanks for being here and have a great day, Kathy

Antique white with a distressed finish adds so much charm! Love the timeless look it gives to furniture.
Yes Kevin, I used latex water based paint. For the dark color it needs to be really dark! I cut the paint with water about 50/50. Hope this helps.
Kathy,
Thank you for the article. I am from Australia and years ago we could buy a product for doing antique finishes similar to yours. It was an oil based primer/paint and I used it to finish picture frame mouldings. After painting it was left to dry, then you applied a toner to it and wiped off most to leave a heightened colour to the inner parts of the moulding. Sadly this is no longer made but I would consider trying your method. I am assuming you use standard water based paint and use a darker colour for the toning. Is this right?
Kind regards and thank you. Kevin.
Thank you Vicky! It’s really nice that you have that piece handed down from your great grandparents! I would love to see a photo once it’s done. kathy@petticoatjunktion.com
Beautiful piece beautifully done. I have a dresser that belonged to my Great Grandparents, then Grandparents, and my parents. I was blessed enough to acquired this piece and will be doing this process to it. Can’t wait for the final outcome. I will treasure it even more. My siblings are waiting for pictures as well. Thanks for the information. It will be very helpful. Enjoyed seeing your work. Have a blessed day.
So beautiful. I give you lots of kudos for transforming this dresser into something beautiful. Happy to feature your distressed dresser today at Love Your Creativity. Happy Sunday.
The sideboard is so much better painted white and the white painted hardware is perfect. As always your distressing is perfection. Pinned
It’s not yellow Laura. The color chip on Amazon does look yellow but it’s not.
I loved the off white color but on Amazon. It looks yellow and yours looks a gray white ( which I would like better – I do not want cream.
Thoughts
Everyones furniture looks great
Laura
It’s a WOW, looks beautiful! You always inspire me.
Thanks Kathy
This looks so good Kathy! Kudos to both of us for finally finishing a project we were putting off, haha. The sideboard has a whole new life now. xo
I purchased a similar buffet and intend to repurpose it as a bathroom vanity. Mine is in really pristine shape and was going back and forth about painting or leaving the finish as is…. I think you’ve made my decision!!! Beautiful piece….
ah, thank you so much Rose. You always say the nicest things!
Thanks Nancy! I’m 66 and it’s never too late to start painting
Oh my gosh! First I have to share this was a step back in time for me. This is the exact piece I grew up with and I am 72! It wasn’t new but was cherished by my mother for sure. I can just see her Jewel Tea Autumn Leaf dishes in the side storage areas.
Your makeover is outstanding! It is a piece most anyone would love to have in their home. I’m new to this so you have given me hope and encouragement! Thanks so much for sharing…
I cannot say it enough. You are an artist! You take pieces that might end up destroyed and restore life to them. You create beauty!
Thanks Mary!
I’m glad you found me and thank you for the comment on the sideboard. I just love Christy. She’s so talented. Please keep coming by, Kathy
Oh my goodness, I just discovered you through Confessions of a Serial Diyer. This dresser stopped me in my tracks. Absolutely gorgeous. I’m going to watch the video now! 🙂
Kathy, your piece looks wonderful! Job well done.
You know I love a white distressed look and this is just perfect!! A ton of work, but the results were worth it! XOXO
Beautiful before and after Kathy… and I love the architectural piece hanging over the sideboard! Perfect styling for this piece. 🙂
Thank you, Kathy! I swooned when I saw your Dawson knockoff and my heart is still going crazy! It’s exactly what I was hoping for. You are sooo talented and sooo nice to share!
Hi Sindy, I just replied to your email. You can find my knockoff of the Dawson Media Cabinet here…..https://petticoatjunktion.com/themed-furniture/pottery-barn-knock-off-furniture-themed-furniture-makeovers/
Kathy, this looks professional & beautiful! I know what you are saying about buying distressed furniture retail–especially at Pottery Barn! I think this method could be used to obtain PB’s distressed finish on their Dawson Media Console–what do you think?
Thanks,
Sindy
Thank you Cheryl!
Thank you so much Kathy. You made my day. I love Furniture Fixer Upper Day too. My friends are super talented and I can’t wait to see their projects. Thank you for the fabulous comment! Have a great day, Kathy
Oh my goodness. Beautiful. I love the vintage hardware. I can just see it pictured and staged with beautiful treasures. I love Furniture Fixer Upper Day! On Tuesday and Thursday mornings I’m so excited to boot my computer to see what you girls have been up to. It’s “me time” and I’m in my happy place! Happy Fall Kathy.
Very pretty Ksthy!