Transform Guy Furniture To Girl Furniture With Fuchsia Paint And White Drawer Pulls
As an Amazon Associate, I earn from qualifying purchases.
Completely change the look of a piece of furniture with paint. That’s what I did here and now I’m doing the happy dance. This all-wood chest of drawers was completely masculine and now it is definitely feminine. I layered two colors of paint for a custom look and added bright hardware. I made a video showing how I did the distressing and the finishing touches for this project.
1. Outdated Furniture Needing Paint

This is the chest of drawers for the project. I bought it at an auction for $35. Not a steal, not a deal. Some of you really didn’t want me to remove the oak leaf applique. Sorry. The more I looked at the chest the more I thought about changing it completely. I decided to go for a feminine look. The oak leaf and the wood handles were leaning toward masculine. I popped that oak leaf off without any trouble using a flat putty knife.

2. Prime Furniture
To get the layered paint finish, I started with white primer (Glidden Gripper). I was going to use white as the base color anyway and decided the color of the stain on the chest might bleed through and that called for primer.
You can see in the photo above that some of the stain did bleed through. The problem areas were mostly where I removed the original drawer pulls. I sanded those areas pretty well because excess stain had settled around the edges of the pulls. I still don’t know why that would cause the stain to bleed in that area.
3. Paint It

The fuchsia color I selected is Very Berry by Glidden. I had it mixed in Behr Premium Plus Ultra Paint eggshell finish. I don’t think I’ve ever mentioned this in a blog post before but I have the paints mixed in the quart size. That size will do several furniture projects. I buy paint by the gallon only when I run across a pretty can of oops paint. I used a small sponge roller for this paint job.
I normally use a brush. A few years ago I used the foam brushes religiously then got away from them. Don’t know why. They work great. When the paint is rolled on with the sponge roller it looks like the finish contains tiny, tiny, raised bubbles….but the paint dries smooth. I needed three coats of the Very Berry to get complete coverage over the white. I usually have this issue with red, pink, and orange paint colors.
4. Spray Paint Drawer Pulls

I was able to find eight French Provincial drawer pulls the perfect size to fit the original hardware holes in my large hardware stash. I also found two knobs for the top drawer.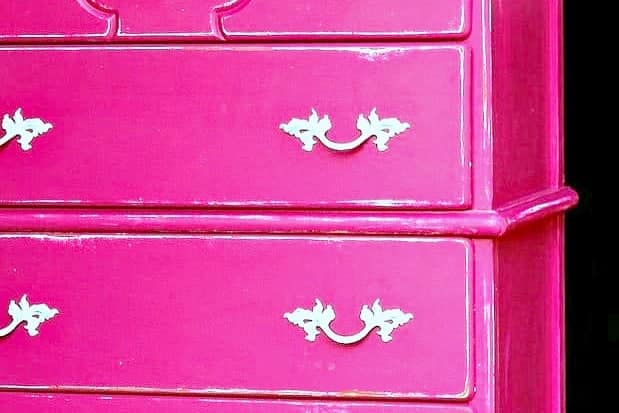
I spray painted the drawer pulls gloss white using the Walmart brand spray paint. I distressed them just a bit by hand with 100-grit sandpaper. Once I put the drawer pulls on the top drawer I knew I had a problem……..the big blank space where I removed the oak leaf applique. I needed to put something there.
I first thought of an escutcheon plate (a thing on vintage furniture where the key goes to open the drawer or door). If I did that I would need to drill a hole to make it look like a keyhole. I didn’t want a hole in the middle of the drawer. What happens if I don’t like it.
I thought about just adding another knob to match the two on either end of the drawer. Not big enough for the space. No to that to. I then went through my stash of wood junk stuff and found a scallop shell wood applique. It was the perfect size.

5. Add Details
I spray painted it white with the same color I used on the hardware and used wood glue to attach it to the drawer. To make sure the applique wouldn’t fall off I used my Ryobi Brad Nailer and shot a nail into each end of the applique. The only problem is I forget how delicate those pieces are and part of the curlicue on the left side chipped off when I used the nailer. Always something to deal with.
I didn’t have another applique to fit in that space. I pulled out a container of wood putty and reconstructed the missing bit. Once the putty was dry I sanded all the rough edges and tried to make it match the other side of the scallop in size and shape. I spray painted and faux distressed the details and sides. For the faux distressing, I used black paint and the dry brush technique. It looked pretty good after I finished with it.

That wasn’t the end of my issues though. The hardware I picked out to replace the old wood pulls wouldn’t fit down into the holes. The drawer pulls were the right width for the holes but the screw part of the pull is made to set down into the hole. All I really had to do was drill the original holes a tad bigger. Easy fix.

6. Distress The Paint
It’s easy to distress painted furniture. You can do it by hand with a piece of sandpaper or use a power sander. Really depends on the finished look youre’ going for. I distressed the paint using my Ryobi battery powered mouse sander and 120 grit sandpaper. My plan was to reveal the white paint and not go all the way down to bare wood. You can see how I used the sander in the video I made below.
How To Layer and Distress Latex Paint

I distressed the paint on the entire chest and the sander took off the paint sheen and made the paint look dull. I used Howard’s Wax in Neutral (clear) and rubbed it on the paint to renew the sheen.
The combination of white and fuchsia layered paint might be a bit bold for some. No worries. You can use any color combination with this paint technique so give it a try. I’m sharing all the details so you will know just how to do it.
Did I accomplish my goal of recreating the inspiration look? Pretty close. What do you guys think of the project? Did you watch the video? Did you notice how I rocked the sander on the edges to reveal the white paint? I also pressed down hard with the edge of the sander on the flat places to remove the fuchsia color. As always thanks for being here, Kathy
Yes!
Using the mouse sander to distress is such a great idea!! Will have to try that on future projects:)