How To Make Paint Look Old Using Waxes And Toners
As an Amazon Associate, I earn from qualifying purchases.
There is more than one way to make paint look old. I’m going to show you four ways to do just that today. These special paint techniques to age, antique, or make the paint look old are super easy.

I painted these four wood trays using four different techniques to age the paint. Then, I spruced them up with recycled belt handles.
After looking at the paint techniques and all of the trays, you’ll have to let me know which is your favorite color and technique.

I found the four wood trays at my favorite junk shop. They were three dollars each-you can’t beat that! Do the trays look heavy to you? They each weigh between 10 and 11 pounds. I know because I weighed them on my vintage kitchen scale!

The day I painted the trays, I felt like experimenting. I have days like that, and sometimes things work out, and sometimes they don’t. This was a good day.
I selected a popular paint color for each tray. Then I used various products on the trays to make each of them special. 
I like all of the trays, but if I had to pick a favorite, it would probably be the black one. I bought belts at the local thrift store for $1 to $2 each, and I cut some of them up to make the unique handles.
I saw this idea somewhere months or years ago and loved the look. While I was searching for drawer pulls for the trays, I remembered the belt idea.

The belt handles could be nailed or screwed on, but I used decorative tacks. This was easy, and I had the tacks on hand. The handles are decorative and not functional. Now we will look at the paints I used and the products that make the paint look old.

First technique: The white tray is painted with Beyond Paint in Off-White. This paint is great. It’s an all-in-one primer, paint, and sealer. The paint is perfect for kitchen cabinets , too.

I applied two coats of paint and distressed the paint with 100-grit sandpaper. This is the simplest technique for making the paint look worn or old. Distress the paint as much or as little as you like. A clear wax can always be applied to add extra sheen or for protection.

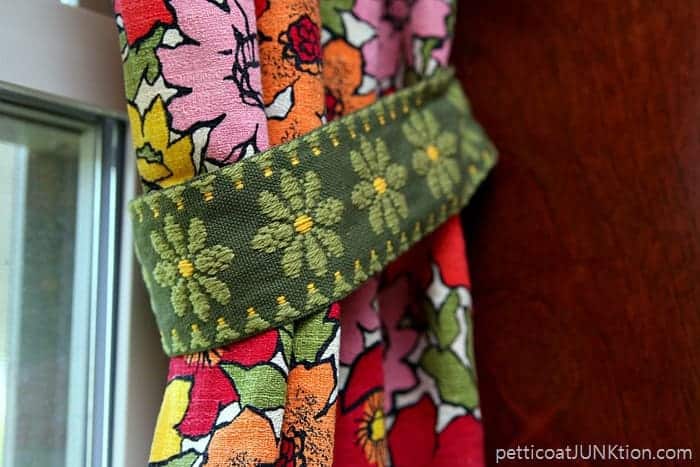
I cut up the thrift store belt to make handles. I used the belt’s reverse side because it had a softer finish. Not sure what the material is.

I nailed the belt pieces to the tray using upholstery tacks. As I mentioned before, these are purely decorative, and on the heavy wood boxes, the belt handle would probably pull off if you tried lifting the tray by the handles.

Second technique. The black tray is painted inside with brown latex paint and the outside is Beyond Paint in Licorice. The white finish is Barnwood Wax from FolkArt.

This tray is two colors because I started painting it brown and then decided to go with black on the outside.

I applied the Barnwood Wax using a soft, lint-free cloth. I just rubbed the wax on and then rubbed off the excess until I got the look I wanted. I don’t think they make the Barnwood Wax anymore but you can use a thin white wax or a whitewash technique to get the same look.

It’s the same process as for the white wood tray above but a different belt. This finish kind of has an alligatored look like old furniture finishes get sometime.

I also tacked this belt on. I’ve mentioned being lazy, and you can see I take the easy route.

How pretty is that? All of the belts I bought were faux leather, but they still look good. The day I went to the thrift store, I couldn’t find any belts made of real leather. They probably go pretty fast.

Third technique. The brownish tray is painted with Beyond Paint in Pebble. Pebble is a neutral color, but it has a little pizazz, too. This is one of my favorite colors.
Caromal Colours Toner gives the tray an antiqued or aged look. I use this product on painted furniture all the time.

You brush the toner over the paint. Then, wipe it off with a dry or damp rag.

A damp rag will remove a lot of the toner; a dry rag does just the opposite. The toner seeps into the little dings and crevices in the tray.
It’s best to wait until the paint has cured for several days before using wax or toner on a paint project. The paint may come off in places if not dried well.

See what a difference an extra step makes when you paint something. You can use any of these techniques on painted furniture or home decor items.

Fourth technique. The bluish turquoise paint is an oops paint sample. You have to love the price of 50 cents. Howard’s wax in Golden Oak gives the paint an aged look.

Always apply wax with a lint-free cloth (old sheets work great). Howard’s wax is available in neutral or clear also and there is a walnut color that gives a deep color to paint.
Wait about 20 minutes, then buff the wax with a dry lint-free rag. Buffing the wax is what makes it shine.

Like toner, the wax also gathers in the dings and crevices of the tray, adding to the aged look.
I made a short video on how to antique painted furniture using toner. You can see it at the end of the post, or you can go to that post here.
It’s time to tell me which technique is your favorite or which you want to try.
I listed the products below, and all can be found on Amazon except for the Caromal Colours Toner, which I linked to their website.
Products used for this project:
Beyond Paint
Howard’s Wax – Golden Oak (no longer available try this Liberon wax instead)
Caromal Colours Toner
Painted Finishes Barnwood Wax (try this white wax instead)
Upholstery Tacks

How To Use Waxes and Toners To Make Paint Look Old
Be sure and watch my video on How To Antique Furniture…
How To Antique Furniture Video Tutorial
As always, thanks for being here and have a great day, Kathy
The trays really turned out well! Love the different colors and the leather handles really add something extra and makes them special.
Great tips, thank you
you’re welcome Renee. Glad you found it.
Funny that I found this, because I have three boxes already. I planned to use these for our cats after I put leather handles on them. They are to sit on a long and low dresser under the living room windows. Thanks for reminding me what I wanted to do with them. I will make each one a different color also.
No! Use them in a project. I brought home a bunch of Dad’s old belts on my latest visit to him. I plan to make some more recycled belt projects!
How is this for serendipity – I was cleaning out my husband’s closet today as he passed away recently and guess what I found? lots of leather belts which I am definitely not going to throw out now.
I love the trays! The colors are great. Thank you for sharing this tutorial, Kathy 🙂 I’ll definitely be trying out one of these methods for my next project.
Nice, looks good!
I love them all! The black one is my favorite. Great information. Thank you!
I think if the sides were shorter, they would make great casserole holders, and help keep casserole warm longer. Love the handles and the colors you chose
Kathy! I would be the one at the booth picking up each one saying, ‘Oh I love this! Wait! I love this one! & this one too! Oh rats I’ll take them all!’
Those handles do make such a big difference Kathy and I’m loving your experimental paint techniques. I can’t really decide which one I like more, but I think I’m leaning towards the blue. I’ve always been partial towards blue and brown
Hi Ann, I haven’t written the post for that yet. Hopefully it will be coming on Tuesday! Stay tuned.
Where is the post for the technique for the blackish tray?
Wish to copy
Tks
A
I love these and the belt idea is great! I love adding things to my stash of stuff and leather belts will definitely be something I’ll use in future projects! Thanks! Pinning 🙂
Love all four finishes equally, Kathy and would have a hard time picking just one from your booth. The leather handles are perfect too. Pinning to share.
really like it
I LOVE every one of them! Miss you guys too.
Your trays look awesome Kathy! I just picked up a couple of great belts for .50 each last week for this very purpose. 🙂
I love the colors.
gail
Love the trays. I’ll be looking forward to your post where you talk about the different paint techniques. Black one is extra awesome.
These are fantastic 10-11 pounds each, like weight training. Can’t wait to read painting techniques
Cindy
I love all four of those trays Kathy… and the leather handles… LOVE!
Love it ! You always come up with the greatest idea’s.
One of my favorites! Thanks for sharing?
Love the trays. Would never have thought to use belts. They look great.
I love the tray’s! They all turned out really nice. I like the handles with the decorative tacks. I wouldn’t be carrying them around, I would use for decorative purposes. I can’t pick a favorite, I like them all. Can’t wait to learn your technique’s.