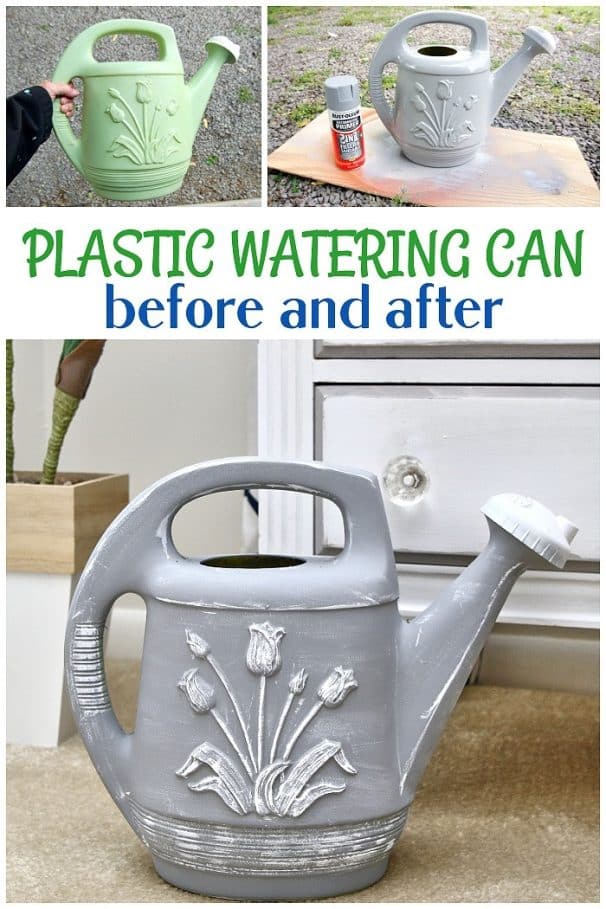
How To Paint A Cheap Plastic Watering Can
As an Amazon Associate, I earn from qualifying purchases.
Gray spray paint and a small bottle of white acrylic paint are all you need to give a cheap plastic watering can a makeover. This simple project takes less than an hour to complete, including paint drying time. This tutorial is short and sweet too.
")
I bought the watering can at the thrift store for $1.99. The plastic piece sure was plain but it had a lot of pretty details to work with.
")
I thought gray would be a nice color for the watering can. I headed to the local home improvement store and bought a can of Rust-Oleum gray primer. I wanted the paint to have a flat or matte sheen and I knew primer would give me that look.
")
After the primer dried I spray painted the sprinkler top with white spray paint. The original white was a little yellowed.
")
Next, it was time to do a little dry brushwork. To dry brush the raised flower details and other details on the watering can I poured a bit of white acrylic paint on a paper plate. Next, I dipped a small paintbrush in the paint and dabbed most of the paint off on a paper towel.

To effectively use the dry-brush paint technique, the paintbrush has to be really dry—so dry that you may think there is no paint on the brush. Dab off almost all of the paint, then run the bristles over any raised details.
")
Keep dipping the brush in the paint, dabbing the paint off, and running the brush over the details until they pop.
")
The can had a lot of details. I brushed white paint over the ribbed bottom.
")
Then I ran paint over any sharp edges and did a few light strokes over the body of the can. Dry-brushing does not have to be perfect. It is something to have fun with.
Dry-brush your project until you get the desired effect. If you overdo it, just repaint it with the original paint and start over with the dry brushing!

Now, doesn’t that can look much better? I probably should have gone for a galvanized tin look…..maybe next time.

As you can see in the photos, the dry-brushed white paint is perfectly imperfect. The watering can doesn’t look cookie-cutter……it’s one of a kind.

I may brush sealer over the paint just in case it gets wet, which will likely happen with a watering can.

I told you the project was simple and the tutorial short. What do you think of the watering can now? It sure doesn’t look like a $2 watering can now.
If you liked this post you will love this one…..Create Designer Style Metallic Gold And Clear Glass Vases
Leave a note if you have the time and thanks for being here, Kathy