Trash To Treasure: Thrift Store Lazy Susan Makeover
As an Amazon Associate, I earn from qualifying purchases.
Trash to Treasure Lazy Susan
This is the perfect lazy susan makeover if I do say so myself. The lazy susan got a coat (or two) of paint then I stenciled a colorful design over the whole thing. You guys know I can’t do decorative painting so stencils it is and the stencil design is soooo beautiful. I made a super short video showing my stenciling technique. And today is Thrift Store Decor Day. Yay! The tour group links are at the bottom of the post.

Lazy Susan Makeover
The stencil design is by Handmade Charlotte. The bold color selection is by yours truly.

It’s always nice to have a blank slate to work with. The ideas are endless. The lazy susan was $2 at the thrift store did it ever need a makeover.

I cleaned it up then painted it with FolkArt Coastal paint, color Sea Salt. I thought I wanted to go with an off-white color like the sea salt but that was before I picked out a stencil. I didn’t really know what the whole color palette was going to be.

Once I selected the stencil I knew the off white color was a bad choice. I needed a white white background. I pulled out the only white spray paint I had on hand and it was a flat white primer. I used that. Who wants to run out and buy paint in the middle of a project.

I picked out 5 acrylic paint colors I thought would compliment each other and grabbed a bunch of stencil brushes.
The name of the stencil is Suzani Splendor by FolkArt.

I taped the stencil down with painters tape and dabbed a bit of each paint color on a piece of wood (my palette). The paper towel is to dab the paint off of the stencil brush. Tip (this is the secret): Your stencil brush must be very very dry with just a bit of paint left on it so you don’t have big globs of paint seep under the stencil. That’s it!

I dab or tap the paint on the surface vs swirling. For this stencil I didn’t really plan where each color was going before hand, I just winged it.

Those colors just make me smile.

The multiple designs on the stencil sheet can be used separately or in a grouping. I stenciled the whole sheet in the middle (kind-of) of the lazy susan then I moved the stencil and painted designs around the edges of the lazy susan. I like running stenciled designs over the edges of projects or painting partial designs up to the sides. Doesn’t look so planned and gives it a designer look.
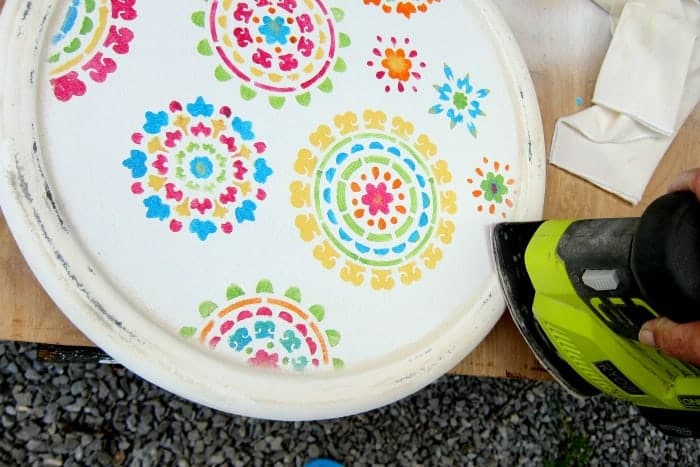
I’m not saying it’s super easy to stencil when there are raised edges and the stencil is stiff but it can be done. I have been known to cut the stencils to make it easier. I really didn’t want to cut this one up. Once the stencil was dry I used my handy dandy Ryobi battery powered sander to distress the outer rim of the lazy susan. I tried distressing by hand but the two layers of chalk paint and one layer of spray paint didn’t want to come off.

Not going to lie, doing the happy dance. The stenciled design is perfectly imperfect. And the color combination is a winner. I can come close to stenciling perfection if I try but that isn’t my thing.

I love all of the Handmade Charlotte stencil designs. I used the paisley stencil on brown kraft paper a few years ago and those wrapped Christmas packages were the stars under the tree.

It’s easy to see the stenciling process in my short video. Don’t worry, I didn’t video the whole thing. No one wants to sit through a 30 minute stenciling video. Click the video below….
Stenciling A Thrift Store Find – Lazy Susan Makeover

Are you ready to try stenciling a multi-color stencil project? It’s not difficult and as you can see it doesn’t have to be perfection. Just remember my number one stenciling tip. Find a piece at the thrift store or maybe you have something at home to take from trash to treasure using paint and a stencil.
 Alright, that’s my project. Time to see what the girls have for us today. Just click the links under the “before makeover” photo collage below.
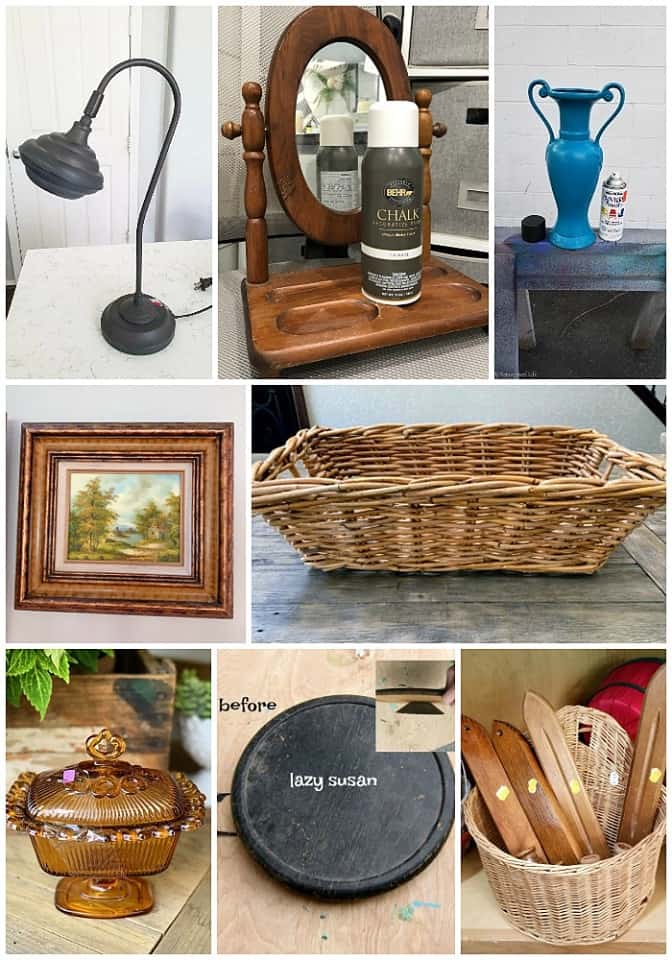
Chrome Desk Lamp Domestically Speaking
Table Top Valet Makeover Refresh Restyle
Over Sized Vase | Easy Thrift Store Makeover My Repurposed Life
Picture Frame Makeover Our Southern Home
DIY Painted Basket Makeover My Uncommon Slice of Suburbia
Repurposing Granny’s Candy Dish House of Hawthornes
Paint a Thrift Store Lazy Susan Petticoat Junktion (you are here)
DIY Towel Rack from Candle Wall Sconces Sadie Seasongoods
As always, thanks for being here and have a great day, Kathy

Love the stencil & the bright, cheery colors!
This is super cute, I love the stencil and the gorgeous colors you used!
SO fun and festive! I really love the results of using all those delicious colors on the stencil – it puts me in such a cheery mood!
Wow! Love it!
Ha!
This is so stinking cute! I haven’t seen these stencils. Thanks for sharing!
That is so cute and bright and cheerful! At first I thought the green thing was an iron and I was intrigued as to why you were ironing wood. Sanding makes so much more sense!
I bet you had fun making this!! Has your name written all over it.
Fantastic!
Kathy,
whoa! what an awesome change in that lazy susan. I love the colors you chose and the stencil.
pinned!