How to Paint Sealed Natural Wood Furniture Without Sanding
As an Amazon Associate, I earn from qualifying purchases.
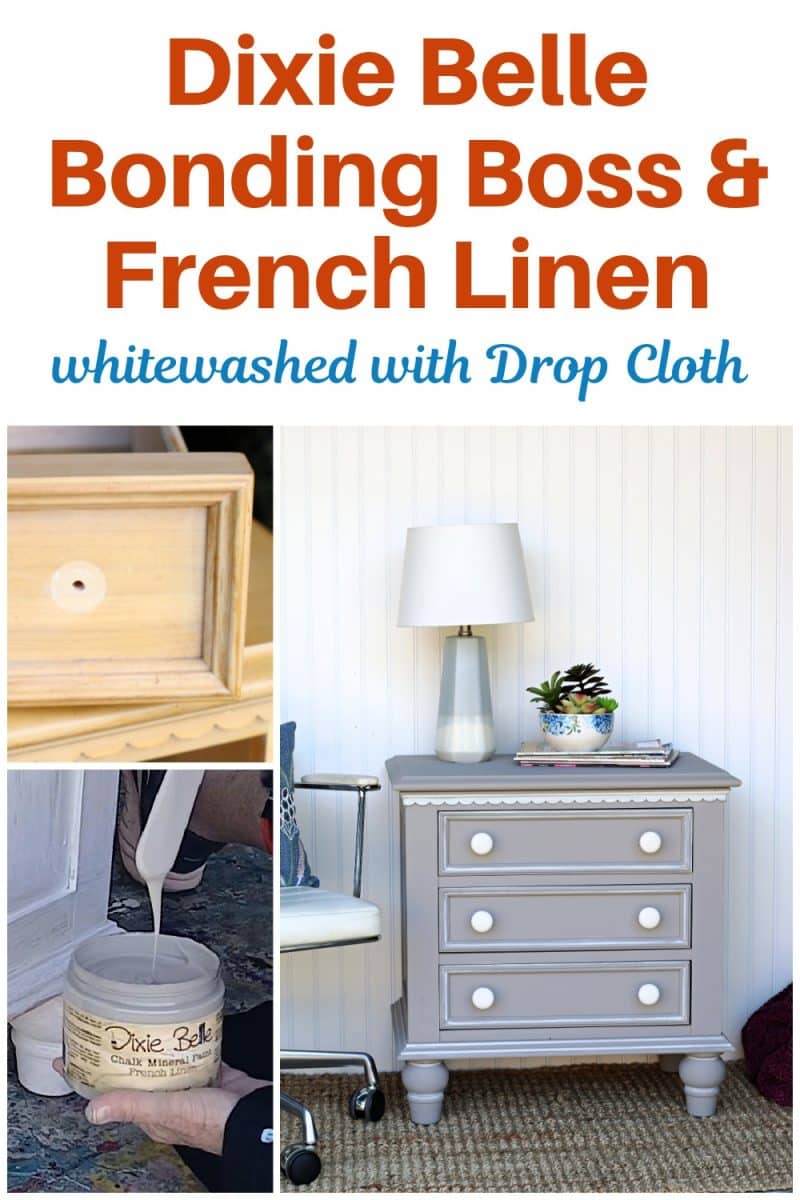
Painting and Whitewashing Natural Wood Furniture With No Sanding | Video Tutorial
How do you guys feel about natural wood finishes with a yellow color tone? Yeah, me neither. Making natural wood the star of the show is sometimes the way to go, but not for this little nightstand/table.
The finish was very yellow, and the wood was clear-coated. So, I painted the table a soft neutral color and the knobs a soft white. Then I whitewashed the paint to create a unique one-of-a-kind finish. My video tutorial shows every detail of the makeover, and I have step-by-step photos and instructions here!

The Furniture Project
I purchased the nightstand/side table at the local thrift/antique store where I have my booth. The price was $45, which wasn’t a steal by any means, but it was in perfect condition… except for the finish. I just can’t get past the yellow. The before photo isn’t the greatest. I don’t know how I messed that up.
")
The following photos of the piece better show the original color. You can see it was made by Broyhill, which is a fairly good furniture manufacturer.
Supplies for this Project:
Dixie Belle Boss
Dixie Belle Chalk Mineral Paint, French Linen
Dixie Belle Chalk Mineral Paint, Drop Cloth
Painters’ Tape
Dixie Belle Paintbrush
Furniture Prep For Painting
")
Always remove the knobs before painting furniture. It’s also a good idea to store them in a bag with the screws until it’s time to paint them. If new knobs for the project are preferred, then store the original knobs away for later use.
")
The clear coat or sealed finish became obvious once I removed the knobs. I guess they sprayed the sealer on the table after the knobs were in place
")
Cover the screw holes on the backside of the drawers with painters’ tape to prevent paint from leaking into the drawers. I always stand the drawers on their back ends to paint the fronts.
The Bonding Agent
")
The table didn’t need much cleaning. I just wiped it down inside and out with a household cleaner. Once that was dry, I brushed on one coat of Bonding Boss.
Bonding Boss
Description from Dixie Belle — a versatile solution that seamlessly combines bonding and stain removal in a single product! Our primer, aptly named Bonding BOSS, is the result of a unique marriage between Slick Stick and BOSS, creating the ultimate powerhouse for your painting needs. For added assurance against wood tannin bleed-through, especially under whites or light colors, and for superior bonding durability, we strongly recommend incorporating our Bonding BOSS into your painting routine.
")
This is my first time using Bonding Boss, and from now on, it will be my go-to primer. It really bonds and creates an amazing foundation for the top coat, plus it prevents stain bleed-through when painting old furniture.
")
The photo of the Bonding Boss above shows that it didn’t take much to cover the table. The Boss is available in gray and clear. I’ve always preferred gray under most topcoats except for white and very light colors!
The Paint Color – Dixie Belle Chalk Mineral Paint, French Linen
This color is the perfect neutral. Not too gray and not too brown.

Dixie Belle describes it as – a serene light taupe with a warm, weathered blend of brown and gray. This subtle yet sophisticated color enhances the ambiance of any space.

I applied two coats of paint for full coverage.

This is how I paint furniture drawers: standing on their back end, with the knob screw holes taped on the back of the drawer front so the paint doesn’t seep into the drawer.
")
I hardly ever paint the backs of my furniture pieces, but this one was finished so nicely that I decided it needed paint. Who knows, its placement in the room might make the back visible, or maybe use the back as the front??
I didn’t prime it with Bonding Boss since I was in the middle of applying the paint.
The Furniture Knobs
I went through my stash of knobs and also checked Hobby Lobby, but didn’t come up with any good alternatives to the original wood knobs.

So I brushed on a coat of Bonding Boss and then two coats of Dixie Belle Chalk Mineral Paint, color Drop Cloth. This is my favorite off-white color.
Whitewashing the Furniture

Mixing Whitewash
The furniture and knobs are painted and dry; now it’s time for the whitewash. The first step in whitewashing is to mix your white (or whitish) paint and water in equal parts.

Applying the Whitewash
It doesn’t take much at all for a whitewash project. I mix up about 1/4th cup, and it probably takes less than a tablespoon of whitewash mixture to do a table like this one.
Every piece I whitewash is different. They have different details, such as appliques, cut-in trim, and turned legs. Always whitewash the details first, then, if you like, move on to whitewashing the entire surface.
For this table, I started by dipping a small artist’s brush into the whitewash and tapping most of it off. Then I ran the brush over the raised area above the scalloped trim.
Take a look at the video for more details.
For the scalloped trim, I ran the whitewash over the trim, then wiped it back with a lint-free rag. These photos are snapshots from the video, and the one where I wiped the whitewash back is all blurry. But there is another photo below of the same process. You can see all the makeover details in the video tutorial!
Whitewash the Details

Anywhere there was a small dip or edge, I applied the wash with the small paintbrush.

Then I wiped it back with my lint-free cloth (old sheets are great for this).

The drawers had a thick border, and I whitewashed it all on the first drawer. I set the drawer back in place to see how the wash looked with the finished body and decided it was too much white. I painted over the whitewashed areas, then lightly brushed the outer edge with white and smudged the wash with the rag.

All that was left to do was put the knobs on. The perfect contrast!
")
To say this was a total transformation is an understatement. I really enjoy these projects. The finished look is so different from the original.

A look at the back leg. One thing I always talk about is making things perfectly imperfect. When whitewashing or even distressing furniture, it isn’t necessary to make every detail match.
For one thing, there is no way to perfectly whitewash all the details the same. And when you stand back and look at the piece, everything flows nicely.

You might think the whitewash process takes a long time, but it doesn’t. The process took me about an hour, but I was filming the video and had to stop and move or readjust the camera continually.

There wasn’t even a question about painting the back of the table once I saw it was finished like the rest of the table.

The whitewashed scalloped detail really pops. It needed highlighting.

Favorite Dixie Belle Products:
Dixie Belle Website
Dixie Belle Boss
Scrubby Soap
The Belle Paint Brush
Gold Gilding Wax
Peacock Chalk Mineral Paint
Roses Silkscreen, Belles and Whistles
Terra Seal Matte Finish</div?

Please leave a comment. I read every one and try to respond to all of them!

As always, thanks for being here, Kathy