The Best Way To Paint Damaged Furniture
As an Amazon Associate, I earn from qualifying purchases.
Painting damaged furniture and distressing the paint will play up the flaws in a beautiful way.
Do you guys know why I distress so many of my paint projects? It’s because distressed paint hides furniture flaws. The furniture I buy to paint usually is not in the best shape. There may be missing veneer, dings in the finish, chipped corners, split wood…….just to name a few possible condition issues.
I can’t spend an arm and a leg on good furniture to paint because I could never recoup what I have in it after the makeover. If the furniture is in good condition, I usually will not paint it, so I get the beat-up stuff.
The cedar chest for my makeover today definitely needed help. Today is Furniture Fixer Upper day, and we have some great project tutorials to share.

This is how the Lane Cedar Chest looked when I brought it home. It came from my favorite junk shop. I can’t remember the price, but it was probably around $20. The chest had a padded top at one time. I have a similar Lane Cedar Chest with a padded top, and I re-covered the top not too long ago (here).
The padded top is a separate piece that just screws to the wood top of the cedar chest. The top on this one was gone and I just needed to fill the screw holes before painting.
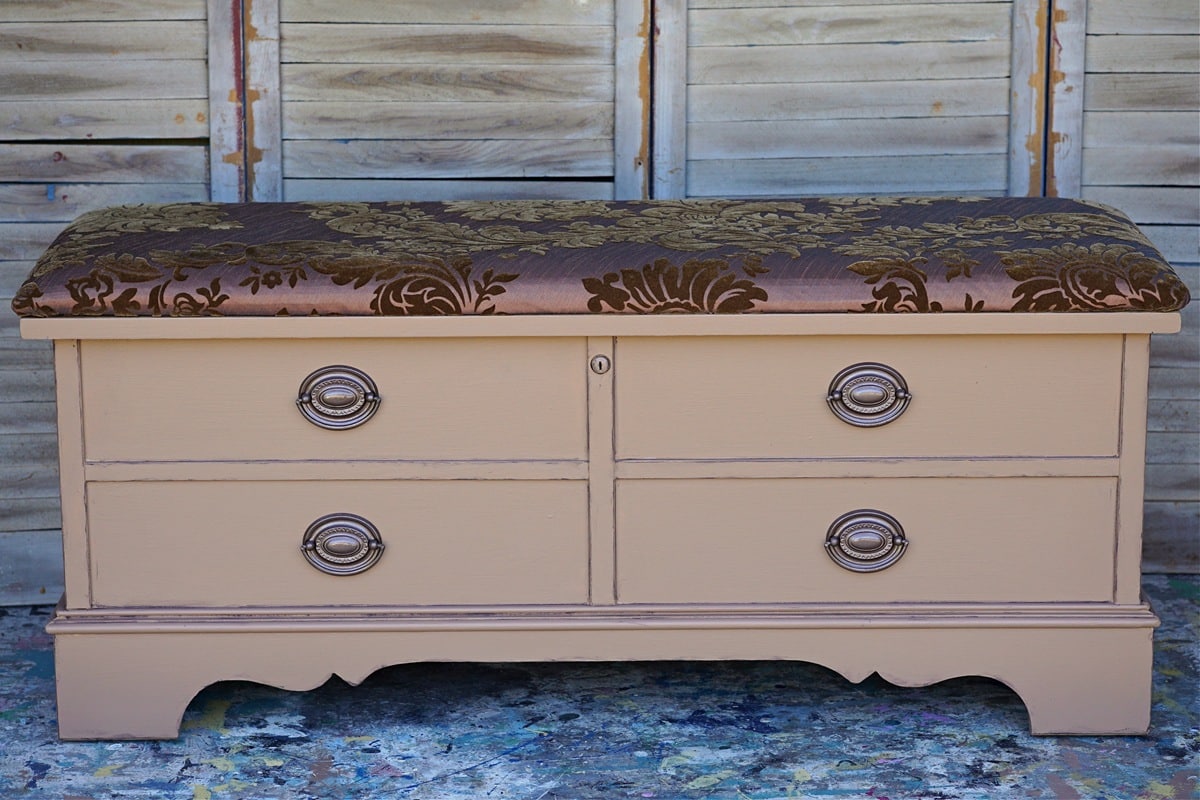
This cedar chest looks great now. The neutral color I selected will fit in just about any color scheme. The paint color decision has a good story behind it.

The metal latch plate had come off of the chest top. The JTS worked on that for me, and now the latch works. There is no key, though. I put painter’s tape over the screw holes on the inside of the top so wood filler wouldn’t seep inside the chest.
I used Elmer’s Wood Putty to fill the holes. Once it was dry I sanded it flush with the wood. Originally there were two drawer pulls on the front of the chest. At first I planned to replace those with a couple of cool looking pulls. On second thought I decided to just fill those holes too. Makes the front of the cedar chest more modern looking.

I applied a coat of Glidden Gripper tinted gray as a basecoat. The plan was to paint the cedar chest a pale gray. I found a can of semi-gloss white paint and added gray to it from another can of paint. Still trying to use up that paint stash. The bottom photo on the left shows where I started applying the pale gray over the dark gray primer.
The pale gray was really pale. I painted the whole chest then decided it was too pale for me. Back to the paint shelf. I found a jar of FolkArt Home Décor Chalk color Castle. That is the color on the right photo. It’s gray with a slight brown tint. The color is really warm and I like it a lot.

The photo above shows the Castle color on the bottom of the chest and the top still painted the pale gray.

I distressed all the flaws and edges of the cedar chest. The bottom board on the chest was a bit chewed up where the corners met and the top where the padded top came off had several funny indentations around the edges. More good things to show some distressing love.

I sanded down to the original finish in some areas and in some just down to the pale gray paint. A distressed paint finish has depth and character.

I really do love the color. I need to get more of the paint. What do you guys think? Like the color? Like the distressed look? Having a great week so far? Just wanted to see if you were paying attention.
You need to see this cedar chest I painted using the Vaseline distress technique. It’s a doozy. Click the video below the paint colors are amazing…..
Vaseline Paint Distress Trick
Time to take the Furniture Fixer Upper Tour. Leave me a note please before you head on the tour. I love to read your comments. Just click the text links below the “Before Makeover” photo collage.

Two Simple Furniture Makeovers – Girl In The Garage
Thrift Store Dresser Makeover – Confessions Of A Serial Diyer
DIY Clock Face Table – Prodigal Pieces
Beach Finish Furniture Paint – Just The Woods
Decoupaged Napkin Serpentine Dresser – The Interior Frugalista
Distressed Paint Hides Furniture Flaws – Petticoat Junktion (you are here)
This is a safety alert from Lane…..Since many of our cedar chest products have withstood the test of time and have been in homes for decades, there have been cases where children have climbed inside chests with old style latching mechanisms and locked themselves in, and there have been incidences of suffocation inside chests. The chests require the new lock upgrade. Please click here for more information
As always, thanks for being here and have a great day, Kathy


Maybe when I get tired of it I’ll ship it to you. Don’t hold your breath though 😉
Kathy, the chest turned out perfectly distressed and beautiful – but I especially LOVE the suitcase on top! If I was closer I might have to steal it from you! 😉
Kathy,
Absolutely love the color! My day is great. You did a beautiful job on this beauty from Mr. B’s? I need to contact Lane asap. Thanks girlfriend you learn something new every day.
Keep brightening the world,
Karen Marie
Cece, thanks for the information. I did not know that you could be fined and the piece confiscated. Very serious. Passing along this message help all of us.
Oh gosh, thanks so much for the information. I need to do that before I take it to the shop.
Thank you for mentioning this. I own a Brick and Mortar and have been visited by the State looking to make sure we aren’t selling Cedar Chest with these old locks. Fortunately we were aware of the replacement latches and had replaced the latch on the one we had for sale, otherwise they would have confiscated it on the spot and fined us heavily. And yes there have been several children that have suffocated inside these old cedar chests. I don’t want that on my conscience. Contact Lane Cedar Chest Company and they will send you a free conversion kit. It only takes a few minutes to change it out! Be safe, not sorry!
The color is beautiful – it could become a new favorite. The chest is fantastic now!
what a great makeover Kathy!
I like it! Looks nice!
The warm grey is lovely and the distressing gives it so much character – another great makeover Kathy! I’m having a very productive week. Hope your week has been a good one 🙂
This turned out great, Kathy! Love this warm gray tone, and I’m having a great week so far…thanks for asking! 😀 XO
Kathy, just a note about the Lane cedar chests- you can get a free replacement latch and lock by emailing Lane. The original latches are self locking and children have suffocated inside. The company strongly recommends everyone replace them with the free safety latches they will send out. Sorry to be a “buzzkill” but everyone should be made aware of this. Off my soap box now, I love what you did to the piece! Great color.
Grey was a brilliant choice! Great work!
If I was ever in your neck of the woods, close to where you sell your pieces, I would fill up a truck and bring them home. I love how you paint and distress!
I also love to read about you and your friends on trash to treasure.
Hi Kathy, I’m having a great week, and I hope you are too, lol!! This chest is so pretty, and I do like the colors that you layered onto her. I agree with you about leaving the pulls off, it looks fresh and more modern!!! Well done!!
Who doesn’t love a blanket chest, right?! Your choice in a soothing gray is perfect for this pieces, Kathy. Love it!