How To Add Color To Walls With Wallternatives Wall Decals
As an Amazon Associate, I earn from qualifying purchases.
Wall Decals
Wall decals are my new best friend. They are easy to apply and can be removed when you get ready for a new look. I selected dot decals and applied them to the bathroom wall.

How to add color to walls with Wall Decals
You guys know I paint furniture and make crafts from recycled junk but how often do I redecorate…..huuummm. The answer is….. not very often. I got the bug to redecorate at least one room when I met the Wallternatives™ girls at Haven. I was drawn to the booth immediately because of the color…lots and lots of pretty color. They asked me to review their wall décor products and I jumped at the chance.
There is one room in my home that has just bored me to tears for a couple of years now….

this bathroom. Our home was built in 1965 so the bathrooms are tiny. This is the main bathroom! I’m letting it all hang out here because this is how the room looked the day I decided to go to work on it.

The first thing I did was remove every bit of décor from the room except for the shower curtain. The colors in the shower curtain are my color palette for the makeover.

I ordered the Dots Vinyl Pattern Pack Minis: 72 shapes in three colors. I got 72 Teal dots, 72 key lime green dots, and 72 silver grey metallic dots. They came all nicely rolled up with each color on heavy backing paper. Every order comes with a squeegee for burnishing the decals to the wall.

First thing I did was cut the dots apart and tape the paper squares to the wall so I would have some idea of placement. As you can see I also added dots to the curtains.
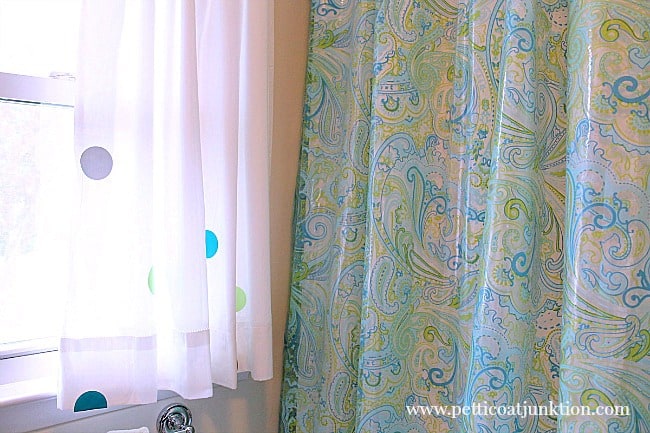
I used spray starch on the curtains and they were new so I’m not sure the dots will adhere for long…we’ll see. The decals aren’t meant for placement on fabric. Ya’ll know I have to be different!

When I had the dots mostly where I wanted them I peeled them off the backing and applied them to the wall. Since the dots are small I used my finger tips to secure them to the wall. I bet the squeegee comes in handy for the larger decals.

That was it! The decals were easy to place on the wall and the humidity and steam from the bathroom want affect them. They can be easily removed from the wall for up to 3 years. The decals added that fresh pop of color my bathroom needed….no painting required….yea!

I hung a few painted frames and other accessories to finish the room. The dots are really fun! There are 20 colors to choose from and I think my color selection was right on the money.
Every time I walk by the bathroom doorway…I smile. The bathroom isn’t boring now. I used 90 dots so I have a lot of them left over. I think I feel a furniture makeover coming on.
I’m going to be ordering the Summer Days Flower Vinyl Wall Decal and the Antique Keys Hardware Vinyl Wall Decal Set to use on furniture. Can’t wait….I think they’ll be perfect! I’m sure I can use them on furniture! {think outside the box}
What do you think of the bathroom makeover? What do you think about the wall decals? I found this article on maintaining walls and windows helpful.
I can tell the hubby is feeling better because he was teasing me about seeing spots (maybe bathroom dots) the other day. No he wasn’t having problems from the surgery…he was just making a joke. Thanks for stopping by and have a great week, Kathy
{disclosure: I was provided product for this review. All opinions are my own}


I like your style, it is very similar to mine and mine is definitely eclectic. I love old rusty stuff and I love enamel pots and pans and the list doesn’t stop there.
This came out amazing! I love the thought of using these so much, you get the fun design on the walls without the hassle of removing wall paper or painting over paint. The dots are so adorable I would love a wall or two like this in my house!
The dots are so bright and cheerful! The frames just take it over the top! I love the idea that they are removable.I know how us creative people get tired of things easily and this makes it so easy to change!
It looks great, Kathy! I love the pops of color. And the frames look awesome.
Wow! Great impact with not too much effort. I REALLY like the new look. AND, I can not resist polka dots. Thanks for your tips, Kathy.
These are awesome! My youngest son saw your pictures and now he wants us to put these in our bathroom. Such an easy way to add impact to a space.
What fun!!! I love this idea. What a quick and easy way to update a room! ~Christy
Super cute! What a great idea, and I love how you added the frames, looks GREAT!
Blessings,
Cindy
The bathroom has a completely new look and I love that it was so easy to transform.
And I agree, the colors you chose are right on the money.
That’s a great idea Paula. I got gold stars at Haven….
Thanks JaneEllen. No one really says any thing about the empty frames. I’ve been doing it so long I may have forgot the questions! Yes the hubby is doing better but still has a long ways to go. Thanks for asking.
Great post Kathy, the dots almost look like they’re floating on the wall. The empty frames really set whole design off, love how it looks. Like how you put one color dot over another somewhat.
I might just be interested in getting some of those Wallternatives, cute idea for simple/quick redo.
I am enamored of empty frames right now but seems anybody that sees them asks me why the frames are empty. Not like it’s a new idea but you’d sure think so by reactions I’m getting. Does anybody (except for your hubs that must be used to it) ever say anything to you bout empty frames?
Sounds like your hubs is feeling better if he noticed dots on wall. You did great job varying their positions on wall. Hope they stick on your curtains. Happy week
Great choice on the Wallternatives! They make the room look happy & brighter:)
Such a cute bathroom! The Wallternatives are awesome!
Your bathroom looks great! The dots add whimsy to the room and color, too. I’m using the gray dots that I got at Haven to label the cabinets in my classroom.
I love the dots- so fun! Genius idea adding them to your curtains too, it really pulls the room together. Love your shower curtain too- I’m glad you kept it!
LOVE this Kathy! I am heading to check some options for a project I have! ~Sonay
glad jts is feeling better,for him and for you…the bathroom looks great decals are a lot easier than painting huh xx
This is super cute. I love dots. And it looks pretty easy for the decorating impaired.
I think the decals are great, especially if you want different colors and you don’t want to invest the money in paint and stencil, that can be really expensive, especially if after you are done and you don’t like it. I love your dots and the frames and the curtains. If the dots don’t stick to the curtains maybe you could use some fabric glue. The JTS has got his since of humor back, so he definitely is on the mend, that is good news. I love it when you post new ideas that we can use in our own homes. Thank you.
Love the dots Kathy! Good to see the JT getting his sense of humor back. Has to bring a little sense of relief for you 🙂 Have a gorgeous day!
Kathy, I love this idea, and I think putting decals on the furniture will also be marvelous. Your JTS is funny…seeing spots…hahaha. Connie
Great idea for a university dorm room!