2 Simple Updates Make Your Front Door More Welcoming
As an Amazon Associate, I earn from qualifying purchases.
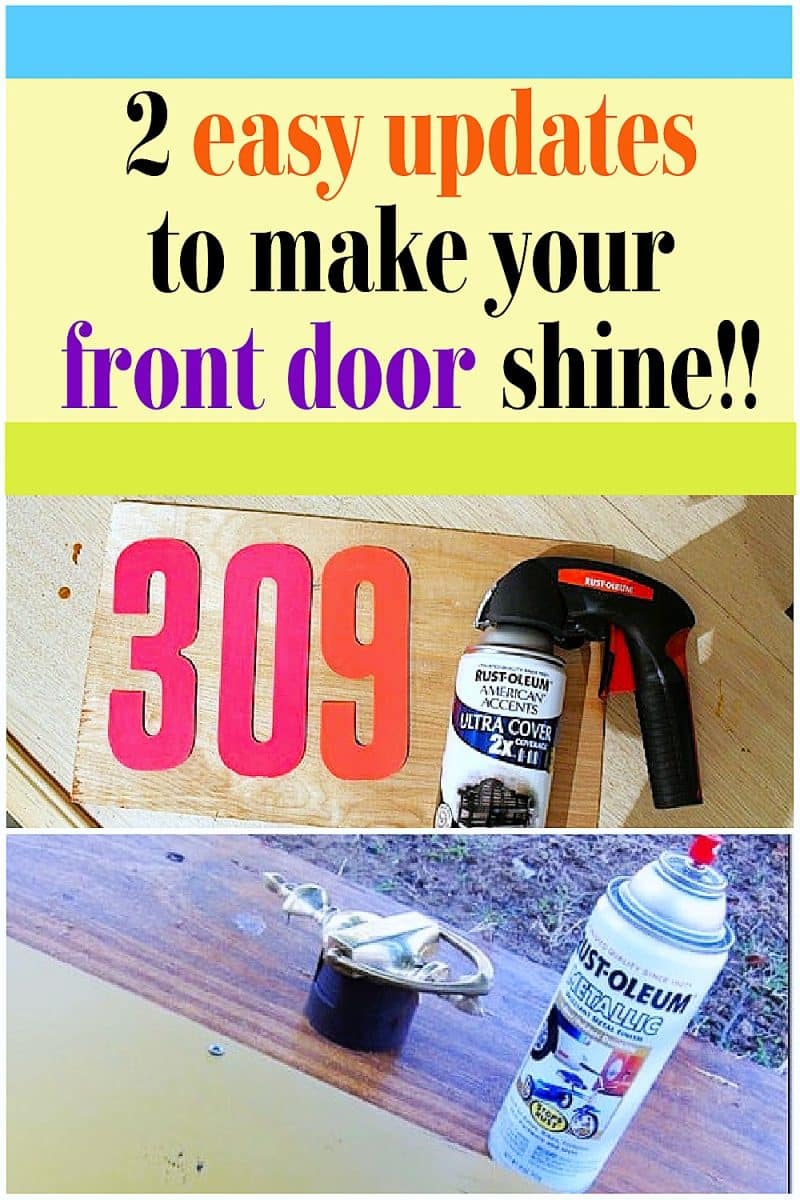
It’s easy to spray paint outdated, shiny brass door hardware. The door knocker, kickplate, and even the door knobs look old and worn after 40 years.
This inexpensive front door update will make your neighbors envious. Painting various items on the exterior of your home is a simple way to enhance its curb appeal. I have several budget front door update ideas in this post.
No need to worry about “Can I do this?” if I can do these projects, you can too! I also included a short video in the post showing the best way to paint louvered doors and shutters.

Like the Red Door? I did 15 years ago when I painted it this color. It’s time for a change. A few posts ago, I shared with you how the Junktion Technical Specialist painted the window shutters.
While the shutters were being painted, I was painting the door and the outdated hardware.

I like having a door knocker, not that anyone ever uses it. I think it gives the door a little pizzazz! But the shiny brass had to go, too out dated.

The kick plate was added to the door when I painted the door red.. I also think this detail adds a little something extra to the front door. Now the dust…..that’s another story.
We’re back-door people, so I hardly ever look closely at the outside of our front door. Does anyone else have a dusty front door? Go take a look. Surely I’m not the only one.
I’m rethinking the kick plate, although it’s still there. Are kick plates out of date? Maybe the next time I paint the door, there will be no kick plate.

Rust-oleum Metallic Spray Paint covers great and it adheres well to the brass. I used the same Antique Brass finish. This is the same spray paint I used for the hardware on my Hepplewhite Style Sideboard.
[amazon box =”B082QMZTJW”]
I spray painted the kick plate and the other door hardware. Lots of tiny screws in the kick plate and the door knocker. Ummm….how to spray them without getting paint on the threads? I came up with a simple solution.
If you are not a fan of the antique brass, choose copper, black, or even hammered bronze. Do your own thing.
I took the lids off several spray paint cans and laid the kick plate and the knocker flat on the lids to raise them up. Then, I set the screws into them, just as they would screw into the door.
And that’s the way I spray painted both pieces. Brilliant, if I do say so myself! I’m sorry this picture doesn’t show that very well.

The kickplate in a rich antique brass color. I suppose that when I post about painting the door, the color won’t be a surprise.

Wow, I like the Metallic Antique Brass. It’s so different than the outdated, shiny brass.
Now, it is time to add house numbers to your front door. This is an excellent idea for many reasons. Prominent house numbers are a big help if emergency vehicles need to find you! Also new friends and family from out of town!

These are chipboard numbers I purchased at the Nashville Flea Market a couple of months ago. I shopped in several stores looking for wood numbers for the door, but I could never find the right size or style.
The chipboard numbers were 3 for $2, and I thought they might work. I got out my spray paint and painted them black.

I found some tiny nails, grabbed my nail punch and hammer, and nailed the numbers to the door.

Black, why did I paint them black. That’s what I asked myself after I nailed them to the door and backed away to get a good look. I suppose in the back of my mind, I had the idea that all house numbers are black.
Anyway, I had already nailed the numbers to the door, and since they were made of chipboard, I knew I would probably tear them up if I tried to pry them off.
I found the brown paint that we used to paint the house shutters and repainted the numbers, leaving them in place on the door. Yes, it was messy. Those numbers were not very thick at all so I made a mess on the door. I had to take a wet shop rag and wipe brown paint off the door. It wasn’t an easy process.
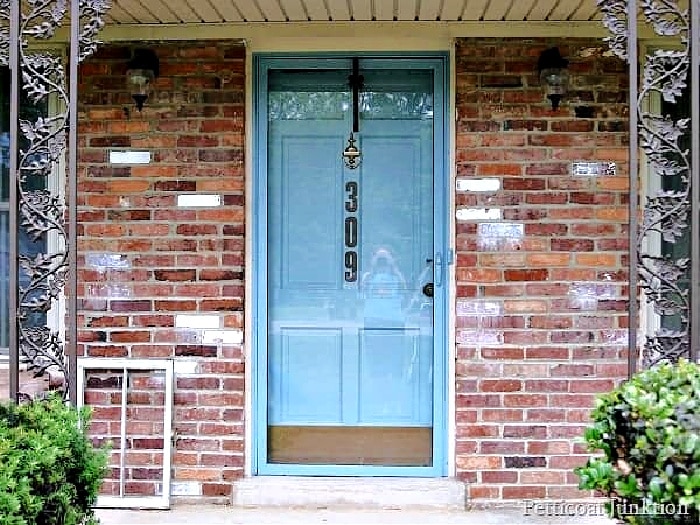
It was a pain in the butt, but the numbers on the door look great!
Time for more budget front door updates….. You won’t believe the difference this simple project made in the house’s curb appeal. The white framed door was a stark contrast to the blue front door.
This metal frame was painted four years ago and still look like new. The complete tutorial on painting a metal storm door can be found by clicking here.

Another simple update is painting the house shutters. This project was completed in one afternoon. For all the details click here.

Watch our video on the best way to paint shutters and louvered closet doors below…
[adthrive-in-post-video-player video-id=”HkpeW5mC” upload-date=”2019-07-02T03:10:50.000Z” name=”The Fast Way To Paint Louvered Doors” description=”How to paint louvered doors with a paint sprayer” player-type=”default” override-embed=”default”]
How To Paint Louvered Doors And Shutters
Update to this post. Funny Story
Notice anything? One of my dear readers Leslie left a comment for me and she asked really nicely, like I might get offended, “is your knocker on upside down?” What?
It was about 10 at night and dark and I was all curled up on the couch so I just looked at the picture instead of going to the front door. Then I looked up some websites that sell door knockers and guess what…..it is on upside down.
This is how the door and knocker looked for the past 15 years before this latest paint job. It’s been on upside down for that long! I went outside this morning to put it on right, but I had stripped the screw head on one of the screws and was having a heck of a time getting it out.
That’s when I said to myself “You know Kathy, I think it looks better this way”. So that’s the way it is! Was I offended that Leslie would ask me that question? Not a bit. You have to be able to laugh at yourself.
So now, when I look at my front door or these posts, I will just have a good laugh and think about Leslie and her sweet comment.
Some of you have commented on my spray paint racks, so I thought I would give you the low down. They were free…can’t beat that. My son, Jay, got them from a friend. The place where his friend works was getting rid of these heavy-duty metal shelving units, so I got the goods.
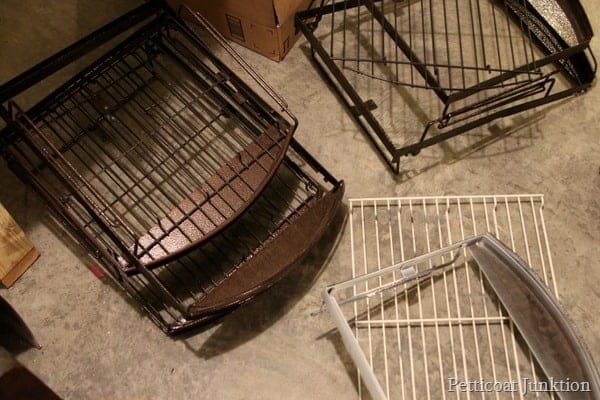
I first thought of using them to help organize some of the stuff in the workshop. Yeah, we know that’s not going to happen. But I couldn’t figure out how to use them because they need something to hang on and they are really heavy.

Well, one day I was looking for something to use when spray painting some furniture hardware. I took the wire racks off of the metal shelves…..perfect. There is a raised lip on the racks so the hardware is suspended off the table.
The shelf lays flat and doesn’t fall over. I always spray paint the hardware on my work table outside or place the rack on a piece of wood outside. I don’t want to get the paint on the grass. The rack is perfect for spray painting other small items too.

I use one of the racks to dry paintbrushes, foam stamps, stencils, etc. I just place a couple of shop rags and the rack under the laundry sink in the workshop. You could also use metal cookie racks; maybe you can find some at the thrift store?

This article was originally posted on Petticoat Junktion in November 2012. The article has been updated with new information on photos.
As always, thanks for being here, and have a great day, Kathy
I think your front door looks great! So funny about the knocker – I would have done the same thing, I’m sure. Ha!
It still looks like new Gretchen!
Hello there!
I love it!Looks great ! I was wondering how the paint is holding up in the weather?
Saw this at the perfect time for my next project! Thanks!
Did you also paint the door knob and lock? How did that work?
LOL, my husband was practicing with the engraving tool. It didn’t turn out too hot so I painted over it!!
Di I see that is engraved ? I would like to try this, hoping to hide the name engraved?!?! Thoughts?
That’s a great idea Sheri, I’ll have to try that next time.
Forgot to mention how I paint the screws . . . . I used a plastic flower pot (the ones plants are purchase in), turned it upside down and put the screws through the drain holes!
That looks nice. Love the new door color, too.
boy, do I feel stupid!! It is upside down. And it’s always been upside down, that’s the really bad part. Thanks for drawing it to my attention. Oh, well, at least I’ll give people something to laugh about. I guess I’ll have to put it on right tomorrow. Or….. maybe not. I might just leave it like that.
Hi! Love your blog. Love the colors, but is your knocker on upside down?