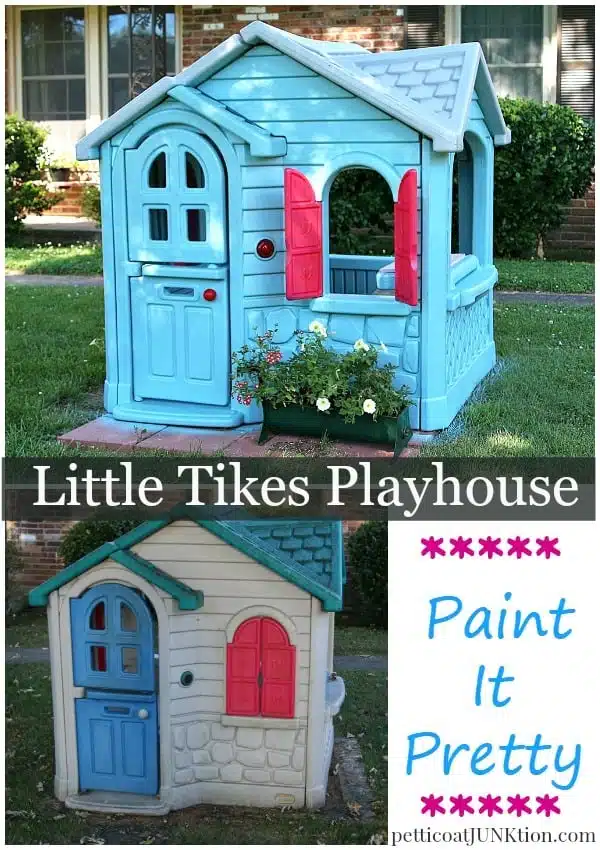
How To Paint A Plastic Playhouse Using A Paint Sprayer
As an Amazon Associate, I earn from qualifying purchases.
What kid doesn’t love a playhouse? I never had one when I was growing up….soooo deprived. Our neighbors gave us this playhouse about 10 years ago. It was a hand-me-down from their grandson.
Our oldest granddaughter, Tenley, was two or three at the time, so we were thrilled to get it. That was about ten years ago.
How To Paint A Plastic Playhouse
When we set the playhouse up in our yard, the telephone didn’t work, and the “cooktop” was a mess. At that time, Little Tikes had replacement parts for the playhouse. I ordered the two parts, and the little playhouse was as good as new.
Ten years down the road and one extreme paint makeover for the Little Tikes Playhouse and it is better than new. Our youngest granddaughter, Sofi, is four, and she loves the little house.

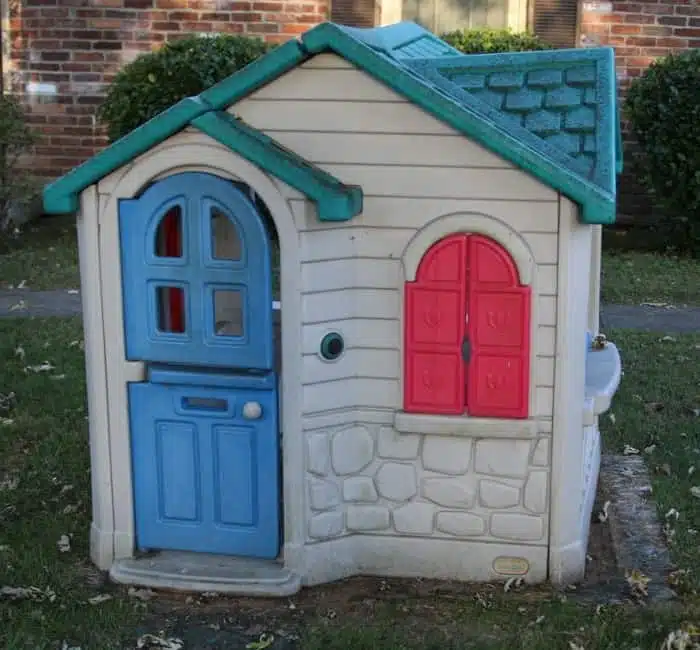
This is how the house looked before the makeover. It was covered in mold, and you can see the condition of the “cooktop” in this photo.
Materials list for the Playhouse makeover:
Primer
Paint ( I used Glidden Latex Paint & Primer in one)
HomeRight Finish Max Paint Sprayer
Red Spray Paint for door knob and door bell
Frog Tape
Polyacrylic Sealer ( I used Minwax water-based interior because that’s what I had on hand)
Step 1. Remove the shutters, door knob, and doorbell/telephone combo
The best way to paint the house is to take it completely apart. Start with removing the small items and set aside to paint later.
Step 2. Disassemble the house

The JTS (also known as The Junktion Technical Specialist, or hubby) took the playhouse apart. It only took about 30 minutes to disassemble the house.
Step 3. Pressure wash all surfaces
If you do not have a pressure washer, then use a garden hose with a sprayer attached and a scrub brush. The pressure washer is the best way to go if the playhouse had been weathered for years.

Step 4. Paint the underside of the roof
I selected gray for the roof and a soft cape cod color blue for the “siding.” The blue is an Oops paint I bought at a local home improvement store. I started the underside of the roof first.

Glidden Gripper Primer tinted gray is my go-to primer. I decided the gray primer would be the perfect color for the roof, so I went with….primer.
Step 5. Paint the rooftop

I used my favorite DIY tool for this makeover….the HomeRight Super Finish Max Paint Sprayer. I sure wasn’t going to brush this thing by hand. Look at all those angles and grooves, no way.
It took no time at all to spray the roof. I painted the bottom side of the roof first, then turned it over and sprayed the top when it was good and dry.
What happened next…the weather. I painted the roof at the end of October then the weather turned awful. I didn’t finish the playhouse makeover until this month June. During the winter,
Sofi asked if we could paint the house, and I had to keep saying no. She also wanted it to be a castle when we put it back up, but that’s another story!

Step 6. Paint the inside of the house
This photo was taken outside our workshop doors, where I usually spray paint things. You can see the playhouse leaning against the tree in the background. That’s where it stayed for 6 months.
Needless to say, the JTS had to power wash it again before I could paint it. All this time, the roof had been taking up space in our workshop because I didn’t want it to get dirty before I sealed it. I was going to apply the sealer after the whole house was done.

Moving on to June and I’m finally painting again. I worked on the inside of the house, first spraying it with white primer. After the primer dried, I applied the Cape Cod Blue color.
Step 7. Put the house back together
At this point, I decided we would put the house together and then paint the outside.

The JTS and I set the house up and I applied the blue paint. As shown in an earlier photo,
Step 8. Paint the outside of the house
I primed the inside of the house before applying the blue paint. I decided the coat of primer was overkill since the blue paint contained primer. I did not prime the outside of the playhouse.

The paint sprayer is such a time saver. I painted the outside with a couple of coats of paint in about 10 minutes.
Step 9. Spray on polyacrylic sealer
When the paint was dry, I applied the Minwax Polyacrylic sealer. Yes, you can use sealer in the paint sprayer.

Step 10. Paint the shutters a contrasting color
You may have noticed that I painted the house with the shutters attached. We couldn’t get the shutters off when we took the house down. I was afraid to pull on them too hard, thinking they might break.
After we put the house back together,I did a Google search and found a forum (somewhere, can’t remember where) that said to pull up on the bottom of the shutter while pushing down on the base of the house.
Our son was visiting, and after reading how to remove the shutters, I was determined to get them off. I didn’t like the shutters being the same color as the house, and they were too difficult to brush paint with them attached.
Between the three of us, we got them off. Yay! I sprayed the shutters with Simple Green and scrubbed and scrubbed till I got the blue paint off. They were the perfect color to start with. That was a lot of work that could have been avoided. Remove the shutters before painting….you’re welcome. They snap right back on.
Step 10. Spray paint the doorknob and doorbell

I found a pretty red spray paint in my stash and used it to paint the doorknob and doorbell. I wrapped Frog Tape and a plastic bag around the telephone part and just painted the outside doorbell red.
Step 11. Reattach the shutters, door knob, and doorbell

See, isn’t that cute? The interior is so clean and fresh now.
Step 12. Accessorize in your own unique style and enjoy!

Sofi is happy as can be and has forgotten all about the castle thing. Thank goodness.I placed a couple of my junk stash planters under the windows and Sofi waters the flowers when she’s here. The rest of the time, I get to do it.

We had a few concrete pavers left over from another project so that is the floor of the playhouse. The playhouse has been painted and up for a month, and the paint hasn’t peeled, chipped, or bubbled. I’m happy.

I love this project. Yes, I’m patting myself on the back and having a piece of chocolate. As you can tell, Sofi is happy too. The colors are so much better than the original color scheme.
The telephone and doorbell still work, but the cooktop was trashed. I called Little Tikes customer service, and they informed me that they no longer manufacture the replacement cooktop.
I’ve searched eBay and Amazon without any luck. If anyone can help with this, please email me. I’ve found stickers that might work, but I still hope to find a cooktop just like the original.

It was cheaper to paint the house than to buy a new one. And I have to admit it gave me a sense of accoomplishment and made me smile once the project was completed.
When researching for the makeover, I noticed that moms and dads paint all sorts of Little Tikes products. Who knew? We have a small Little Tykes slide I bought at a yard sale that might be my next project.

Are you ready to tackle a Little Tikes Playhouse extreme paint makeover? I have a few tips and tricks to help you tackle the project. I learn through doing so that the job will be much easier next time.

As always thanks for being here, Kathy
I love that! It turned out so cute and your granddaughter will have many happy memories playing in it. ?
I’ve wanted to find a cheap playhouse to update for my boys for a while, but I’ve been unsuccessful. Love this update, thank you for sharing at Merry Monday!
You did an amazing job.
Just precious!
Thank you for sharing this at Thoughts of Home. We are so glad you are here.
I have metal outdoor tables in need of painting
I have signed up and have e-mail
I’m in love with every thing I saw at your site. I’ m newbie here congrats.
Will be coming back.
Hugs,Marcia
is it named after the delight full series on T.V
oh, goody! I was thinking of those other rafflecopters that count each entry as you go to each facebook page, pinterest page, etc. Good to know! Thank you so much!
It says that because it just counts the entries for that day. It is taking your entry everyday
Kathy, just to let you know, I tried again yesterday, and I entered again today (just now) but it’s not taking…. still says I only have one entry. I’ll put all my hopes in that one little entry! 🙂 It could happen! Thanks again for giving us the opportunity to win this. It’s a great idea!
I NEVER would have thought to paint those plastic houses!!! OMG! Our backyard would have looked so much better if I had read your post 10 years ago. LOL!!! They get so ugly and faded so quickly. LOVE this idea and I’m passing it along to my Sister for her two daughter’s playhouse!!
Hi Patty, I am checking on it. I clicked the tab to add an entry everyday but something may have happened. Please check back later today. Thank you
Mary, On a desktop or laptop computer the rafflecopter box is beneath the paragraph below the photo of the spray shelter. It says HomeRight Spray Shelter answer a question. On mobile phones it is a small rectangular box with an arrow to click to open the entry box. Hope this helps.
How do you enter I did not see a spot to enter !
kathy, I entered yesterday, but it won’t let me enter today. I typed in what I would paint, and I think I hit the return button because it closed and I could not click on the button that said “I entered” or whatever it was. When I click on the arrow at the top right it says I only have one entry, but now I cannot get back into it today to correct it. 🙁
Hey Barbara, I’m not giving away the playhouse. I’m giving away the HomeRight Spray Shelter.
Hi. Kathy I. Did paint a play house for my chickens . So they could get out of the sun then. We put Christmas. Lights on it ! Turn out stinking cute !
Kathy, you sure have updated this little playhouse. I’ve seen many of them in my 30+ yrs as a preschool teacher/daycare director and you have made it look new again! Way to go, and then to give it away? You’re a real winner!
Kathy, what a great job on this playhouse! Such things didn’t exist when I was a little girl either. Someone in our trailer park must have gotten a new refrigerator and we got the box it came in. Placed on its side on our patio I cut a door and windows and decorated the inside with drawings of furniture and appliances. Thank you for this giveaway….fantastic! It occurred to me that for those of us who won’t win, an old camping tent would work, too!