How To Make A Large Chalkboard Using A Reclaimed Mirror Frame
As an Amazon Associate, I earn from qualifying purchases.
Today we are making a large chalkboard using an old furniture mirror frame. The project started with a vintage wood frame I found at my favorite junk shop, and the project came together without a hitch.
That doesn’t happen very often. The project looks a lot more complicated than it is. There are just a bunch of pieces and parts to deal with. As a bonus I added a second reclaimed chalkboard project tutorial to the bottom of this post.
How To Make A Large Chalkboard
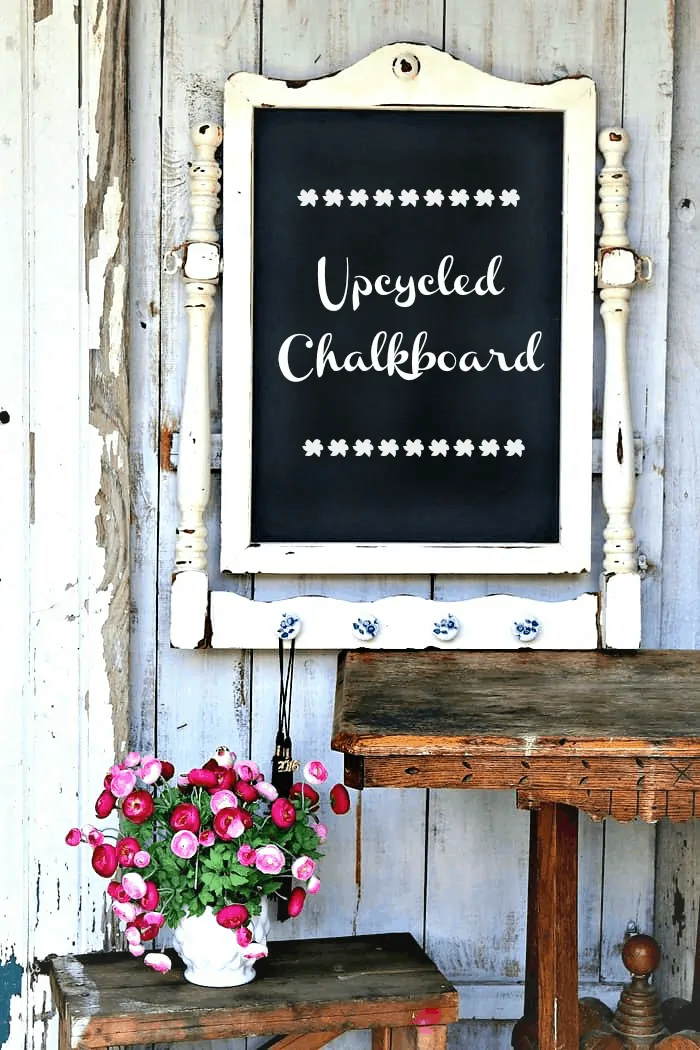
The new chalkboard is a two-in-one. I added pretty furniture knobs to hang necklaces or maybe tea towels if the chalkboard is hanging in the kitchen area.
The kitchen might be the perfect spot. Use the chalkboard to write the dinner menu.

Find A Large Wood Frame
The vintage wood mirror holder came from my favorite junk shop. I think I paid $5 for it, but I’m not sure. I found several pieces of scrap lumber and a piece of leftover chalkboard panel as options to fill the frame. The frame was a dingy white, but a little work was taken care of. No painting was required.

For the past two months, every time the JTS walked into the workshop and spotted the frame and wood he wanted to work on the project…..and every time I would say no, I wasn’t ready yet.
We went through this same scenario at least 10 times. Last week the JTS came in the house and told me he cut the chalkboard panel to fit the frame. See, we got some new tools and he just couldn’t wait to try them out.
Products used in this project:
FolkArt Succulent Motif Stencil
Martha Stewart Erasable Chalk
Ryobi Super Combo Tool Kit
Simple Green
Cut Chalkboard Panel
I asked him to wait on project tasks because I like to get photos of everything. If other projects are in progress, I’m not always prepared to take photos.
Guess what he said about cutting the chalkboard without me? “I can pretend I’m cutting the board and you can take a picture”. So the above photo is of the JTS pretending to be cutting the board. “Full Disclosure”, lol.
Did you know you can buy chalkboard panels….all ready to go….no need to buy chalkboard paint? Isn’t that a great idea. Our chalkboard panel came from The Home Depot.

The photos of steps 1-12 are of actual work in progress. There were a ton of photos, so I made collages of them.
Make Repairs If Needed
1 and 2. The holes for the screws holding the swivel key to the frame were all wallowed out so we replaced the original screws with bigger screws.
3. Next, we removed the original blocks made to hold the frame to the dresser on the back of the wood frame.
4. Me trying to saw off the two end pieces of the bottom frame but my little saw didn’t work too well. I would have been sawing on that thing forever.
5. The JTS did the job in about 2 minutes using a Ryobi Reciprocating Saw.
Clean And Distress The Frame
6. I distressed the original paint, which was already a little beat up. The white paint was yellowed in places, and sanding the frame removed most of the yellow.

7. I cleaned all the dust and grime off with Simple Green.
Add Knobs For Hangers
8. The bottom board on the frame is the perfect place to add furniture knobs. Great for hanging jewelry, towels, or anything. I measured and marked for spacing of the knobs.
9. I drilled holes for four knobs and screwed them to the frame.
Insert The Chalkboard Panel
10. The last piece is the chalkboard panel. I inserted it in the backside of the frame and nailed it in place using a nail gun connected to an air compressor.
11. Add foam pads to the back of the frame to protect the wall.
Season The Chalkboard
12. The last step is to season or prime the chalkboard by rubbing the chalk all over it using the flat edge of the chalk.
Next, rub the chalk into the board with a rag or paper towel, then wipe it off with a damp rag. The chalkboard is now ready to use.

Just for fun, I used Martha Stewart Erasable Liquid Chalk and a FolkArt stencil to pretty up the board. My handwriting is atrocious and the stencils are pretty. The liquid chalk wipes off with a wet rag.

I staged the photo using some of my favorite junk finds. The small handmade bench is from an auction at my brother’s business in Arkansas. The flowers and vase were a steal at $1.50 from Goodwill.
You might remember the table from the junk shop video of my favorite finds including prices. The tassels hanging from the knob are my high school graduation tassel (1972) and my college graduation tassel (2016).

The white knobs with the painted blue flowers have been in my stash for a long time. They probably came off of a furniture purchase.
And that is it for chalkboard number one. I am moving on to the second reclaimed chalkboard project.

This vintage mirror dresser topper came from My Favorite Junk Shop. It had the cardboard backing but the mirror was gone. You see that a lot with these old pieces.
This reclaimed piece was missing a mirror, so all we had to do was cut a wood panel to replace it and paint it with chalkboard paint.

The JTS (aka hubby, aka The Junktion Technical Specialist) cut a piece of board to replace the mirror and he also cut the two long ends off the mirror stand. They were a little much for the frame turned chalkboard.

I distressed the turquoise frame using the wet distress method. I used wet shop towels from the home improvement store to rub the paint off. You have to do this just after the paint dries. Don’t wait too long.

The turquoise chalkboard is hanging in the granddaughters bedroom at our house. Looks great with those cute little necklaces hanging from the knobs. The little knobs I used for hangers came from Hobby Lobby. I drilled holes in the frame for the knobs. Easy.
If you liked this chalkboard project get a look at my bling magnets and chippy paint magnet board project here…Vintage Earring Magnets And Antique Tin.
That’s it! How do you like the chalkboards? Which is your favorite? Leave a note if you have time. Thanks for being here, Kathy
I love this vintage piece. Thanks for posting at Funtastic Friday.
Your chalkboard came out beautiful. Thank you for sharing at Party In Your PJ’s!
So pretty! Love the liquid chalk flowers; didn’t even know that existed!
This is so cool! I love chalkboards! If you have time on Friday, I would love if you would join us at Embracing Home and Family link party! https://theeverydayfarmhouse.com/embracing-home-and-family-link-party-4/
great piece
Great piece. Glad to see the JTS is healed and working again. Love your transformations!
Love, love, love it! Great find? Perfectly distressed?
Hahaha Thanks for the laugh this morning.
So many uses! Adorable!! I did have to smile about writing a menu on it. I’m feeding my husband & 3 grown sons. Guess I could write the time of dinner, & the words, “shut up and eat it!”
Thanks
Thank you Joy!
Thanks Sam!
Love everything about your awesome find!!! Perfect in every way!
Pinned. What a great idea.
Joy
So cute Kathy, and I love the little swirls on those flowers. It gives it such a great detail and interest.
Love it! What a great idea. The chalkboard really pulled it all together!
I love this chalkboard! So much character!
Kathy,
I love how your white framed chalkboard turned out. That liquid chalk? I had no idea! That stenciled flower is what made me hop over from Talk of the Town. Thanks for sharing.
gail
ps pinning!
Hi Bonnie, I may have an update the end of this week or next week. It always takes me a while to write those.
Thanks Fonda! Hope your birthday was a good one 🙂
I love these mirrors that belonged with old-fashioned dressers! They are beautiful, and I love what you did with this one!
I love the way that you and your husband did the chalkboard! Looking forward to the update on your trips to Arkansas.
That is very cute, Kathy. One question: just out of curiosity, what was your thinking in deciding to cut off the “wing” pieces from the bottom of the frame? I tho’t I would have left them on, myself, but then when I look at the finished project I like it with them removed. I’m not sure why. Did you have a particular reason for removing them?
I’m very interested in the chalkboard panels. Where did you find them? I have a piece that was the frame for an advertising sign but the center panel is missing from the frame and I have intended to replace the panel and paint it with chalkboard paint. But the chalkboard panels would be so much easier. You’ve inspired me to get started on that project.
I love dresser salvage mirrors. Good job!
That chalkboard is darling. Great save! I’ve been sanding yellowed white paint this week, too.
Ginene
I too love the stencils on the chalkboard – it’s a fresh new twist instead of the handwriting/quotes. You are lucky that you have a guy who supports you and wants to help. Wish there was a spare one like him around here. 🙂
Love this Chalk broad frame this was a great ideal. Love ,Love !
My handwriting skills are terrible too. Love this new chalkboard with the stencils…great idea (as usual)! I had not seen or heard of doing that before – You Rock!
Love this piece, stencils and all! Also love the dates of your tassels, 1972 and 2016! Way to go girl! Mine are 1956 and 1982! Give us a pat on the back! Keep up the good work.
Sweet transformation! I adore chalkboard just about anything. 🙂 Yet this vanity mirror turned chalkboard is so much fun. 🙂 Thank you for the details and the “full disclosure” :)))
Have fun out and about.