How To Create An Antiqued Paint Finish For A Vintage Buffet
As an Amazon Associate, I earn from qualifying purchases.
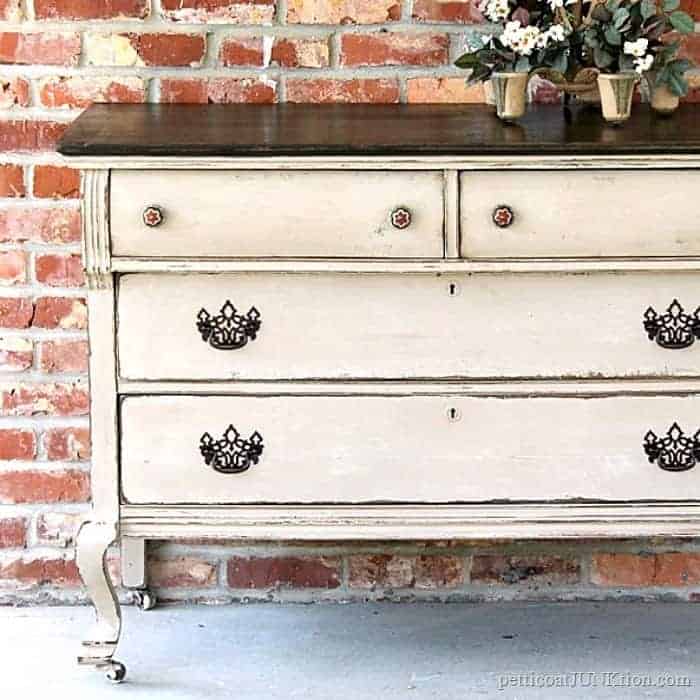
This buffet has an antiqued paint finish on the top and the original finish on the bottom or body. You may remember the top was a mess and the original finish on the bottom was in good shape. I went in several directions with the buffet before settling on a look I was satisfied with.

How To Achieve An Antiqued Paint Finish
There were a few times I just wanted to throw in the towel. I’ll tell you guys everything I tried before getting the look you see in the furniture photo above. Get ready for a long post and tutorial with a lot of photos.

One more look at the beauty before I begin the tutorial for the special paint finish I used on the top.

Buffet For Makeover
I paid $165 for the buffet at auction, a bit more than I wanted to pay. However, I really liked it and thought I would keep it for myself.

The original finish on the body was good but the top was a mess. There is no way to hide, restore, or touch up those spots. Believe me I tried….several things.
The only way to get a pretty wood top is to remove the original stain from the top and re-stain the whole thing. And who knows if the stain would match the bottom.

Prepping The Furniture – Repairs And Cleaning
I took a ton of photos so you guys can see what was involved in getting the buffet up to snuff. Since there were so many, I made several photo collages instead of having 30 photos in this post. No one wants that.
In the photo above, you can see where the leg was damaged and repaired. This is an old repair, and I left it as is. After vacuuming the buffet inside and out and wiping it down inside and out, I touched up scratches with a stain pen, then used Howard’s Feed-N-Wax to restore the shine to the original finish.
I did this on the inside of the drawers too. The wood was just as beautiful on the inside of the drawers as on the outside. They don’t make furniture like this anymore.
One of the drawer catches came off and I used wood glue and a clamp to put it back in place. Last photo is of the mirror. I was so glad to have the original mirror for the buffet. There were a few loose nails on the back and that was an easy fix.

The wood divider in the lined silverware drawer had come out of its slot and was bowed. The JTS glued the two small divider strips back into place and used a clamp to ensure the bowed wood piece stayed nice and straight while the glue dried.
I vacuumed all the dirt and lint from the drawer and then used a damp rag to clean the lining. Where the drawer pulls rubbed the wood, I used a stain pen and Howard’s to restore the wood. The wood detail on the drawers is so pretty.

Bar Keepers Friend for Cleaning Hardware
It’s always nice to have the original hardware, and there wasn’t a piece missing on the buffet. Win-Win. I cleaned and shined the drawer pulls with Bar Keepers Friend.
Now, I want you to know that cleaning old hardware is a job. It takes some scrubbing, for sure. You don’t just put the Bar Keepers Friend on and wipe it off. I use a toothbrush to scrub the pulls and a soft cloth to rub and rub until they shine. There are still areas of the pulls that are discolored, but I quit cleaning anyway.

Moving on to the top of the buffet, the problem area. I thought I would at least try to revive the bad spots but knew it was probably a lost cause. In some of the areas the finish was chipped off of the veneer, not just rubbed or scarred. I tried using the stain pen and then Howard’s but as you can see in the top right photo, the areas still looked bad.
I decided to take the suggestion of painting the top black. I taped off the outer edge of the top and painted it black. Then, I smoothed the top with sandpaper. Once the black was all cleaned up, I hated it. Now, what to do??

Selecting Paint Colors For An Antiqued Paint Finish
I decided to go with a lighter color……not white, not brown/beige, not gray, something in between. I pulled out three colors to try and painted swatches of the colors on the top of the buffet for comparison. I’m not happy with any of them.
I ended up mixing FolkArt Chalk colors Adirondack and Castle with Delta Ceramcoat color London Stone. I mixed the colors until I liked the new color. Ready to paint now for the second time. The bottom right photo shows the final color being brushed on.

How To Get An Antiqued Paint Finish
You guys didn’t think I was going to stop there did you? Of course you didn’t—time to give the paint an antiqued look. I used FolkArt Home Décor Antique Wax for the antiquing process.
Here is how the process works…….The first thing to do is wipe the dark antiquing wax on with a lint-free rag, then wipe off the wax with a damp rag until you get the look you want. Work in small areas, then blend the wax as you move to the next area.
I admit it does take a bit of practice to get the technique down pat, but you can do it. Do a practice board until you are confident with the technique.
The last bit is not a must, but it made all the difference to the antiqued paint finish. I dabbed my rag into the dark wax and then dabbed bits of the wax in different areas on the buffet top…..just willy-nilly. After the wax was good and dry, I buffed it up with a dry, lint-free rag.

The miracle product. This is the first time I’ve used the wax, I think. It was opened, so I don’t know if I started using it for a project or if I did. I don’t remember.

I was super excited once I finished the buffet top. It turned out much better than I expected. Doing the happy dance. I don’t know the first thing about removing stain and re-staining. Staining the top might have been better than the antiqued paint finish but the new top sure looks good.

The mirror was the finishing touch. I worked on the buffet so long that I almost forgot about it. All it needed was cleaning up and the nails on the back tapped down a bit. The mirror has some age spots, but that just adds to its character.

How pretty is that original finish once it was shined up. And the drop pull hardware is the perfect style for the buffet.

Am I going to keep the buffet? No. I don’t have a place for it, and it doesn’t fit my decor style, even though I call my style eclectic. So this beauty will be going to my booth with a sell tag attached.
You can find Howard’s Feed-N-Wax, FolkArt Antique Wax, Bar Keepers Friend, Stain Markers, FolkArt Chalk Finish, and other of my favorite DIY products and tools on the Petticoat Junktion Amazon Page here.

How do you feel about the makeover? Do you like the top or would you prefer a different look? Leave a note, please. Have a great day, Kathy
This article first appeared on Petticoat Junktion in 2018. The information and photos have been updated.
Absolutely beautiful! I love how the top & the hardware are a perfect pairing! It really pleased my eye to see how the one brought out the beauty of the other. Well Done!
You did a very special job on this on. I love it.
Love what your hardwork accomplished!!
Thank u for sharing
Love to see these beautiful pieces restored to their former Glory!!! THANK YOU
That was a really beautiful job you made of this buffet – not just technically professional, but very sensitive to the piece and you brought out its true beauty.
Kathy,
I really love the look you created! It is beautiful with the light and the dark, accented by the light drawer handles!
Great job!
I love what you did to the top – it is gorgeous!
What a beautiful piece you did! I love the look and know how much you put into it. Thanks for sharing.
I’m happy to say it’s an interesting post to read. I learned some new information from your article. Great job, keep it up!
What a beauty!!!
knocked it out of the park!
Gorgeous.
Vote to keep it.
It looks lovely! I do believe it will be snatched up quickly.
Thank you Nonnie. I thought about trying to put a decorative piece similar to a mirror but there were too many damaged places spread over the top. The mirror was a great idea and I bet it makes a statement! I like to use mirrors to display pretty items. Works perfect on a buffet.
Kathy, all your hard work truly paid off, this is a gorgeous piece!!
That is one beautiful piece of furniture I had a similar problem with a buffet I was working on. There was one patch in the center of the top where the veneer was damaged beyond repair. The rest of the top was in good shape. I refinished the rest of the top, and covered the damaged portion with an old mirror. It looked great, and made the center of the piece the focal point. If only you had two of those awesome old mirrors !!!! Your solution is great too…..just a suggestion for anyone else with a similar dilemma. The original finish and the detail on this piece is amazing..it was well loved by someone for a lot of years. So glad you saved it .
Looks great. Nice job.
That is a huge amount of work! I admire your perseverance and I know how frustrating it is when you don’t like the initial results and have to come up with something different – a triumph in this case.
Kathy this is a spectacular makeover! Love the top and your “what if” thought process in finding the solution. The top looks amazing as does the rest of the piece. The hardware is the perfect jewelry and your hard work paid off big time.
Thank you for both the beautiful project as well as the inspiration.