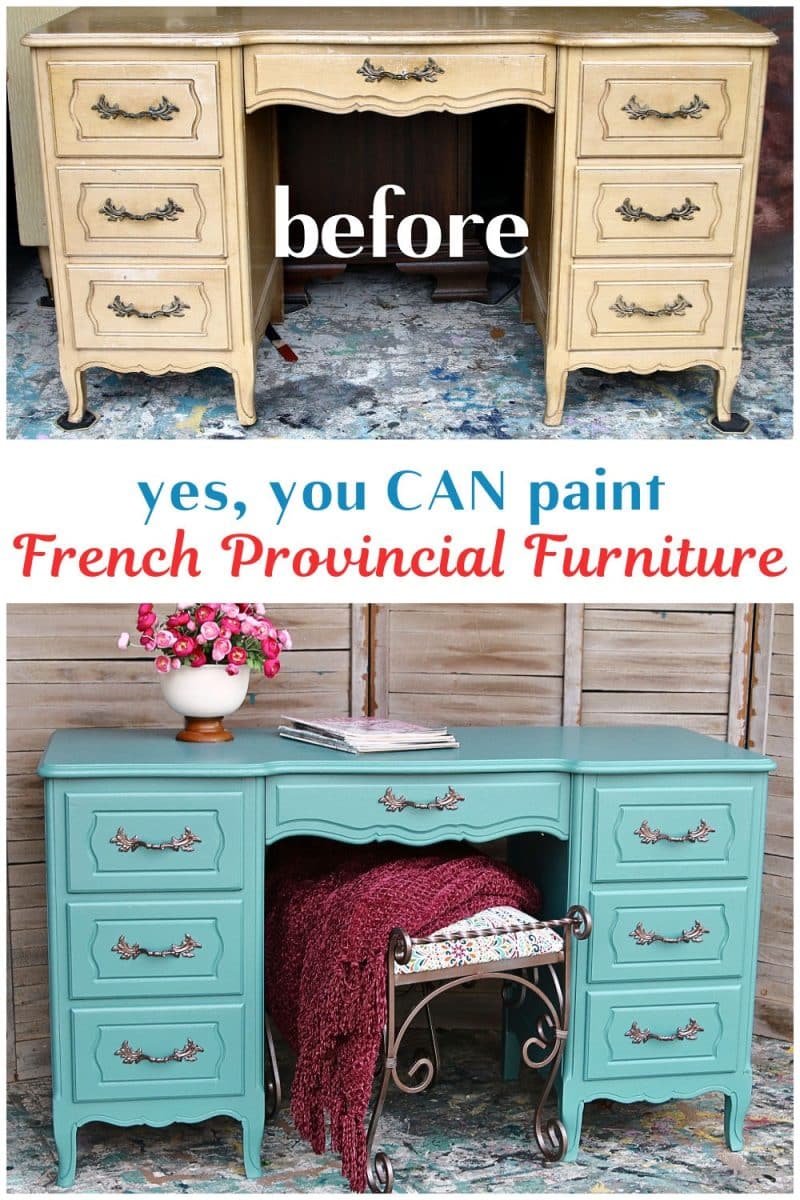
How To Paint A French Provincial Desk
As an Amazon Associate, I earn from qualifying purchases.
In this tutorial, I share how to paint an old French Provincial desk. Two coats of paint over the discolored finish and spray paint for the original drawer pulls brought the desk back to life!
French Provincial bedroom furniture was a thing when I was young. Those curvy details and the frufru hardware were very distinctive. Sadly, my bedroom furniture wasn’t as charming or stylish.
You know how it goes. My daughter’s bedroom was wall-to-wall French Provincial with a desk and hutch, nightstands, a headboard, and a tall chest of drawers.

Today is the best day of the month…..Furniture Fixer Upper Day. I’m joining 4 of my DIYer friends to share painted furniture makeovers.
![]() Be sure to check out all of the furniture makeovers. The links are at the bottom of this page. Now for my project!
Be sure to check out all of the furniture makeovers. The links are at the bottom of this page. Now for my project!
How To Paint A French Provincial Desk
I am over-the-top-happy with this makeover. The color is just gorgeous, and after going through a couple of paint options for the drawer pulls, everything is perfect.
")
The first thing to mention is the price. I bought the desk at our local auction house for $4! Yes. I couldn’t believe no one wanted this beauty. The drawer pulls alone are worth at least $35.
")
It was dirty, and a couple of the drawers were a mess inside, but overall, the desk was solid. And I mean solid wood. Even the dust panels between the drawers are solid wood.
")
Morgan Manufacturing made the desk. I did a little research and learned that the furniture company was founded by David Morgan Sr. in Black Mountain, NC, in the 1930s. The company was purchased by Drexel Enterprises in 1969 and closed in 2002.
Prep Furniture For Painting
")
I scraped that “stuff” off with a paint scraper, then cleaned the inside of all the drawers with Simple Green.
")
On older furniture, there is often a slight indentation where the drawer pulls were screwed tightly to the drawers. Also, a lot of grunge. I cleaned this area too.
If I were replacing the original hardware with a different shape, I would sand the area smooth so the slight indentations from the original hardware would not show.
")
The top had some wear on the finish, and a light sanding with 120-grit sandpaper smoothed it out.
")
I used a shop vac to remove the worst of the dust and cobwebs. There were a bunch of old spider eggs on the bottom. Ugh!
Remove Drawer Pulls And Prep The Drawers For Paint
Preparing the furniture for painting is the most important step and is usually the most time-consuming. It is worth taking the time because it will prevent problems later. The prep work on the desk took about 3 hours.
")
Remove the drawer pulls using a handheld screwdriver or battery-powered drill. To prevent paint seepage inside the drawers, cover the screw holes on the inside with painter’s tape.
[amazon box =”B085ZQKQXN”]

Bag the drawer pulls and screws together.
")
Drawers in dressers, desks, and chests really fit well only in their original slots. The drawers in the desk didn’t look right or close completely, so after placing them in the slots where they fit perfectly, Time to mark the drawers.
I write on the backside of the drawers and use letters or a combination of letters and numbers. The top-right drawer can be TR (top right) or T1 (top number 1). RM is right middle and so on. Use any marking system that works for you.
")
My household cleaner of choice for prep work is Simple Green, but just about any cleaner will do a good job, along with a bit of elbow grease.
")
Don’t forget to clean the outside of the drawers, top and bottom.
")
To ensure clean paint lines, I apply painter’s tape to the front sides of the drawer and the top front edge.
Repair Damaged Areas
Always inspect the furniture for areas that need repair.
")
The top back side of the desk had a couple of areas that needed attention.
")
This was a simple split, close to where a mirror was once attached.
")
I filled the holes with wood filler and sanded them flush to the desk once the filler was dry. I forgot to take photos of the sanded filler. Sorry. Imagine a nice, smooth, filled area!
")
Sometimes damage or wear isn’t very noticeable. I noticed a slight separation at the dovetail joint on one of the drawers while applying painter’s tape. A simple fix with my nail gun was easy.
Select The Paint Color

I buy a lot of paint samples when they’re on sale. The Valspar paint sample had been sitting on my shelf for a few years; the label date was 2022.
I painted a tabletop with the sample last month. I didn’t notice an odor until I was painting the table. It was terrible. I had to sand and repaint that table. The paint technician at Sherwin Williams told me it was normal with newer paint formulations to develop an odor after a couple of years.

I liked the sample color so well, I took a paint stick with the color on it and had a quart of Sherwin Williams Emerald paint mixed for this project. The paint brand was recommended to me by one of the guys at the place where I have my booth.
Paint The Desk

Since I had the desk turned on its back in order to clean the bottom, I started painting the legs first.
")
This is actually a good way to start the painting process. It’s hard to paint furniture legs with the furniture in an upright position unless you are lying on the floor. At my age it’s hard to get up once I’m down.
")
When I flipped the desk upright, I began by painting the kneehole area—but I saved the lip on the middle drawer space until I finished the underneath.
When you have your head underneath the desk and wet paint above you…Well, I learned from experience. Dried paint is difficult to wash out of your hair.")
This is how the desk looked with one coat of paint.
")
I usually paint the drawers first, but I guess I had a wild hair on paint day. Going through the photos, you will see a difference in the blue paint color. This is due to the camera I was using and also the dark work area. The final photos show the actual color.
")
I paint the grooves on the drawers first, then the flat drawer front. Don’t let paint puddles gather in the grooves.
")
I go around the drawer several times to be sure I have it all covered.
")
Paint the outside of the drawer above the tape line.
")
In this instance, I painted the inside lip of the drawers. It just looks nicer when the drawer is open.
Paint All The Details
")
I brushed on two coats of paint, then, after looking closely at my work, I discovered a few areas I had missed. A tiny paintbrush with slightly stiff bristles works great for this touch-up work.
")
Tiny edges are easy to miss.
")
Also, grooved areas on the legs. I didn’t notice the chipped leg until I took this photo. I should have filled it with wood filler……but I didn’t.
Paint The Drawer Pulls
The color for the drawer pulls was a toss-up. Do I go, dark, light, metallic?
")
My first thought was to use a lighter blue than the desk color. I spray-painted an old pull just for a sample and decided I didn’t care for the tone-on-tone color combo.
")
Next, I thought I would try a neutral color similar to the original. I didn’t like that either.
Choosing The Right Paint Color
")
For option number three, I spray-painted the drawer pulls with my favorite Rustoleum Heirloom Satin, then I dry-brushed the blue paint over the white.

I thought this was the winning look, but a couple of days later, after hunting for a desk chair, I decided it wasn’t.

I went back to my spray paint shelf and found this Rustoleum Hammered Brown color.
Paint A Stool Or Chair To Match The Desk
I didn’t have a chair to pair with the desk, so I went on a hunt. I searched the thrift stores and antique/vintage shops, but nothing caught my eye.
I finally purchased a white barrel-type stool at Burlington Coat Factory, but it was too in-your-face white. This was when I realized I didn’t like the white drawer pulls either.
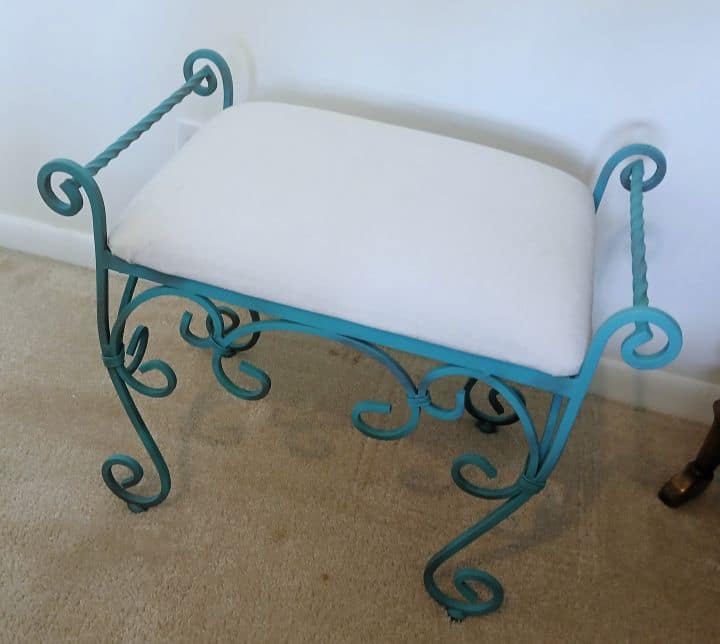
At this point, I shopped my house. This stool was in what we call Sofi’s bedroom at our house, although she never spends the night here. She hangs out here every day after school.
Since I was painting the desk for her bedroom, I grabbed the stool, and it fit perfectly under the desk when turned sideways in the kneehole.
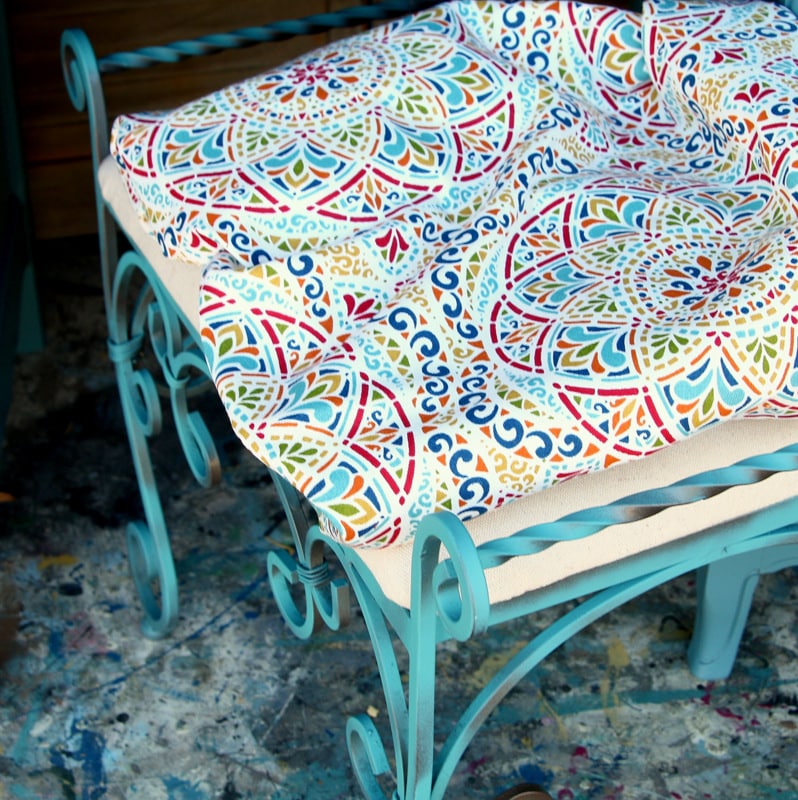
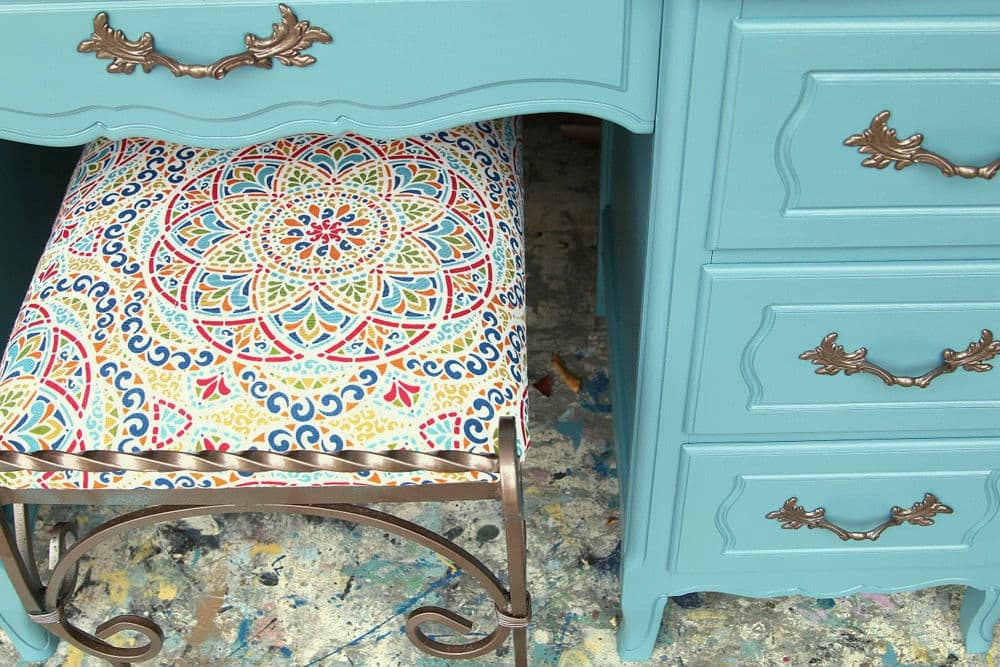
I found a fabric in my stash that matched the desk color and decided to try brown metallic paint on the drawer pulls and the metal stool base.
I can’t tell you how many transformations this stool has had, and you will have to wait for another post to see the many makeovers. Too many photos and details about the desk today.
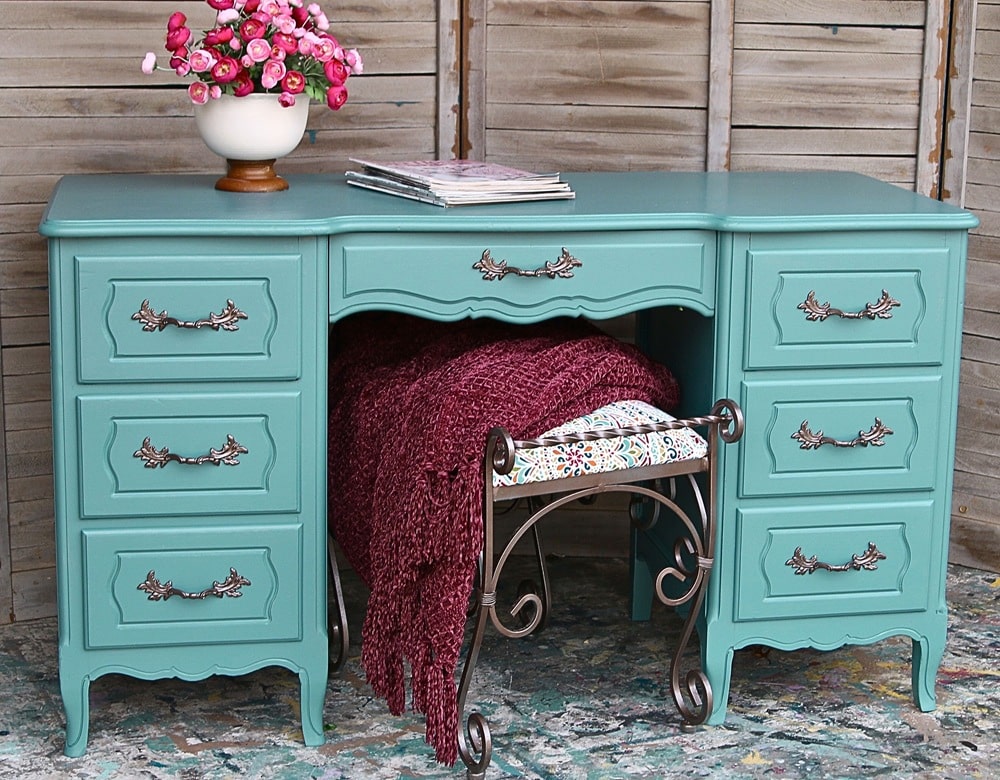
The Painted French Provincial Desk
It’s been a journey for sure, and now it’s time for the full furniture reveal.

How do I feel about the Sherwin Williams Emerald Paint? I love it. Goes on smoothly and dries without any brush marks.
It’s a premium water-based paint that has the hardness and finish of oil-based paint but without the hassle. I’m a messy painter, and oil-based paint is difficult to clean up.
The color was a custom mix sample, so it doesn’t have a name. I have the formula on the can….I think.

I like the brown drawer pulls, and I think I made the right decision with the stool, too. When you have a chair with the desk, it takes up more room, and the chair, when pushed up to the desk, hides the pretty drawer detail.

No distressing for this piece, although I think the lovely details would really pop if distressed.
Sofi is into Cheetah and Leopard print everything, so I covered the drawer bottoms with Leopard print scrapbook paper.

The multi-color fabric I chose for the seat closely matches the paint color. I had the fabric in my stash and have used it on numerous projects. It is an outdoor fabric with a lot of body.

What do you think? Do you like the paint color, lack of distressing, and the drawer pull color? Leave a note if you have a minute, and thank you!
Now it’s time to take the Furniture Fixer Upper Tour. Just click the links below the “before makeovers” collage…..
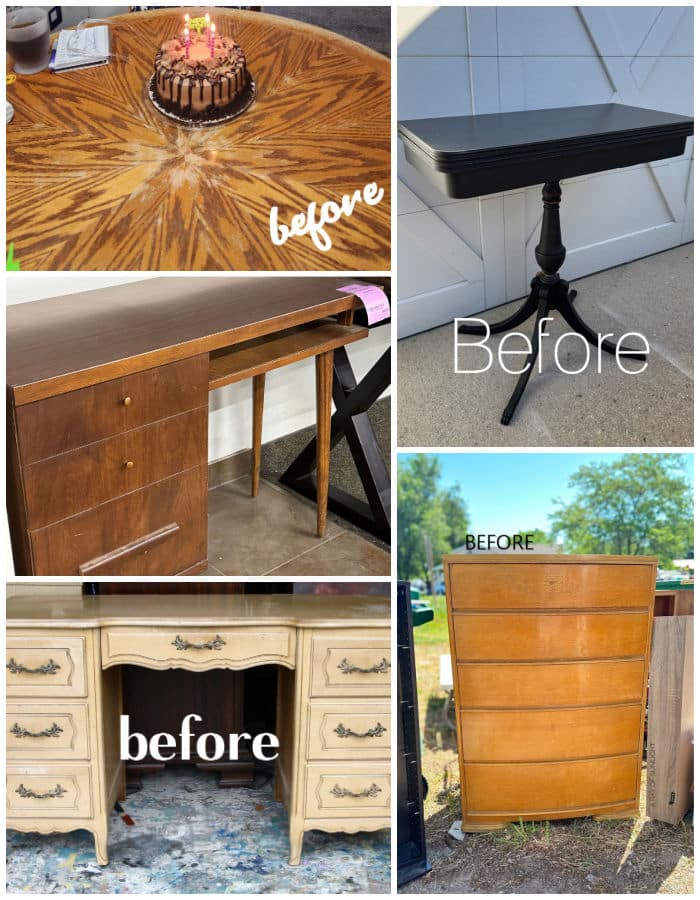
Furniture Fixer Upper Tour:
Vintage Game Table Makeover – Confessions of a Serial DIY’er
MCM Writing Desk Makeover – Salvaged Inspirations
Vintage Oak Table Makeover – My Repurposed Life
The Easy Way To Paint Furniture – A Ray Of Sunlight
How To Paint French Provincial Furniture – Petticoat Junktion (you are here)

As always, thanks for being here, Kathy
It turned out beautifully!! $4?? Unreal! Lovely work!
My mom had a desk like that, long ago. I love the color you chose.
You did a great job. It looks so pretty now.
What a steal for $4! It looks so fresh now.
The final brown for the hardware is a perfect fit.
The stool fabric is so cheery. Miss Sofi should be impressed for sure 🙂
I love everything you do. I also appreciate you because you make me laugh and you’re so honest about what you do and what you don’t do. Thank you! Have a blessed Thanksgiving ❤️🙏
I think the pulls match the stool perfectly, and the pop of color on the seat adds the magic touch to your project.
Kathy,
I think an aqua or turquoise paint in any shade is perfect for French Provincial furniture. Years ago, I painted a dresser, and I loved how it looked.
I like the color of the handles and the stool. I’m glad you kept working on it.
Pinned!
gail
First of all, DEAL of the century for $4!! What a score and it is absolutely perfect! The hardware is the ideal color and the liner took it over the top!! XOXO
Thanks and I don’t know about Miss Sofi…..she doesn’t like change!
Four dollars!!!….whaaat!?🤯 You brought this back to life my friend. I LOVE IT! 💙 And I’ll bet Sofi is going to be over the moon happy as well. Pinned! XOXO