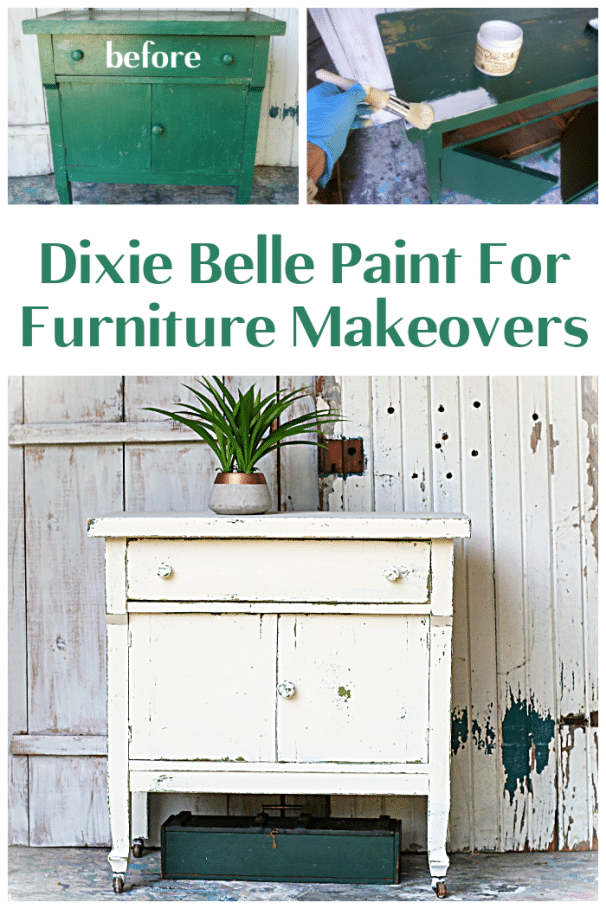
Painted Furniture With A Layered Chalk Finish
As an Amazon Associate, I earn from qualifying purchases.
How to achieve a layered Dixie Belle Chalk finish with a green underlayer and a warm white top layer of paint.
This piece of furniture was an auction buy. The small chest is old and has been painted at least twice. There are two colors of green paint layered on the small chest, and I thought I would top it all off with white and distress the paint for a layered look.
Today is Furniture Fixer Upper Day and my friends have some great makeovers to share. I know for a fact that one of the projects involves a transfer. Yay!

The green chest is cute. I like the size and the color and the price was $33. Not too bad.

The green color on the backside of the doors is not so cute. I think it was the first paint layer and then was painted later with the darker, prettier green.

I removed the shelf paper and started cleaning the inside of the cabinet with Simple Green.

Once the shelf was dry, I covered it with a couple of wood look adhesive vinyl sheets I bought at Dollar Tree several months ago.

It’s always a good idea to turn furniture on its back so you can get a good look at the bottom. Sometimes there are repairs to be made on the legs or trim, and sometimes the underside just needs a good cleaning.
There were a bunch of cobwebs and spider egg sacs on the bottom of this piece. Luckily, the spiders were all gone. I vacuumed these areas with a shop vac, and then I used Simple Green to clean the wood.

For the top coat of paint, I chose Dixie Belle Chalk Mineral Paint, color Drop Cloth.

Drop Cloth is a nice warm white color. I brushed on two coats of paint using a Dixie Belle paint brush.

Before painting the whole chest, I painted the drawer with one coat of paint and distressed it just to be sure my plan to show the layers of paint would work. Things looked good, so I brushed one more coat of paint on the drawer for full two-coat coverage, then distressed the paint again. You always need to start with full coverage before distressing paint.

I used my Ryobi cordless sander to distress the chest’s edges, top, and sides. So basically, I distressed the whole thing.
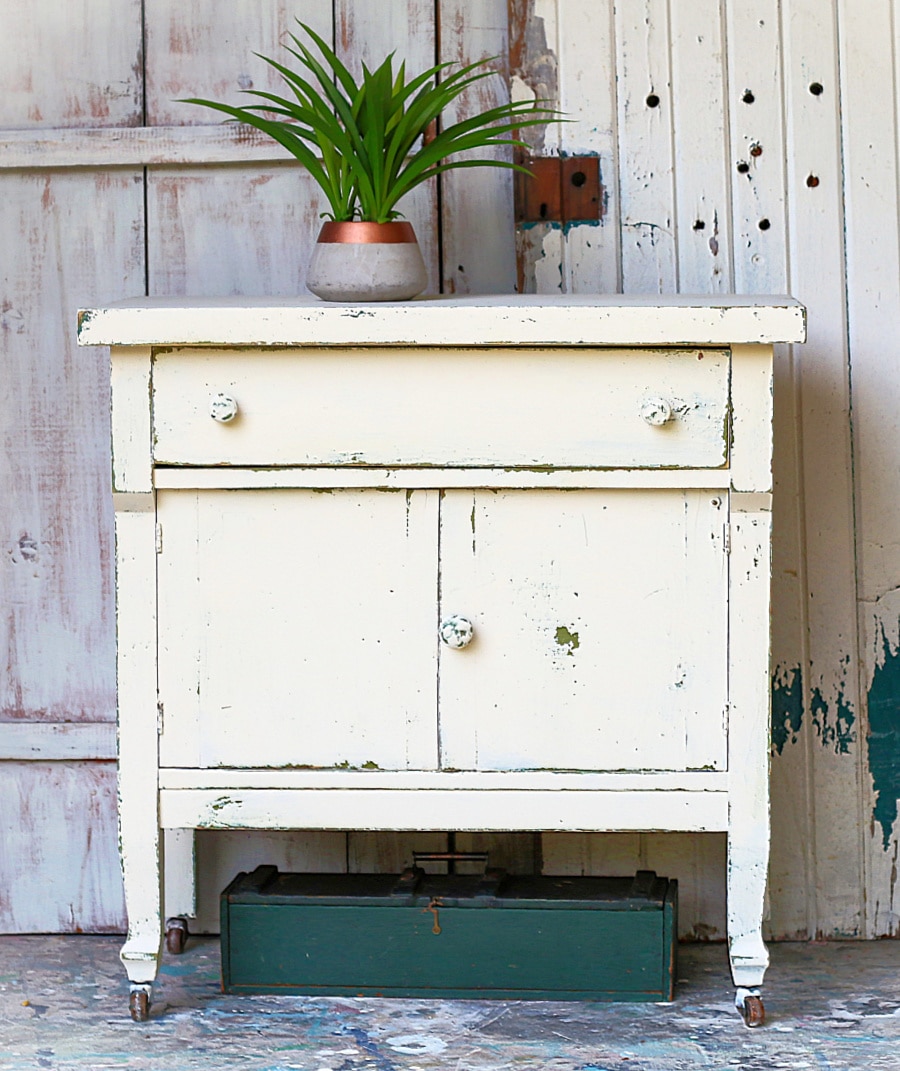
In some areas, I distressed the paint down to the lighter green color, and in others, just to the dark green paint color. I had very little control over this part of the makeover regarding how the paint distressed with the two different greens.

I liked the original wood knobs so I painted and distressed them too.

This antique piece was already painted, so I didn’t feel bad about adding more paint. Some of you don’t like the idea of painting antiques. I can see that.

There were rough areas on the chest and tiny bumps from the earlier paint jobs. To say the green paint finish wasn’t smooth is an understatement. But those rough spots and bumps make the distressed finish look even better.

Let me know what you think of the makeover then take the Furniture Fixer Upper Tour by clicking the text links below the “before makeover” photo collage…..

Furniture Fixer Upper Tour:
Vintage Brother Sewing Machine Cabinet Makeover – Confessions of a Serial DIY’er
Chalk Painted Thrift Desk And Hutch – Salvaged Inspirations
Furniture Transfer Updates Ugly Nightstand – My Repurposed Life
Layered Dixie Belle Chalk Finish For Furniture – Petticoat Junktion (you are here)
As always, thanks for being here, Kathy


I wasn’t sure at first that I liked what you did with this piece, Kathy. But the more I look at it the better I like it. I think the white paint shows off the simple, clean design of the piece and the distressing gives a nod to it’s history. I could see it as an interesting piece to add to a modern white kitchen or bathroom. I give it a thumbs-up! I think I would buy it. That is, if I had a place in my over-stuffed little ranch to show it off! Thanks for sharing this project!
Kathy,
I love that you left the original dark green paint. This little cabinet definitely has some history. 🙂
It’s soooo darn cute. I love the size and shape of it as well.
Beautiful job, great tips.
pinning!
This looks amazing with the distressing over the green paint!! The wear looks very natural too! XOXO
I like the new color with the old one peeking through. It’s a cute piece.
Yep..You did good girl!!! I like the bits of green showing through. Someone is going to be very lucky to have this piece.
I truly love this piece.
I really like the green peeking through Kathy, super cute! Pinned! XOXO