Painting Thrift Store Furniture
As an Amazon Associate, I earn from qualifying purchases.
I almost missed the Furniture Fixer Upper Tour! I thought it was next week. Good thing I was painting thrift store furniture from my shopping trip a couple of weeks ago. And it’s also a good thing Jen, Girl in the Garage, asked early yesterday morning if I had my photo for the tour ready. Nope, not quite finished with my project but I’ll get on it…… and I did.
")
The tiered table is one of a kind. I haven’t run across a piece even close to this one.
")
The table looked really rough when I spotted it at the Salvation Army Thrift Store. But, I did love the look of it and even though the price was $30 I snatched it up. After working on it a while I was questioning my decision.
![]()
As I mentioned earlier it’s Furniture Fixer Upper Tour day so be sure and visit my furniture painting buddies after reading the tutorial on my table.
")
The first thing to do was clean up the table. It’s hard to see without a close-up photo but the paint job is a mess. The paint is thick and discolored and you can see very obvious brush marks. Also there is a lot of unevenness where I think there was missing veneer. All in all not something fun to work with.
")
I cleaned the table with Simple Green and it was obvious from the cleaning and the red stain on the rag that I was going to have problems with stain bleeding through the paint.
")
And I did. The photo above show the bleed thru after two coats of primer. At this point I was ready to trash the project and take the table back to the Salvation Army Store.
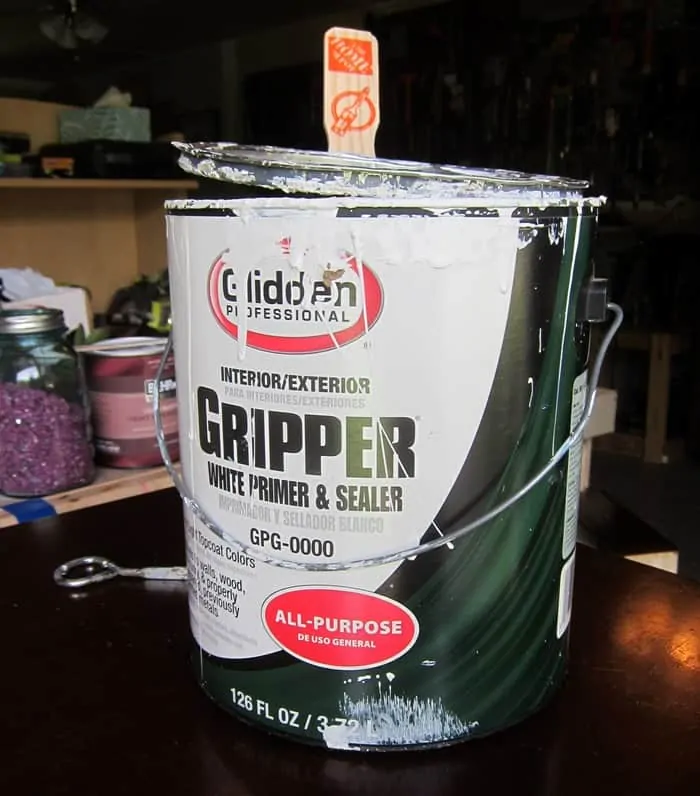
But I just kept right on working. I always use Glidden Gripper Primer which I think is now PPG Gripper Primer. A lot of times I have the primer tinted gray because to me gray is so much better and easier to cover under just about any paint color….except white of course.
")
I applied one more coat of Glidden Gripper then decided to start painting.

I chose Beyond Paint in Off-White because it has primer built in and I was hoping the paint would cover the red/pink bleed thru.

And after two coats of Beyond Paint the red bleed thru was gone. The table had 5 coats of paint and primer not counting the top of the table which had a thick coat of paint to start with. I decided to distress the table.
Let’s face it. The table top and bottom shelf were not nice and smooth after all the stain loss and the earlier paint job. So distressing the thing could only make it better.
I used my Ryobi battery powered sander so no cords which makes it nice. I made a video of me sanding the table. It’s short and sweet and speeded up x2. I don’t ever move that fast except in videos. Using a power sander is the best when you want to take off a lot of paint. In this case the paint was so thick that I didn’t get much off except on the feet and the three leg pieces in the middle. The video is less than one minute. If you can’t view the video you may have an ad blocker enabled on your browser. Turn it off just temporarily. Video below…..
[adthrive-in-post-video-player video-id=”HKzkKg0k” upload-date=”2021-04-22T02:04:08.000Z” name=”Using a Sander To Distress Painted Furniture” description=”How to sand painted furniture with a sander.” player-type=”default” override-embed=”default”]
How To Use A Sander To Distress Painted Furniture
")
And this is what the table looks like now. I love white distressed paint. My last furniture project, the long bench, is also painted with Beyond Paint, Off-White, and distressed. I love it too. You can find Beyond Paint on Amazon here.
")
I’m taking the table to the booth to sell so I set it up in Miss Sofi’s bedroom for the photo shoot.
")
You do know us bloggers are crazy. We do all kinds of things to get a photo. My house is a mess a lot of times because I take decor from other rooms, move furniture, set up lights…..just to get a few photos.
")
That picture on the bottom shelf is of granddaughter Tenley who is 17 now. She was hugging on to my Mother at my brothers wedding. That photo gets my heart every time I see it.
Don’t forget to subscribe to my emails so you don’t miss any new projects. Sign up form at the bottom of the page. Thanks!
")
The succulent planter is a project I made this week too. If you missed it you can find it here….Silver Plate Succulent Planter Idea With Seashells.
")
The circle trim on the legs is the first thing that caught my eye when I spotted the table in the store. It distresses so nicely.

Before you head out on the Furniture Fixer Upper Tour please leave a note and let me know what you think about the table. Click the pink text links below the “before makeovers” photo collage…..

How To Paint Cane Webbing Furniture – Salvaged Inspirations
Upcycle Mirror French Style – Girl In The Garage
Antique Hexagon Pedestal Table Makeover – Confessions of a Serial DIY’er
Painting Thrift Store Furniture – Petticoat Junktion (you are here)
Thanks for being here, Kathy
I had no idea it was a plant stand but makes sense, thanks. I took the stand to the shop and it sold right away.
Thank you
Thanks for sharing this info. I’m not sure how old the table is but from your story must be pretty old. I took it to the shop and it sold right away.
Very neat table….what a great piece for a conversation started. Beautifully done,,
Beautiful project. We had a chair that bled through like that. Many coats of paint applied.
That is the second table like that I have seen. I just ‘met’ the first one in October. I used to care for a 96 year old woman in her home. She had one, she said it was the first piece of new furniture she had bought with her husband when they were married.
I love that you shared your feeling about the picture if your daughter! It brought a tear to my eye, it “ got “ me too!
Table turned out beautiful!
I think the last owner donated it after realizing that painting isn’t so easy! I don’t know how you managed to see the beautiful details; that tragic paint job makes me want to look away. By the way, it’s a plant stand, probably early 20th century. Beautiful job, now it can stick around for another hundred years!
Kathy, I LOVE how this table turned out! I would have bought it too! I also use Zinsser Bin Shellac Based Primer Stain Blocker a lot if I think it’s going to be a heavy bleeder and I’ve had some that I think died ?. I would have a hard time giving this one up! You do find the quirkiest pieces! Always look forward to see what you’re working on!
I have had bleeders like that one you have there. I recommend you use Zinsser Bin Shellac Based Primer Stain Blocker. It works well. You can buy it in a spray can or you can buy it in a quart, gallon, 5 gallon bucket. You can also use Spray or roll on shellac.
What a fun, unique table! I love the circles too- beautifully distressed, my friend! xo
I love this table! You did a great job. If I lived close I’d be heading to your booth to purchase it. You’ve inspired me to get out again to search for quirky pieces. I love what they can become!
When will it be in your booth and where exactly is your booth? I may drive down to take a look. It’s really unique!
I have never seen a piece like it! I love how you improved it. Such a unique and versatile piece.
I love it!!! and although I am (not yet) almost 69 years old, I love to redo recreate, etc…for myself. and some of you ladies are awesome at inspiration, this table turned out great!!! its a one of a kind. never seen another. so…I was thinking the other day, that I would love to have a little hand sander. this one might just be perfect for my little projects. so thank you for sharing!!! Angela (from NJ)
It’s really cute. I bet a plant mom buys it!
I wonder if shellac or a shellac-based primer would have worked better to prevent bleed-through. I have a bench that bled-through after a long time had passed. I painted over those areas with 2 coats of shellac and 2 more coats of white paint and it’s been fine ever since.
What a unique table…I would have snatched that right up too! Perfect for plants in a sunroom! XOXO
Such a cute and Very unique table !! I would surely buy that.
Maybe a great plant table…?
Thanks for sharing.
p
that table is so unique. I’ve never seen one like it. love it…
You’re a trooper! I would have painted it red and called it good! Lol!! Very cool table!
I hope you are keeping this jewel! Aren’t you concerned that there will be bleed through when you distress?
I laugh at your comments all the time…? love the way you turn sad looking pieces into unique furniture that are beauties.?
This 3 tier table is amazing Kathy! As soon as you posted the “before” to our FFU I knew you’d do something fabulous…it looks adorable! And love your styling. That pic of your GD is so sweet. XOXO
I haven’t seen a table like that either but you made it so it should be front and center in any house! Love it!
Love it!! What an awesome shaped table!
I’ve never seen a table quite like this one. I would buy it in a hot second. Just adorable!
Love the table! So unique, it shouldn’t be in your booth long❣️