Sand And Seashells Beach Jar Idea For Saving Vacation Memories
As an Amazon Associate, I earn from qualifying purchases.
This sand and seashells beach jar idea can be tweaked to showcase all types of things found, bought, and saved from your vacation travels or maybe a few treasured collectibles you have at home. Make the idea your own.
I have the full project tutorial as part of the Thrift Store Decor Tour today plus some exciting news. We have three new additions to our group! I know you guys will be inspired by the thrifty projects by Carlene from Organized Clutter, Suzanne from Shop At Blu, and Cindy from Reinvented Delaware. I can’t wait to go on the tour myself!

This idea came to me while on vacation at the beach last week. The beachy display is easy as pie to put together and inexpensive too. The sand and seashell filled jar is perfect for Summer decorating.
My favorite thing about the project is the bow. Silly, I know. I removed the beach sign and bow from an earlier thrifty find project. Saving them instead of tossing in the garbage was a smart move. You never know what little teeny tiny item is going to come in handy and be the prefect finish to a small DIY project. I save everything just for this reason.
")
The jar with the detailed seashell top couldn’t be a better match for the beachy stuff going inside. I have no idea how long the jar has been in the shop or where I picked it up but it’s come in handy for storing various small items.

The box of seashells and sand is really big. You can’t see all the small seashells in the bottom half of the box but it’s a bunch and there is also a big bag of sand. Granddaughter Tenley gathered the sand last year to make a mason jar beach display for her boyfriend. Well, boyfriend went on the trip with us this year. My grandkids are growing up too fast.

You can’t have a beach or coastal themed project without a little sisal rope. My roll of sisal got out of hand so I had to put it in a paint bucket. Thanks for the handy bucket Black Dog Salvage Paint!
")
After giving the jar a thorough cleaning the first step in the project was hot gluing the sisal rope to the jar. Got to love that fancy glue gun.
")
To save my fingertips from the hot glue I use a popsicle stick to press the sisal rope and hot hot glue to the jar. You can also use tweezers, paint stirrers, etc. Anything to save those fingertips.
")
I decided on 5 rows of sisal rope to wrap the bottom of the jar. Always remember the “rule of threes” when decorating which says…..things arranged in odd numbers are more appealing, memorable, and effective than even-numbered groupings. To me that rule applies here too. I tried wrapping 4 and 6 rows of rope but it didn’t look right.
After the glue was good and dry I pulled all the hot glue “hairs” from the sides of the jar. You might not see them easily but I can sure see them when I look at my photos.
")
Next I filled the jar with sand until the proportions looked right with the size of the jar and the sisal wrapped bottom.
")
I pulled the Panama City Beach sign and the bow with shell from the box of beach goodies and took them apart. You can see the earlier thrift store piece where I removed these items here….Bird Nest In A Basket. Our beach trip was not to Panama City but that’s okay. I didn’t check to see if I could erase the writing on the sign. I have no idea if it is permanent or actual chalk.
")
I added the large pieces to the jar first. You might also notice I tilted the jar to make a small hill of sand on the backside. Little details like this make a difference. The rock came from who knows where but it looks good here. The starfish and sand dollar are eBay buys from years ago. (I found sand dollars on Amazon here)I can never find starfish on the beach, can you? And I only find large broken pieces of sand dollars.

Next I threw in a few small seashells here and there. Sometimes less is better. I was going to put the bow back in my junk stash but then realized it might be a nice addition to the display. At first I tried to put the bow with the seashell attached to it on the wood jar lid. It looked bad any which way I placed it. I decided to remove the seashell and remake the bow. I made it shorter and the knot fuller.

Placing the bow over the sisal rope and off center was a stroke of genius if I say so myself. You guys know how I like to pat myself on the back. In the photo above the little sand and seashells beach in a jar display is sitting on the dresser in our blue and white guest room.
Here the beach jar is sitting on the bathroom counter. Who knows where it will be next week……or tomorrow. As I mentioned in an earlier post, projects like this can be broken down and the parts and pieces used in future projects. If you love decorating with seashells see more of my coastal seashell themed projects here….Seashell DIY’s.
Leave a quick note if you have the time. Everyone is so busy these days and I totally get that. Time to see what my tour buddies have reinvented this week. Just click the text links below the “before makeovers” photo below….
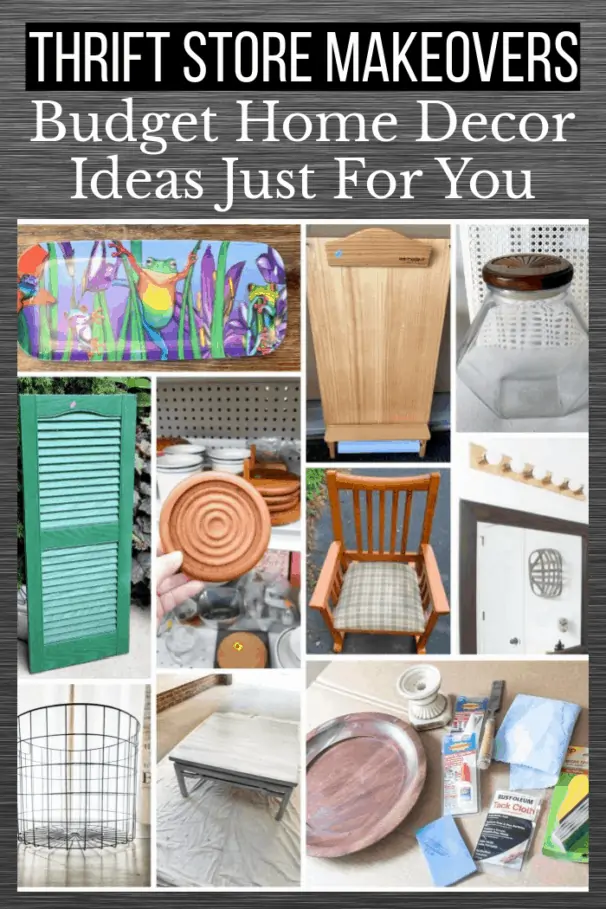
Large Farmhouse Metal Basket – Domestically Speaking
Boys Rocking Chair – My Repurposed Life
Sand And Seashells Beach Jar Idea – Petticoat Junktion (you are here)
Outdoor Coffee Table Makeover – Our Southern Home
Boho Chic Jewelry Tray – My Uncommon Slice of Suburbia
Coastal Coasters – Sadie Seasongoods
Upcycled Shutter Angel – House Of Hawthornes
Thrifted Child’s Wall Easel To Wall Decor – Organized Clutter
Easy Cake Stand – Reinvented Delaware
Refresh Bathroom Vanity Light – Shop At Blu
As always, thanks for being here, Kathy
Hey Pat, We lived in Pensacola for a few years after hubby retired from the Army and was working for a contractor. Yes, we love the Pensacola beaches!
If next time on Vacations visit Pensacola Beach, Fl in the Panhandle of FL next to Mobile , AL. We have sugar white beaches and won all kinds of articles doing the years about our beautiful beaches and sand. You will find all kinds of shells, star fish, sand dollars not broken and beautiful hermit crab shells with live crabs still in its home
If you
So cute Kathy! I am a fan of reusing decor for new projects. It’s so hard not to save everything!!!
VERY cute and I love that hand towel, too!
This is adorable, what a great idea to display your treasured finds! Love the rope, glad you had a great beach vacation!!
So cute! Perfect way to keep your summer memories alive!
This is so stinking cute! We are actually in the car on the way home from the beach. I’ll have to make this for our bedroom nightstand there.
Kathy what a great little project! I just love the twine on the base. This is a great way to extend your vacation! So happy to be part of this tour!
I love great vacation souvenir ideas. I did a shadow box with some stuff years ago, but took an awesome bucket list trip in June and I brought home sand, rocks etc. Now, you’ve given me a new idea to “remember” my trip!
pinned!
gail
Kathy that turned out very cute! Love how you used the roping around the bottom! So glad you enjoyed your trip!
What a great trip souvenir piece, Kathy! Love it!