DIY Easter Decor And Gift Baskets
As an Amazon Associate, I earn from qualifying purchases.
These Easter projects are made with various items, including upcycled Ball jars, recycled light fixture globes, junk treasures, and new craft supplies. Take these ideas and make them your own.
DIY Easter Baskets and Home Decor
Easter is right up there with Christmas for cool decor. I think I like Easter decorations because they are so colorful.
1. Upcycled Light Fixture Easter Centerpiece

I found the hanging light fixture at a new thrift/junk shop in my area. At least the shop is new to me. The fixture price was $5 and I thought that was a good deal. I was perusing the junk shelves in my workshop looking for a small project to work on and came up with the fixture.

I removed all of the electrical parts from the light fixture using wire cutters and a screwdriver. Then I washed the dirty glass globe and applied clear wax to the rusty top and chain.
The wax keeps the rusty stuff from coming off on your hands and gives a little shine to the top. I use wax on all kinds of stuff. You need to keep a can in your cabinet—any brand.

The only thing left to do was fill the globe with colorful shredded paper and a few Easter decorations. I had the rabbits and sparkly eggs left over from the terracotta pot transformation coming up next.
A small piece of cork I placed in the bottom hole of the fixture keeps the paper from falling out. I guess the hole once contained a finial?
2. Stenciled Terra Cotta Pot Easter Centerpiece For Spring
I spotted the flower pot idea when thumbing through a craft booklet at Michaels. It was so cute I wanted to make my own. But as often happens, I veered from the plan in the brochure.
The cool thing about crafting…you can make the project “your own”. Get the basic idea from Pinterest, a magazine, or me, and go from there.

For the project, I picked a medium-size clay (or terra cotta) pot, stencils, acrylic paints, and Easter-type decorations at the crafts store.

I planned the design and started applying the adhesive stencils but then changed the plan as I went and added more stenciled flowers. The pot is so pretty. It doesn’t need to be filled with flowers or decorations. The pot could be used as is to hold pencils, paint brushes, etc.

I glued floral foam to the inside bottom of the terra cotta pot and then started placing the Easter decorations. I started with the paper “grass” mixing the blue and green paper together then placed the rabbit picks and the toy flutes. Next, I added the foam eggs all willy-nilly.
3. Easter Craft: Upcycled Mason Jar Candle Holders
These candle holders are super cute and the kids can help you put them together. Maybe a little supervision using the glue gun. I’ve burned my fingertips so many times using hot glue. I don’t think I have any fingerprints left.

If one is good, three are even better, right? Turquoise and green are an awesome color combination….. It makes me think of Spring.

I went through the junk in my workshop, gathering mason jars, ball jars, and things I thought might work for a Spring project.

I used a glue gun to adhere the glittery trim to each jar and then partially filled them with shredded paper. Next I added LED tealights. Real candles make me nervous.
4. Vintage Water Dipper Spring Display

I found the vintage enamel water dipper at my favorite junk shop. I love the blue color.

You can find the project tutorial for the bird nest display here…Bird Nest In a Vintage Water Dipper Display Idea
5. Bunny Ear Door Wreath: Easter Craft for Spring
This project was so much fun and inexpensive too.
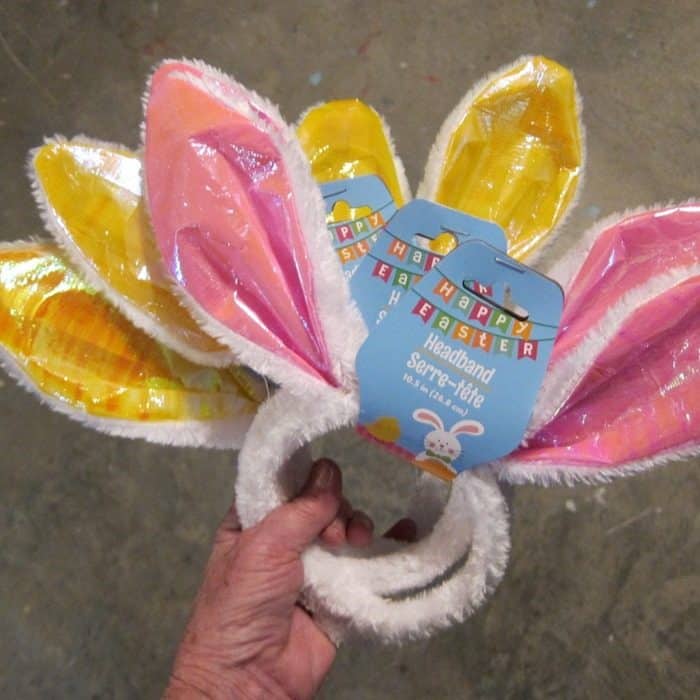
I bought the bunny ears at Dollar Tree.

I wired the bunny ear headbands together and added the metal birdhouse to the middle of the wreath with wire. The birdhouse also came from Dollar Tree. It was originally a garden stake.
6. Old Lantern Bird Nest Display
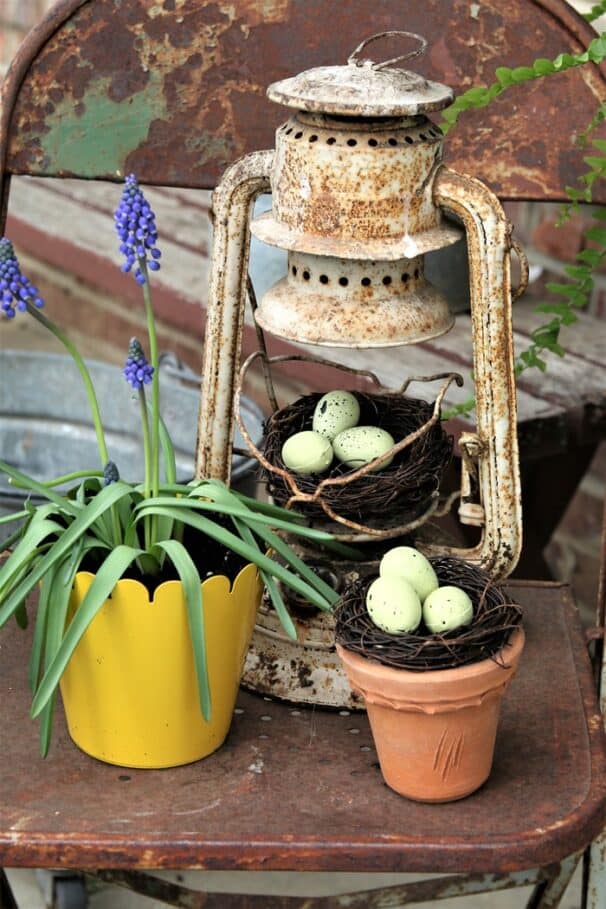
The old rusty lantern was the perfect holder for a bird’s nest as was the tiny terra cotta pot. See the project here on my Spring porch….Decorating the Porch in Yellow for Spring.
7. White Basket Bird Nest Spring Decoration
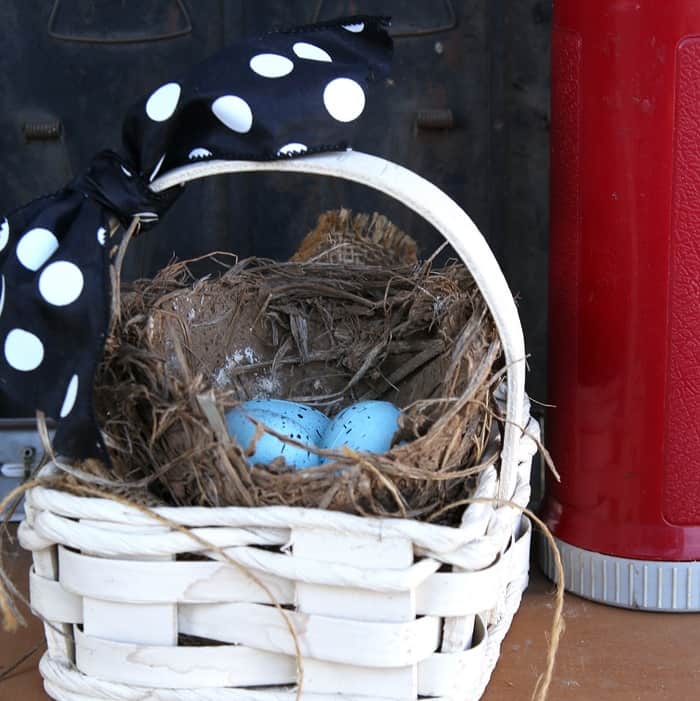
Baskets make great decor pieces and white baskets are my favorite. I filled this one with a real bird’s nest and faux Robin eggs. The project is here….Bird Nest In A Basket Idea
8. A Pretty Display
Sometimes you don’t have to make anything.
I bought the cute rabbit at a local home decor store. It was relatively inexpensive and I just added it to one of my Spring displays.
My friend Sarah, Sadieseasongoods has more great Easter craft ideas here.

Do you have a favorite? Leave a note if you have time and thanks for being here, Kathy


What a sweet scroll of Easter upcycles this was! Your light fixture cloche with the bunnies inside is so whimsical! Totally stole my heart!
I am so happy to feature your awesome post on Full Plate Thursday, 786 this week. Thanks so much for sharing your talent with us and come back to see us real soon!
Miz Helen
Who doesn’t love a good upcycle project, Kathy!
Thank you for sharing your Easter crafts to brighten your spring decor DIY’s at Create, Bake, Grow & Gather this week. I’m delighted to be featuring them at the party today and pinning too.
I love your ideas. It reminds me that I need to pull out my box of Spring decorations and try something new. This post will be a feature this week. #HomeMattersParty
Thank you Naomi!
Barbara, I love your bird cage idea! I have one I could do something similar with after reading your idea. Thanks for sharing it!
Kathy, I love the old, rusty lantern and especially the vintage water dipper with nests and eggs. Probably because I tend to love rusty stuff in general. But the jars filled with Easter decor are appealing, too. A sweet collection of Spring decor.
Love these Easter vignette ideas. I have a bird cage and I’ll put a rabbit in it along with some Easter Eggs and a bunch of carrots hanging from the top. I love the old rusty pan with the bird nest and the old lantern. You are indeed an inspiration! Thanks so much!