Technique For Metallic Silver Furniture Project
As an Amazon Associate, I earn from qualifying purchases.
I promised you guys I would tell the secret to my metallic silver polka dot whimsical table.
Here it is…..spray paint.
Yep, I never use canned spray paint for furniture projects….well now I can’t say never…this project is the first.

Now, many years ago I used spray paint on a table…but that’s before I turned into a real furniture painter.

This is the table before.

This is my inspiration for the project. I use the scrap board for spray painting hardware and such.
At one time I spray painted something brown then I spray painted some round hardware with metallic silver and this is how the board looked.
I loved the brown circles against the metallic!!
And this metallic spray paint had such a glorious sheen to it!
Of course when I went to buy more….no where to be found.
It is the Wal-Mart brand and the color is aluminum. I don’t know how long the paint has been on my shelf but they don’t make this color anymore.

Since I love Rust-Oleum spray paint I came home with this paint in the hopes that it would be just as lovely as the other.
And it was.
It’s called Bright Coat Metallic Finish.

I first applied one coat of Glidden Grey Gripper Primer.

Then the Rust-Oleum spray paint. It took about 10 minutes to paint this table.
I applied a second coat about 30 minutes after the first.
The second coat was just a little touch up.
This paint covers really well.
I think there has been a huge improvement in spray paint over the past few years.

Stenciling was next.
I have this huge Caromal Colours circle stencil with circles that aren’t exactly round and they are placed all willy-nilly.

This is a picture of the table with the stencil still on it and you can see where I applied the brown paint.

The stencil has a sticky back which I just love because it keeps the stencil in place and also because paint very seldom leaks under the edges.
The stencil works best when I let the paint dry more than 30 minutes.
I am a bit impatient.
Can you see where I pulled up a little of the silver paint?
It wasn’t really bad and since I was going to use toner on the top…probably would not have been noticed.

But I tried to patch it anyway and look how it turned out.
After working with it a little more and re-painting the missing circle…I moved on.
Yes, I know…patience is a virtue.
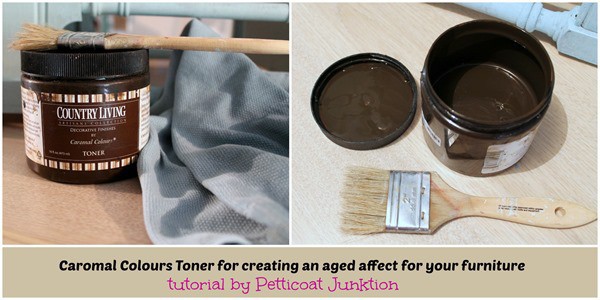
Next comes the toner for an antique affect or just cutting the shine a little.
I use this product a lot.
For a really in-depth tutorial on how to use the toner for antiquing furniture just click on the here.

I brushed the toner on and then wiped it off until I got the look I wanted.

You can see where the toner settles into the imperfections of the table top.
Awesome!
I used a very light toning affect on the table.
The toner can be used very heavily, moderately, or very lightly…like here.

I also used just a touch on those wonderful curved details at the top of the legs.
So that’s it folks.
This project had it’s ups and downs.
Most of my projects don’t go smoothly…you just don’t hear about the goofs!
Do you like metallic silver furniture?
Do you use spray paint for furniture projects?
Leave me a little note below.
I love hearing from you.
You only have to leave your name (first name is ok) and your email address, then your comment.
Your email address will not be shown on my blog.
Thanks for stopping by and have a great week,
Petticoat Junktion Pinterest Boards
Kathy
ADORABLE!! I love the polka dots.
Only if the paint is chipping. Should be able to paint right over it!!
Thanks Kathy!
One more question. I bought the dresser white, and painted it cream about 4 years ago. Do you think i’ll need to strip the paint?
I think either would be fine Missy. I found the spray paint to be really easy to use and it covers well. I like the Rustoleum Bright Coat Metallic.
Hi
I’m planning on redoing a wood dresser with five drawers this weekend and I’d like to do the metallic look. Would you recommend using spray paint technique on a large piece? Or should I go with your Martha Stewart metallic paint tutorial?
Great blog! Thanks for sharing
Thank you for the sweet comment Ms. Mike. I too lived in an apartment for a while a few years ago and I know how hard it is to find a place to paint. When the weather was nice I painted furniture on our tiny balcony. Not fun! Hope you have a great craft show this weekend!
I’ve been saving this post for when I had the time to follow through on all the links. But before I go on I wanted to say that I love spray paint. As an apartment dweller it’s hard to take on a large, brush paint project, but with some newspaper I can spray paint in the parking lot! I use it all the time and patience is really a virtue so you don’t mess up your hard work with finger prints! Today was the first day the weather was good enough to paint and there I was at just past daylight sprucing up the display pieces I’ll be using at a craft show next weekend, silver spraying frames, and painting the legs on the ironing board that I use as an extra table. The ironing board is great to use, easy to transport (which means I don’t have to have a man or a dolly!) and gives a little extra height when used with 4′ folding tables. I love your blog and look forward to every post. Thanks for all you have done to inspire me to try new things, perfect old ideas, and just have fun.
I understand Jill. Some people prefer the wood finish….and that’s ok. Thanks for reading my blog and the nice comment!
i don’t think i have ever used a metallic paint on anything before i may just have to sneak up on something and try it thanks for sharing xx p.s. how did you do on exam ?
I really like the piece in it’s original state. It’s probably just me since I live in a 100+ year old home. You’re very creative and love your posts.
I do like the look and the “goofs” just add to the character of the piece. Great job!