Vintage Furniture Makeover: Latex Paint and Wet Wipes Distressing
As an Amazon Associate, I earn from qualifying purchases.
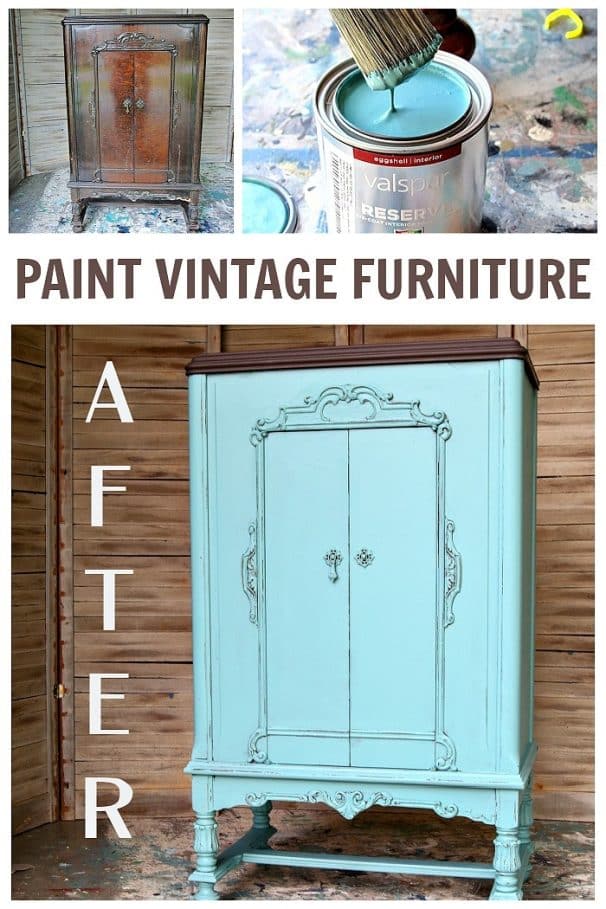
This tutorial will show you how easy it is to paint vintage furniture with latex paint and then distress the paint using wet wipes for an antiqued finish.

I’ve had the radio cabinet for a while now and don’t remember how much I paid. I think I bought it at the auction. My memory! Today is the Furniture Fixer Upper Tour. After this tutorial, be sure to visit my talented friends.

I didn’t have to worry about removing the radio from the cabinet because a previous owner had done it for me.

I removed the remaining parts except for the shelf. It took a little time and a lot of elbow grease, but I got it done.

Next, I cleaned and shined the inside using Simple Green and Howard’s Feed n Wax.

The top of the cabinet opens up. After researching the piece, I discovered it is an RCA Victor RE-57 Radio-Phonograph-Record Cutter, probably manufactured in the early 1930s. The inside top part contained a phonograph and record cutter. I didn’t know you could cut records at home.

Next on the to-do list was to cut a back for the cabinet. The JTS measured the opening.

I had a panel of faux beadboard in the shop, and we decided to use that for the back.

The JTS cut the piece to size, and I painted the panel while he cut another piece for the cabinet. It’s much easier to paint the panel before nailing it in place.

While the paint was drying on the back panel, I taped around the doors because I didn’t want to paint the original stained finish on the inside part of the doors.

I attached the panel using my battery-powered Ryobi Brad Nailer. The Brad Nailer is one of my favorite tools! It sure beats using a hammer and nails. I can never hold on to nails.

The JTS (Junktion Technical Specialist) cut a piece of the beadboard panel to make a shelf where the phonograph was removed.

You might remember this paint from last month’s Furniture Fixer Upper Tour. I love the color and thought it would be perfect for the radio cabinet. The color is Lost Atlantis from Valspar.

The cabinet looked rough after just one coat of paint. I used a small jar of paint to keep the top up while the paint dried inside and out.

We placed the shelf the JTS cut into the open space where the phonograph used to be and nailed it in place. Then I painted it the turquoise light blue Lost Atlantis color.
This area will be a great place to store stuff. It will be hidden. Set decorative pieces on top of the radio cabinet; no one will ever know the top lifts up.

I decided on a two-tone look for the cabinet and mixed several colors in my paint stash to get a brown color. I would have preferred to leave the top unpainted, but the original stained finish was too messed up, and you know I don’t refinish anything. Maybe one of these days, I’ll give refinishing a try.

The custom brown color I mixed myself looks pretty good. The contrast is just right with the blue color.

The whole look was shaping up nicely. I ended up brushing on three coats of Lost Atlantis. The last coat was mainly to cover up a few hard-to-reach areas.

Now, to distress the paint, I ran out of wet wipes, so I used disinfecting wipes, the only wipes I had in the workshop.

I rubbed over the paint with a wet wipe several times to dampen the paint. Since I waited overnight and there were three coats of paint on the cabinet, it was hard to wipe off. Running the wet wipe over the paint several times and letting it sit for a minute makes it easier to remove the paint.

I finally resorted to wrapping a piece of sandpaper in the wet wipe and distressing the paint. I had never tried this before, and it worked great. The sandpaper is 60 grit, and it helped remove the paint without removing the finish down to raw wood.

I like to use the wet distress method because it saves the original stained finish. Using sandpaper only to do the distressing removes the paint and stained finish, leaving the raw, unfinished wood.

The inside of the doors needed refreshing, so I used my old stand by Howard’s Feed n Wax. In the photo above, the door on the left has been refreshed! Can you see the difference the feed n wax makes?
Can you also see the pretty blue painted back and the scrapbook paper from Hobby Lobby I used to line the shelves? Very pretty.

I didn’t go overboard with the distressing. The original stained finish in the distressed areas gives a nice antiqued look to the cabinet

Those distressed areas add depth and character to the radio cabinet. Painting the cabinet was a no-brainer for me. The carved details just called for distressed paint.

The hardware pull on the right door was missing the drop piece, but it looks fine without it.

The carved detail on the legs is gorgeous, and I don’t believe I’ve seen this style before.

So, what do you think of this makeover? Are you tired of the Lost Atlantis paint color? What about distressing paint with sandpaper wrapped in wet wipes ….an invention of my own? Leave a note if you have time before heading out on the Furniture Fixer Upper Tour.
Take the tour by clicking the blog links below the “before” furniture makeovers collage….

Furniture Fixer Upper Tour:
Thrift Store Dresser Makeover – Confessions of a Serial DIY’er
How To Apply Color Wash – Salvaged Inspirations
Round Table Makeover – My Repurposed Life
Painting A Table Blue – A Ray Of Sunlight
Painting Vintage Furniture With Latex Paint– Petticoat Junktion (you are here)

As always, thanks for being here, Kathy

thank you
absolutely stunning!
Absolutely Beautiful! Hugs,
I have several posts about latex paint. The formulas have improved a lot over the past years and I use latex paint for the majority of my makeovers.
Love the cabinet and look! I have one question though. Why latex paint. Everything I’m learning about redoing furniture warns against using latex. Can I get your perspective on this topic please 🙏🏻
That color is good for some items but don’t care for it on this cabinet
Such a pretty piece! I love it!
So pretty, Kathy! That was sure a lot of work and cleaning! But you’ve turned it into a lovely and functional little storage piece. I agree that the painting really makes those details extra special. Nice job!
You and and the JTS did a lot of work to the inside of the piece. I would like to see more before and afters of the inside. In my opinion the door pulls/ hardware should be replaced. I think the missing pull is too obvious. Otherwise it’s a gorgeous remake. The brown painted top and distressing really make the piece. Great job!
Wow! The radio cabinet looks great with the blue latex paint! Pinned!
It’s gorgeous, Kathy! The distressing is just right! XOXO
I am NOT tired of this Lost Atlantis paint color. It is stunning on this piece. The wet distress ties in with the dark top and brilliant using wet wipes. So much better than sanding through to raw wood! PINNED! XOXO
Thank you. I get a little wild and crazy sometimes, lol.
Thank you
Hi Nichole, I’m glad you liked the makeover and it does have a coastal vibe doesn’t it? I just cleaned the cabinet with Simple Green and there was no bleed through of any kind and like I mentioned in the post the paint really adhered well! Thanks for the comment and question, Kathy
Hi Kathy, what a beautiful cabinet and I absolutely adore the fresh coastal vibe of Lost Atlantic! Such a nice change from the whites and grays. Well done as always! I’m curious about any prep/priming for this piece. Were you concerned about paint adherence on (what looks like) the varnished surface? Did you have any issues with bleed-through?
Thanks for sharing,
Nichole
Love it!
I’m laughing over the whole invention of the wet wipes (disinfecting wipes 😁) over the sandpaper, especially since you just said I don’t refinish 🤣🤣
You made my day! Gotta love an inventive girl! This turned out beautiful! Such a great find!