DIY Gumball Machine Snow Globe
As an Amazon Associate, I earn from qualifying purchases.
Make a gumball machine snow globe. A red gumball machine is the perfect decorating piece for Christmas. Create a snowy winter wonderland in the globe that will bring a smile to everyone’s face.

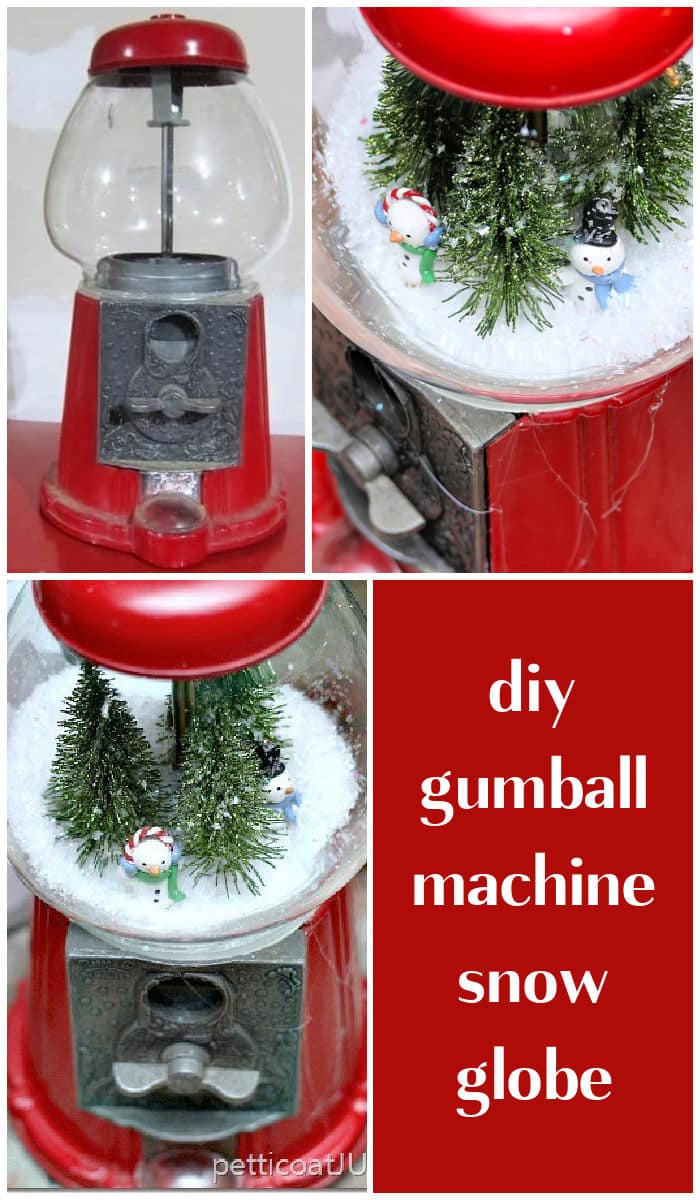
This is the gumball machine I posted about earlier. I bought it at the Nashville Flea Market for $10. It wasn’t a steal, but I’ve been searching for one just for this purpose. So I bought it.

Just wingin’ the makeover since this is a new DIY for me. I first took the top of the gumball machine off and looked inside. The JTS and I talked it over and discussed several ways the project could come together.
I finally decided to remove some pieces completely but leave the center pole inside. It holds everything together as I found out when I tried to remove it. I got a piece of cardboard and cut a circle to fit right down into the lip where the globe sits on the red base.

I put the plastic ring on top of the cardboard and the globe and red top back to see if everything would fit together. And it did. I hot-glued the cardboard to the base of the machine. It looks great, doesn’t it? So far, so good.

Next, I gathered my supplies for the snow scene. The mini snowmen, mini green trees, and fake snow came from Hobby Lobby.

I needed room at the bottom of the globe to build up a deep snow bed, so I hot glued a few wood chips to the cardboard base to raise the snowmen and a couple of the trees to varying heights.

Then I glued the trees and snowmen to the wood bases. In the photo above, you can see exactly what I did. Without the “lifts” the snowmen would have been buried in the snow when I covered the white bases of the trees. And I wanted the trees to be various heights, so I glued a couple of them to wood blocks and left one glued to the base of the globe.

I put the clear globe over the display just to be sure it would fit. Everything looked good, and I was ready to move on to the next step.

I poured the fake snow and some Epsom Salt into the globe and screwed the top on. I tilted the newly made snow globe this way and that until I got the “snow” piled up just right! That was it. The top of the gumball machine holds everything in place.
The project was much easier than I thought it would be and took no time at all to put together. I had all the supplies on hand. Or I should say, I used what I had on hand.
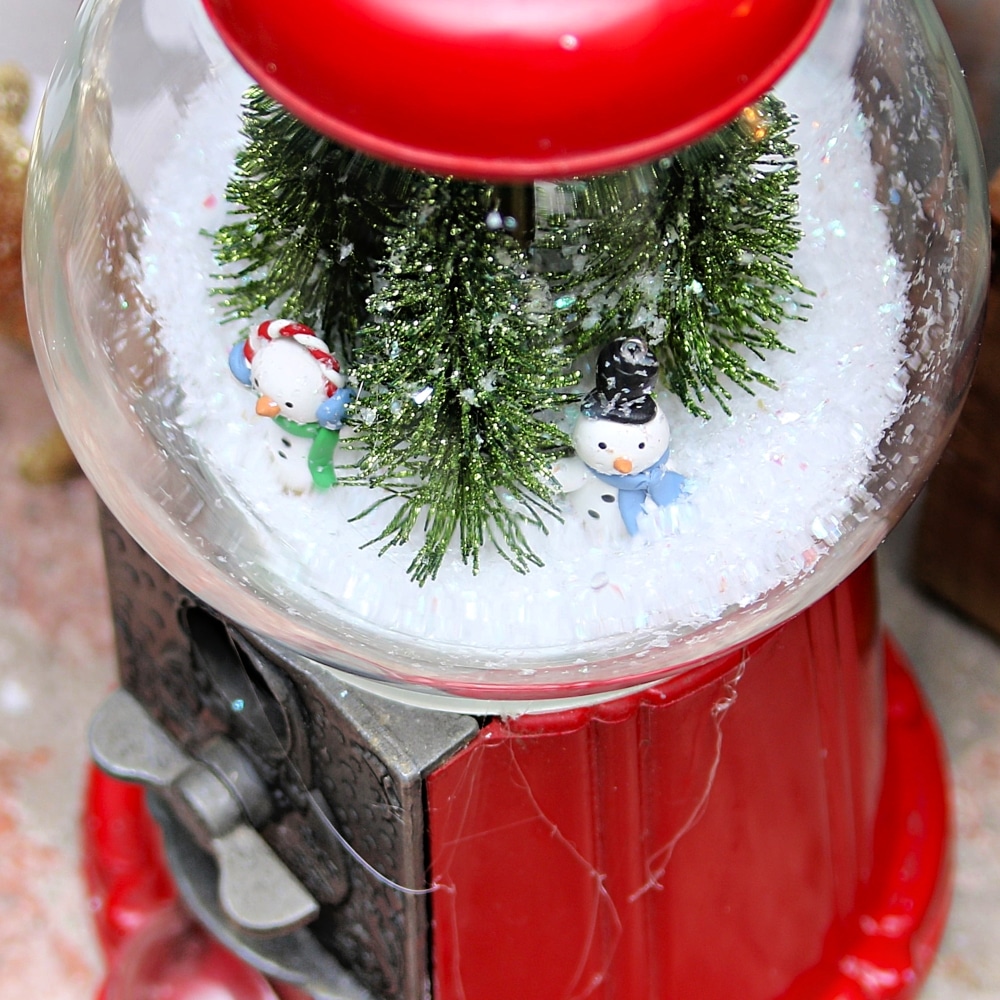
Those little snowmen looking out of the globe are so sweet. In the photo above you can see some of the hot glue “strings” I forgot to remove. When I use hot glue, I get those little strings everywhere.

I hope this idea, with my few tips and tricks, inspires you to create something similar.
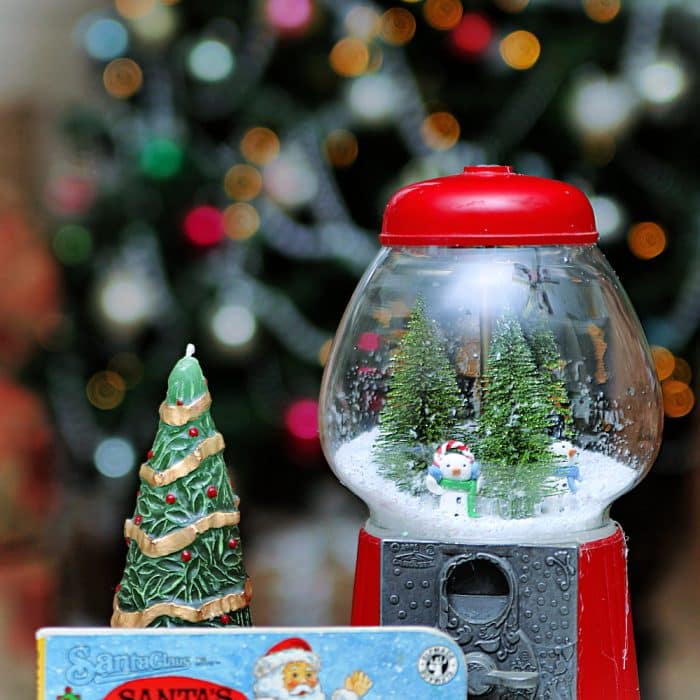
The gumball machine snow globe sits on our coffee table alongside one of my vintage Christmas angels in a little vignette.
What do you think? Maybe I will take the snow scene out and make a display for Valentine’s Day. Hum.
You should see my large stash of vintage glass Christmas tree ornaments. Just click here!
Thank you!
Thank you!
Thank you!
This is so cute. My husband has an old gumball machine. Maybe I can talk him into transforming it into a snow globe – Probably not, but it’s worth a shot!!LOL Here’s wishing you and yours a very Merry Christmas and a Happy Healthy New Year. I always enjoy your posts. Such creativity!!!
So cute! Perfect decoration!
OMGosh that’s just adorable! Thanks for the inspiration.
Merry Christmas!!!
Cutest ever!
I love this and I personally think $10 was a steal. I’ve made things like this using old dome clocks.
Love it! Reminds me of childhood Christmas.
I love this! Such a cute idea. Thanks for linking up to The Creative Exchange. We are featuring your project this week.
xo,
Laura
Wow!!!! In love with this!! Such an awesome upcycle! I have an old gumball machine in the basement that was on its way to the thrift store, but not after this 🙂 Can’t wait to make it!
This looks so adorable!! What a beautiful idea! Thanks so much for sharing!
It’s wonderful! Great job & great that it’s red. Merry Christmas!
Excellent idea! I will be looking for a gumball machine to put one of these together for my mother. Thanks!
I just love these gumball snowglobes I’ve been seeing around the blogosphere this holiday season. Yours is so adorable – love the figurines you used! Pinned to share.
Awww, it’s very cute! I’ve been looking for a little gumball machine to do something similar with!
Tania
Kathy, Your Gumball project is cute. Thank you for sharing the tutorial with us. Merry Christmas!!
Kathy, your Gumball Machine Snow globe is darling! Super cute!!
I LOVE it Kathy!….I have one of these and this will be a project for next year!….Great idea!
Have a most joyous Christmas Kathy…and a very happy, healthy, and prosperous New Year!