Salvaged Junk Art Angel
As an Amazon Associate, I earn from qualifying purchases.
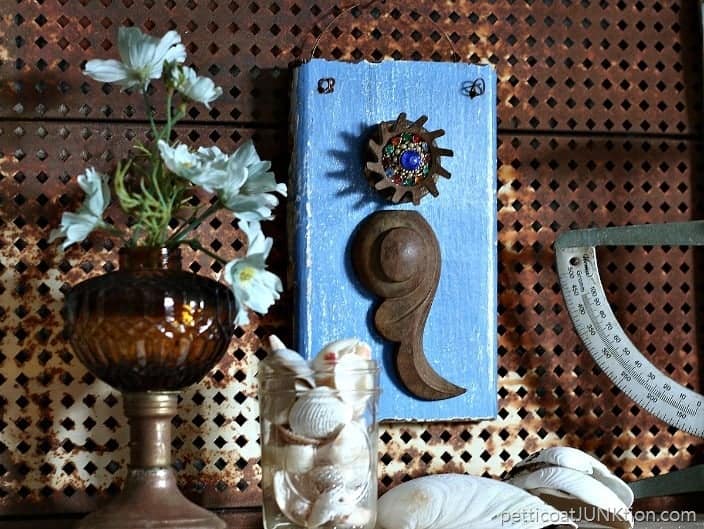
This little angel will be staying at my house. The salvaged junk art angel is made out of reclaimed hardware, junk jewelry, and a door knob backplate from my grandparents house.

When my cousin (Jane) started the whole house makeover of my grandparents home she kept a lot of the original features of the house but some she had to replace.
She was kind enough to give family members salvaged pieces from the home. I got a few of the original interior doors and a few door knob backplates.

I’ve had the pieces for over a year and decided it was time to put together an angel of reclaim using one of the metal backplates. I make what I call “Angels of Reclaim” every so often and I haven’t made one in a while.

These are the 7 backplates I have from the house. Jane started removing the paint from some of the pieces before finding out she couldn’t use them in the remodel.

I liked the patina on a couple of them and selected one to use as the body of one of my reclaimed angels. I went through my furniture hardware stash to find the perfect “wings”.

I tried several pieces before finding the right one. I didn’t care for the porcelain on this drawer pull.

The drawer pull above was a little too straight for angel wings.
Start here here for more Petticoat Junktion DIY.

I decided this one was just right. The way the pull was made I could slide the backplate between the open area in the pull.

Next order of business was to find a piece of reclaimed wood to hold the angel. I found an old door panel in my wood stash that was just the right size.

I distressed the painted door panel very lightly with a power sander. The top layer of paint is a tannish color and the bottom layer of paint was white.

Next I cleaned it with Simple Green and applied a coat of neutral wax (Howard’s). The wax seals the paint and gives it a bit of patina.

I drilled two holes all the way through the wood panel so I could use screws to attach the drawer pull wings to the board.

I used one tiny screw a the bottom of the backplate to hold it in place.

Next I needed the angel’s face. I pulled out my junk stash of jewelry.

The face would need to have a bit of depth to it. A piece of jewelry alone would lay too flat on the board. I pulled several pieces of jewelry and round metal pieces from my junk stash.

I found a giant washer and whatever the thing is in the middle to add depth to the angel’s face and I screwed them in place.

Then I attached a large brooch for the face using hot glue.

The brooch had some missing jewels and was bent up a bit but it looks good with the rest of the stuff.

I drilled a small hole on each side of the wood panel at the top for a plain wire hanger. An antique key attached to the wire hanger was the finishing touch.

That’s it for my angel. What do you think about salvage art? Like it or not? The angel is hanging in our family room.
How about a video on upcycling old movie reels…..
Thanks for being here and have a great day, Kathy

Yes
Yes, angels are good all year round. You need to make one. You can use almost anything. Thanks for the comment Naomi
Oh, that’s so sad. You still have your memories.
I love your angel, especially since she was made with meaningful pieces. I wish I had something salvaged from my grandparents home but it burned to the ground 2yrs ago.
I do like salvage art, Kathy. And I like angel art, so I think your salvage angels are very cool. I’ve never made one but I would like to find the stuff to do it. I should look in my stash(es) to see if I have anything that would work. Anyway, I like ones you have done and look forward to seeing more. Even tho’ the holidays are over. It’s always a good time for making angels, I believe.
Love this idea. I see that I need to start collecting some old hardware.
I hope you wrote on the back why and who—all about the piece and DATED!
Great idea. Sharpies are good for that.
Such a cute idea. I have seen you do some before.
I agree with the top comment-such a wonderful remembrance of your grandparents home. And they are just a neat thing to make just for a look. Angels are always in I think.
What a wonderful reminder of your grandparents house.
I love the angel. I am drawn to angels from a cerebral perspective but am not often drawn to them drom a decorative perspective. However, your angel speaks to me. Perhaps because it’s made with things that were loved which makes it more meaningful and beautiful. Wonderful and fantastically imaginative. Thank you.
She’s beautiful! You are so creative!
I love your angel. You did an absolutely wonderful job. I appreciate your creativity and artistry very much. Thank you for sharing. I appreciate you.