How To Paint A Bench And Recover The Fabric Seat
As an Amazon Associate, I earn from qualifying purchases.
I painted an old, drab, piano bench and recovered the seat with a pretty fabric. Now it looks awesome. The bench is the perfect clothes catchall. Everyone has a clothes catchall in the bedroom, right?
The cool thing is, you can use this process of painting and changing fabric on chairs, cedar chests, stools…..anything with a fabric seat.
Today we’re continuing with the master bedroom makeover saga. The bedroom is slowly coming together.
How To Paint A Bench And Recover The Fabric Seat

Select your project
This is how the piano bench looked before the makeover. Not too stylish but it’s what I was looking for to replace the trunk that usually sits in front of the bedroom window. I would guess the mustard yellow seat is from the 50’s or 60’s.

This isn’t the trunk we had in the space just before the bedroom makeover but it’s one of many in a long line of trunks that have inhabited the space. Trunks make great clothes catchalls and are great for storing everything from clothes to home decor.
I chose the piano bench for the space because it’s small and the legs (instead of a solid wall of wood such as the trunk) make the space more open and thus look larger.
Consider the style and size
Our bedroom is on the small side and in choosing new furniture and decor I’m using various techniques to make the room look larger.
That’s one reason I went with a new headboard only instead of a headboard and footboard. Just a few inches can make a difference and when we walk into the bedroom our eyes land on the window across the room instead of stopping at the footboard.

Remove the padded seat
Anyway, let’s continue with the piano bench makeover process. As you can see the piano bench or piano stool, whichever term you prefer, has a storage space.

Before painting the bench I removed the padded seat and the little thingie that holds the lid up and keeps it from flopping backwards.

Tighten screws and make repairs if needed
The bench was a bit wobbly and all I did was tighten the leg screws and no more wobble.

Choose a paint color
The paint color is the same special mix I used for the nightstands. I promise to share the formula soon. I have a cedar chest to paint and it’s going to be the same off-white color. The cedar chest will be going to the shop to sell.

Paint your project
This is how the piano bench looked after one coat of paint. I brushed on two coats and then started distressing the paint.

It’s more time consuming and difficult to distress paint by hand but you have more control this way.
Distress the paint

For the piano bench I gave up on doing the job by hand and pulled out my handy dandy battery powered Ryobi sander.
How To Recover The Bench Seat
Okay, all done with the painting and time to recover the piano bench seat. The seat smelled a bit musty.

I cleaned it with a mix of bleach and water. The red arrows you see on the fabric are pointing to the screw holes where the seat attaches to the bench.
Mark for screw holes and orientation
Sometimes the screw holes get covered up with the new fabric and I have to hunt for them. Also this way I can tell which is the front and back of the bench which will help with me when I am placing the fabric so the design is just right.

Add extra padding if needed
You might have noticed the vinyl-covered seat has a welt cording around the top sides and bottom edges. I planned to cover the seat as is and in order to cover the cord so there isn’t a big lump under the new fabric I found a roll of polyfill sheeting in my stash of stuff.
Select the fabric
The fabric is from the thrift store skirt I used to recover the seat on the boho chic dresser stool. The print is so pretty.

Prepare the fabric and seat
I wrapped the poly sheeting tight around the seat and stapled it along the edges. Then I cut the fabric to size leaving 2 to 3 inches extra on each side for securing with staples to the seat.

Next, I turned the seat face up and placed the fabric so the pretty part of the design was placed just so-so. Then I flipped the seat over to start stapling the fabric to the bottom of the seat.

Secure the fabric to the seat
I have a complete tutorial on recovering a chair, cedar chest, or an anything seat here. Recovering a padded seat is ridiculously easy.
Staple one side of the fabric to the bottom side of the seat using a heavy duty stapler. Next staple the opposite side pulling the fabric tight. Staple the remainging two sides to the seat.
The corners are the most difficult. Gather the fabric on the corner working it until there are no wrinkles on the upside of the seat then staple securely using several staples. Trim the excess fabric when finished.

The extra padding around the original seat made the piano bench so cushy. The seat was a bit squashed. I bet it saw a lot of use over the years.
BEYOND PAINT - Furniture, Cabinets and More...
THINKWORK Cordless Detail Sander - 20V Electric...
Erosebridal Florals Fabric by The Yard - Spring...
FrogTape Multi-Surface Painters Tape with...
")
How pretty is that old piano bench now. You wouldn’t guess it was the same one would you?

Love that distressed white paint. The fabric might not be perfect against the graphic design in the curtains but it works for me.
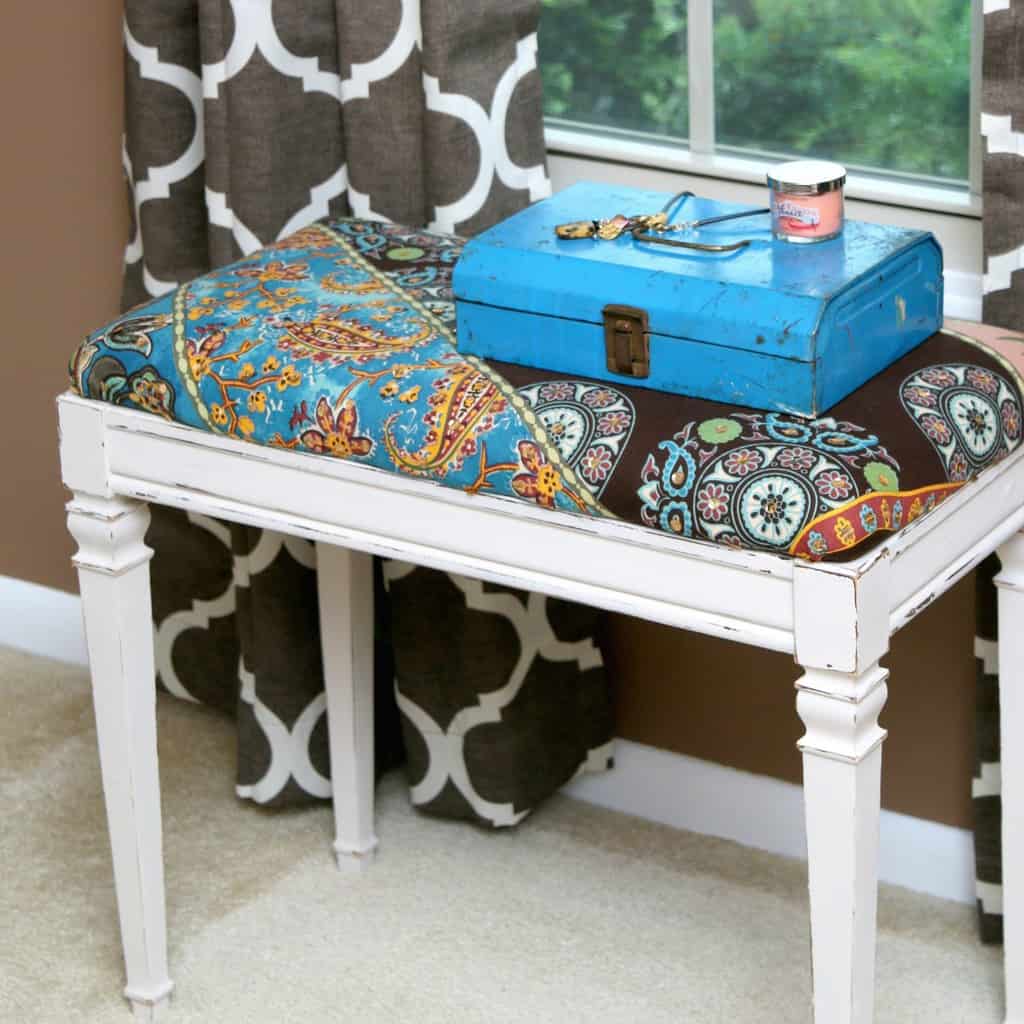
The storage area under the seat isn’t large but it is a great place to store costume jewelry!

I still have one more perfect furniture piece to find before the bedroom is complete. I’ll take pictures of the whole room when it’s done….hopefully it will get done soon.
[ez-toc]
That’s all for me guys. How do you like the bench? If you have time please leave a note. As always thanks for spending time with me, Kathy
Last update on 2026-03-24 / Affiliate links / Images from Amazon Product Advertising API
I love this bench. The fabric is great!
Oooh nice fabric, love the colors and the pattern. I’m admiring your curtains in the background too. I ordered similar ones in dark grey for our living room last week. Can’t wait to see the room reveal! Pinned
Yes, I’ve used curtain panels, shirts, anything pretty!
I never would have thought of using clothing pieces as a recover fabric! I have seen such lovely fabrics in skirts! Cute piece!
No, I’ve never painted an enamel table top. Maybe try an exterior spray paint?
Lovely. I just did a vanity chair. I have a question. Have yo ever painted a enamel top table? Just wondering what type of paint to use. Thanks
I like the bench fabric with the curtain. Great Job!!
I love the fabric…. and you’re very neat when upholstering. An old picnic basket would look great beneath it.
Marvelous! I have saved several outdated cotton printed skirts, etc., for just a thing. I wish I could send them to you as I cannot any more do such things as u do. God bless.
Thank you Glynace. I save wherever I can!
Thanks and go for it girl!
Perfect look! Before I even got to your tutorial, I really loved the 2 fabrics together! Great pick and great savings!
Great job! The fabric is perfect. I have the exact same piano bench. It may be time for a makeover.
Thanks Anne!
Thanks Chris. I purposely covered the seat so the brown would be near the curtains instead of the turquoise. Seemed to flow better.
Thank you Nancy. The drapes came from Walmart. A very thrifty purchase.
Thank you! It’s the second project I used the thrift store skirt fabric to recover a seat. So worth the price.
I love your fabric choice! The project looks amazing! Thanks for sharing!
The piano bench looks great. I love your drapes in that room too.
I’m making a piano bench cushion this week too.?
It looks really lovely and I agree that your choice of fabric is good the brown in the stool goes well with the curtains and the blue a good accent colour
Looks amazing. A fabric correctly chosen can really make or break a finished piece. Well done and Enjoy.
Anne Sands