Old Sewing Machine Cabinet Makeover With Paint And New Knobs
As an Amazon Associate, I earn from qualifying purchases.
I tried a new paint color for the old sewing machine cabinet makeover. I thought the color wasn’t going to be black…..but it’s black. Just wait until you see the makeover results. Paint and a change of hardware works wonders.

I bought the sewing cabinet at my favorite junk shop for $10. The sewing machine parts had already been taken out. That’s a plus in my book.

There were a few things to take care of before I could paint the sewing cabinet. The first order of business was to screw the cabinet top to the base. This is the piece that normally lifts up to raise the sewing machine. The JTS used a countersink bit to drill the holes for the screws.

And this is how it looks. The screw sits flush with or below the top. You sure don’t want a screw head sticking out of the table top.

To hide the screws I covered them with Elmer’s wood putty and waited for the putty to dry.

Then I sanded off the excess putty until it was nice and flush with the cabinet top. Looks perfect doesn’t it. I sanded the whole cabinet top because it was a bit rough in places where the original finish was flaking off.

I didn’t notice the loose veneer until I was cleaning the cabinet. Have to take care of that before painting.

Since I was ready to paint and didn’t want to wait on wood glue to dry I grabbed this little tube of DAP Rapid Fuse. It dries really fast. I use gloves for products like this because I absolutely hate it when I glue my fingers to the furniture.

I got a bit of excess glue around the raised wood. The reason the glue is everywhere is because I kept pressing down and rubbing my gloved hand over the area until the glue was dry enough to hold the veneer in place. That took 2 or 3 minutes.</p?

Since I didn’t think the paint would adhere to the glue very well I sanded off the excess glue.

When removing the knobs before starting the painting process I found one of the knob screws was behind the little tray thingy on the inside of the sewing cabinet. I removed the tray so I could remove the knob. I need to go back and take a photo of the inside of the cabinet door.
I painted it too and screwed the tray back in place. I’m sure the tray was used for spools of thread, bobbins, etc. It’s a great place to hold pens, pencils, tape, etc. because the repurposed sewing cabinet would make a great desk.

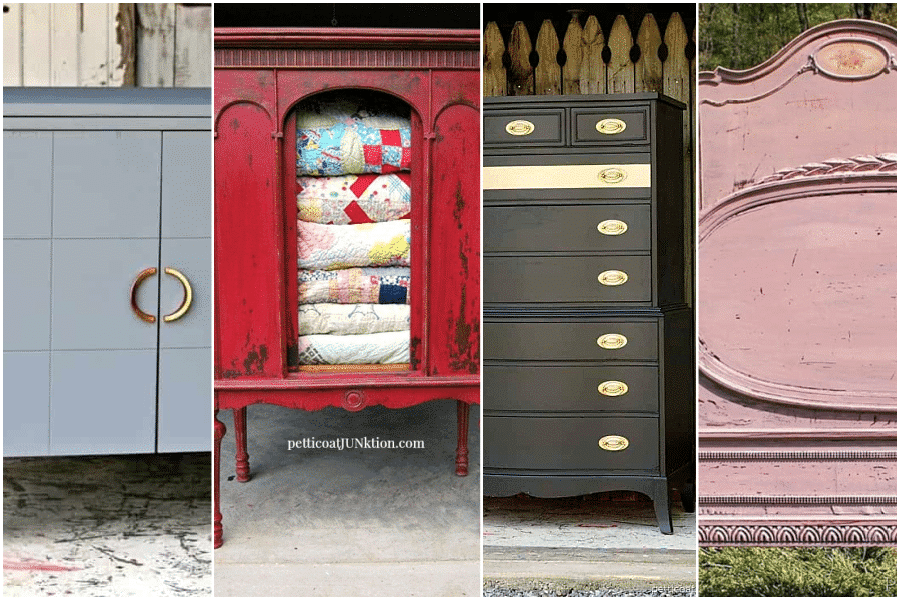
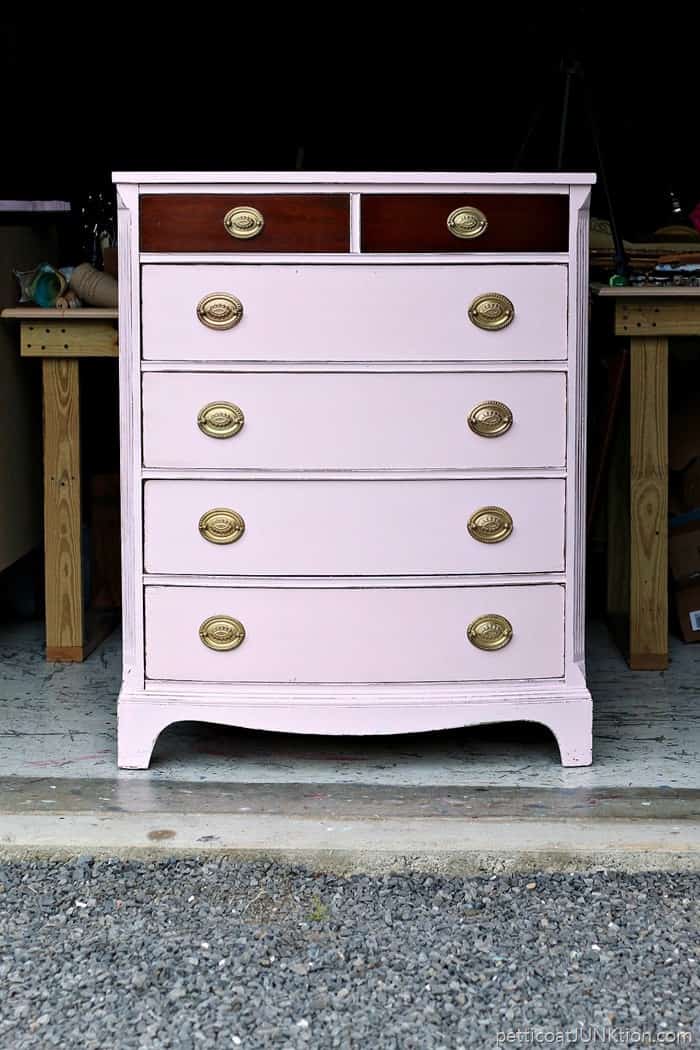
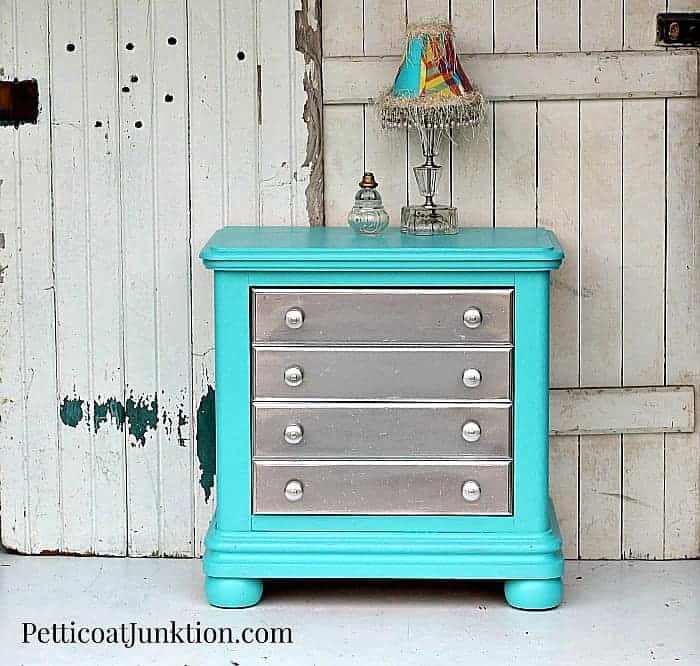
I’ve used the no wax chock paint before. In fact I know Marilyn! She lives here in Clarksville and first retailed her paints and other DIY paint products at the shop where I have my booth. I painted a pink chest of drawers and a blue chest of drawers with the paint a while back.

You can find information and paint directions on the back of the paint jar. The color for this project is Industrial.

I was looking for a color similar to the Deep Caviar paint color from Benjamin Moore. The photos of the paint projects I see online look like the color is almost black but with a slight brown case. That’s what I wanted. Stay tuned because I’m going to mix two chock paint colors together and see what I come up with.

The photo above shows the cabinet with one coat of paint. I applied two coats because there are always spots in the corners or seams that I miss. The color is pretty and the sheen is the best part. I’m not sure how to describe the sheen. Maybe between matte and eggshell but with a soft glow……weird I know.

Okay, now for some different pulls. There was one of the original knobs missing and the knobs were sooooo blah. The JTS bought this huge bag of plain glossy white knobs at an auction for 2 or 3 bucks.

At the time I didn’t think I would use the knobs on anything or at least not without painting them. I was wrong. The shiny knobs look great against the black paint.

The sheen makes the color look a bit different but it’s definitely black, regardless of what my friend Sara says. The color is Industrial from the Miss Lillian’s No-Wax Chock Paint line.

I like that the chock paint goes on smoothly and covers really well. Marilyn, the developer of Miss Lillian’s No-Wax Chock paint, calls it “Chock” because the term “Chalk Paint” is trademarked by Annie Sloan. If you use a trademarked name improperly you can be sued. That is why you see names like “FolkArt Home Decor Chalk”, “Kilz Chalk Style”, “Rustoleum Chalked Paint”, “Americana® Decor™ Chalky Finish Paint”, etc. instead of calling them plain old “Chalk Paint”.

Are you guys surprised I didn’t distress the paint? I am. The finish looked so darn smooth and pretty I couldn’t bring myself to distress even the smallest bit.

It needs a cute little chair or not. The black cabinet would make a great bedside table or anywhere table.

Even with the curvy legs the sewing cabinet has a modern look. I think it’s the knobs.
Updated! To answer your questions in the comments this a.m. about the paint. I did not seal the table but I would suggest to apply a top coat if the piece will get a lot of use. If you are using the furniture on a porch or other outdoor covered area then use a sealer made for the outdoors. Latex or water based sealer should be used.
The paint is not thick and doesn’t look like chalk finish paint at all. It goes on smoothly and covers really well. Yes, the sheen is beautiful. I took the cabinet to the shop the day after painting. The paint has not chipped at all even when I close the cabinet door. I still need to get that photo of the inside. I will try to make it to the shop today and take a shot of the inside.

What do you guys think of the project? I’m patting myself on the back and doing the happy dance. Leave a note and you guys take care of yourselves, Kathy

Oooh Kathy, I love the color AND the sheen on this sewing table. The glossy white knobs are perfect! This little table would look amazing in my new home office. Pinned
You are so sweet Kim. I still have that quilt cabinet. It’s one of my faves too.
Thank you Kay!
I absolutely love this piece the colour and hardware perfect. Congrats from Oz.
I love the color and that sheen is great. I absolutely love the white knobs on it. They totally set it off. Oh how I wish I hadn’t passed up my aunt’s sewing machine now. {{sigh}}
This is now my favorite piece that you’ve done. The other piece that I like so well is the red quilt cabinet. Thanks for sharing your great ideas.
Love it.
Hmmmm…only the first picture would show up for me but it shows the finished product, so at least I see it. Nice! It is much improved and given a second life!
I love the paint treatment on the sewing cabinet! The white knobs are a perfect contrast!
I have a question about the interior of the cabinet. With the machine removed, did you add a shelf so that the cabinet could have storage capability?
I didn’t use a sealer but I would suggest using one if the furniture gets heavy use.
The paint isn’t thick at all and no need to sand.
Yes, be on the look out for the cabinets. Hubby gets some good buys at the auction!
Thank you
Thanks Gwen!
Thank you
Thank you
True!
Thank you
Thank you
You’ve given me ideas! Storage, great!
Yes! Paint works wonders
Wow – what a difference a little paint makes! The color now makes the piece look very rich – great job!
I adore the makeover you did on this cabinet. I was surprised you screwed down the top. Hidden storage was the first thing that popped in my head. Thank you for inspiring me.
Really pretty, and I love the sheen, too!
Quite an amazing transformation. It’s just adorable.
Hi Kathy, Gluing your fingers to furniture is even worse than gluing your fingers together 🙂
Love your blog~ Stay safe.
Kathy, I love this makeover, and I love the white knobs. It is a beautiful piece.
That black is beautiful. This is one of my favorite pieces.
Hey Kathy! I love those white pulls, such a great contrast to the black and a great idea to close up all the opening bits! I love this makeover!
That black paint is beautiful.Somehow it looks richer than regular black.It must be the understated sheen
I love it & you can see that it has a nice finish on it that is a little different than you normally see. Great job. I have seen sewing machine cabinets sell for reasonable prices but wondered what would you do with it. I never thought about screwing down the top. Great idea! Yours with the curvy legs give it a more dressy feel which I like. Ones I have seen look more like a stick. I will have to watch out for those. I think your hubby scored buying those knobs for $4.00. I wished I had been at that auction! LOL
Love it! Is the paint as thick as chalk paint? Does it go on smoothly? No need to sand?
Hi Kathy! I love the color and I see what you mean about the sheen. Did you use any kind of sealer on it? The knobs are perfect for this piece. Great makeover.
Cheryl
Your right-it does look modern☺️ Thanks for this redo because I too have one just like it. Yours turned out great. Would love to see the inside. Did you say you mixed 2 paints? As always— very inspiring?
Now I know what I will be doing today, I have one just like that just waiting for an up do. Perfect for by the bed, just the right height ! Lovely job I think you were right not to distress this piece.
Classy look! Really like that finish.
I do like that – especially not distressed. I’d buy it if it was near me!! Lovely colour and proportions…. but you didn’t show the inside. I was looking for the drawer!