How To Stencil A Farmhouse Style Design | Thrift Store Decor
As an Amazon Associate, I earn from qualifying purchases.
How To Stencil A Farmhouse Style Design
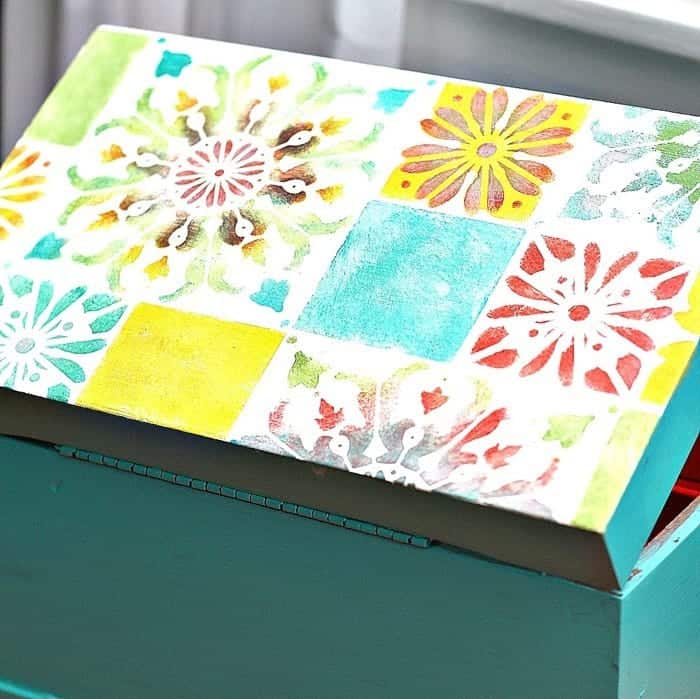
Learn how to stencil a farmhouse style design on a tray. You can use the tray to serve drinks or hang the farmhouse tray on the wall. It’s pretty.
You guys remember that $2 serving tray I bought at the big yard sale? I painted and stenciled it up. The farmhouse style diy serving tray is pretty enough to hang on the wall.

Farmhouse Style DIY Serving Tray
I did hang it on the wall. Actually I hung it on one of the cool doors I use to stage photos…..just so I could get this photo.
Today is Thrift Store Decor Makeover Day and my thrifty friends have some really fun projects for us. Links to all of the projects are after the serving tray tutorial.

If you missed the $2 tray on Monday here it is.

First thing I did was paint the tray white. I left the metal part unpainted…..except where I got a bit of white on the metal…..maybe more than a bit. But that’s okay because it works. Looks like a little dry brushing.

Next I went on the hunt for a stencil. I found this never before used stencil in my stash. The size was perfect for the tray if I left off the top “kitchen” part. The design also looked like it would fit my farmhouse style theme for this project.

How To Stencil A Farmhouse Style Design
1. Select your paint colors
I selected 3 colors of gray paint for the wording; a dark gray, a light gray, and a metallic silver. You can keep your stencil design from looking flat when you use multiple colors and layer them on the stencil. I poured a small bit of each paint onto a piece of cardboard (free paint palette).
2. Place the stencil.
I taped the bottom edge of the stencil to the metal frame of the tray. I also taped the lower half of the stencil on each side. Since the stencil was large and I was only using part of it, the top of the stencil couldn’t be taped down. Sometimes I cut my stencils up but I didn’t want to cut this one. When I started stenciling the “Bakery” word I held the stencil in place with my free hand.
3. Load the stencil brush with paint.
I dipped the brush into the dark gray stencil then dabbed most of the paint off of the brush. You can read my “How to Stencil” instructions here. The secret to stenciling is a very, very, dry stencil brush. No big blobs of paint and perfect stenciling.
4. Begin Stenciling.
There are many ways to apply the paints using a stencil brush which I prefer over the sponge thingies. For this project I dabbed the paint onto the design. Sometimes I use a swirling motion but I hardly every pounce.
5. Stencil the complete design.
I stenciled the entire design with the dark gray color before adding the shading using the other two colors.
6. Check your work.
I always check my design through the process to see if the paint is dark enough and if I covered all the areas I needed to. The corners and edges of numbers and letters are often missed. You can see in photo 6 that the design is not covered completely with paint. Adds character and depth.
7. Add more colors.
The paint dries really fast and you can usually add the second and third colors as soon as you are finished with the previous color. I used the lightest gray and dabbed paint on the stencil kind of willy nilly not covering the dark gray completely. Next I added the metallic silver color using the same process.
Once you are happy with the painted design (remember you can carefully lift the edges of your stencil to see how things are looking) remove the stencil and wash it and the brush with soap and water or a cleaning agent like Simple Green.
Step 8 shows where I very lightly distressed the whole surface of the painted tray using flexible sandpaper. In step 9 I brushed on two coats of Matte Mod Podge to protect the paint. All Done!

The tray can be used as a serving tray or as wall décor….or both. The project took about an hour. I’m always amazed at how easy and quick it is to transform a thrifty find….or stuff around the house that needs updating. I have a lot of that.

I like the tray as wall décor. It will be heading to my booth at the shop. The price will be very reasonable…..maybe $9-$12. The shop owner gets 10% of every sale, plus booth rent each month.

Farmhouse Style DIY Serving Tray
What do you guys think of the tray? Hang it on the wall or use it?
Time to see what my thrifty friends have for us today. Just click the pink text links below the “before” makeover photo collage.

Iron Look Lamp Makeover from Our Southern Home
Stained Apple Basket from Domestically Speaking
Repurposed Oil Can Pumpkin from House Hawthornes
Farmhouse Style Serving Tray from Petticoat Junktion (you are here)
Halloween Haunted House Decor from Sadie Seasongoods
Repurposed Shutter Magazine Rack from My Repurposed Life
As always thanks for being here and have a great day, Kathy


As usual, you rock
I truly LOVE this makeover. It would be perfect in our home. I’ve passed these over too many times!
Super job Kathy! The tray looks fabulous. So funny that you had that brand new stencil in your stash! Sounds like someone else I know. lol
pinned!
Very pretty and what an amazing change! You stencil like I do. My husband always laughed because I would use so many colors on a stencil – he said I was like a kid and a coloring book. Well, he stopped laughing when he saw a beautiful finished stencil i did that had tons of dimension! I often use spray adhesive – just a small amount because I hate the adhesive boogers that are left behind if you use too much. I did find an adhesive eraser that gets rid of the “boogers” easily, though. I clean my stencils with Professional Strength Goof Off. You just put a small amount on a rag and wipe over the stencil. It easily removes the dried paint or waxes that I use during stenciling. It’s big bonus is it works FAST and there’s no oily residue left behind like with Goo Gone (which I never had much luck with). It evaporates quickly, leaving behind a brand new looking stencil. If I use soapy water, I never get off all the paint and I have to spend a lot of time scrubbing. With Goof Off, no scrubbing, no hard work, just wipe and it’s clean! I swear I’m not associated with the company or advertising for them. It’s just a fantastic product I found that has lots of uses. Oh, and it’s cheap – less than 4$!
Kathy that tray turned out so cute!
Very clever. And absolutely the right stencil from the point of view of the proportions of the lettering etc. Great result
Kathy,
Love the tray. It would look great on a wall. If it is used as a tray, it would cover up the wonderful stenciling job you did!! LOL
Your creativity never ceases to amaze me!!
Such a cute project! I’m sure someone will buy that as soon as you put it in the booth!
Really like this idea. Will have to be on look out for a couple of trays similar. Thanks for the inspiration!
Kathy, I love the tray. I would leave it on the wall to show it off.
LOVE It ! This is my favorite kind of project. You totally transformed an ugly duckling. I bet it sells before you get it in your booth . Good job ! r
Kathy,
Love what you did with the tray!
It looks TOTALLY fab!!! And that stencil is pretty awesome- going to have to look for it next time I’m at the craft store, which…let’s face it…will be soon. 😉