Metallic Copper Spray Paint Candleholder Centerpiece Makeover
As an Amazon Associate, I earn from qualifying purchases.
Take this copper spray paint candle holder centerpiece makeover tutorial and use it as a guide to redo outdated home decor or maybe an inexpensive find from the thrift store.
It’s time for Fall decorating and what better color to shine things up but metallic copper. You guys are going to love this makeover. I turned a tacky candleholder centerpiece into a classy decoration for Autumn. The $2 trashy pumpkin candle holder centerpiece find from a few weeks ago is now sitting pretty on our coffee table.

I wouldn’t have thought purple and copper would be a match but I didn’t think gray and metallic copper would either and look how that turned out! (Sewing Cabinet Makeover)

This is the $2 thrifty candle holder find. I know a few of you were looking forward to the makeover. Well, today is the day and it’s featured for Thrift Store Decor Day along with projects from my talented friends.

The pumpkin centerpiece needed a good cleaning. I removed the thick glass/plastic pumpkin pieces and used Simple Green to remove all of the dust and then a screwdriver to remove the wax candle drips. Those wax drippings are easier to get off if it’s cold but I didn’t stick this piece in the freezer. Next up was spray painting with my favorite Rust-Oleum Metallic Copper Spray Paint (find on Amazon here)

The faux leaf branches I used on the wreath for Mom’s nursing home room a couple of years ago were a match made in Heaven for the copper paint. I cut the stems apart and hot glued them to the centerpiece, just willy-nilly. When re-doing home decor don’t try to make everything symmetrical and matchy-matchy or you will pull your hair out. Perfectly imperfect looks better every time. That’s how I roll. Seriously, you just have to go by trial and error until it looks good.

I found a few burgundy colored votive candles in a junk drawer in the house and added them to the centerpiece. I wasn’t really happy with them but went with it anyway. The next day I was having a chocolate attack and while shopping for multiple bags of candy bars (yep), I spotted these tealights. You guys know I can’t resist sparkle and flash. I did buy the black ones to cut the shine!

I went home and found the plastic spider rings in my junk stash. I think I used them in a prior project or two and the girls wear them around. I find these plastic spiders on the workshop floor everywhere.

It all came together nicely. What do you guys think? As I’m writing this post it’s dark and gloomy and raining like the dickens. I moved the centerpiece to the dining room table and turned the tealights on. Sorry, no photo of that. Trust me, it looks great in the almost dark. The centerpiece will probably show up in various places over the next couple of weeks. I just moved it to the coffee table and it would fit nicely on the fireplace mantel.

I’m loving the glitter and the little spiders. It’s always fun when you add the unexpected. The spray paint worked magic too. Do you ever use spray paint? Spray paint is easy to use and gives fast results. You don’t need a pumpkin centerpiece to redo. Look around your house and see if you spot anything that’s a little outdated or just needs a little love. Then go the store and find the perfect color for your first spray paint makeover. Let me know what you are going to paint!

Leave a note, pin for later, and show my creative friends a little love. Visit their blogs by clicking the links below the “before” photo collage.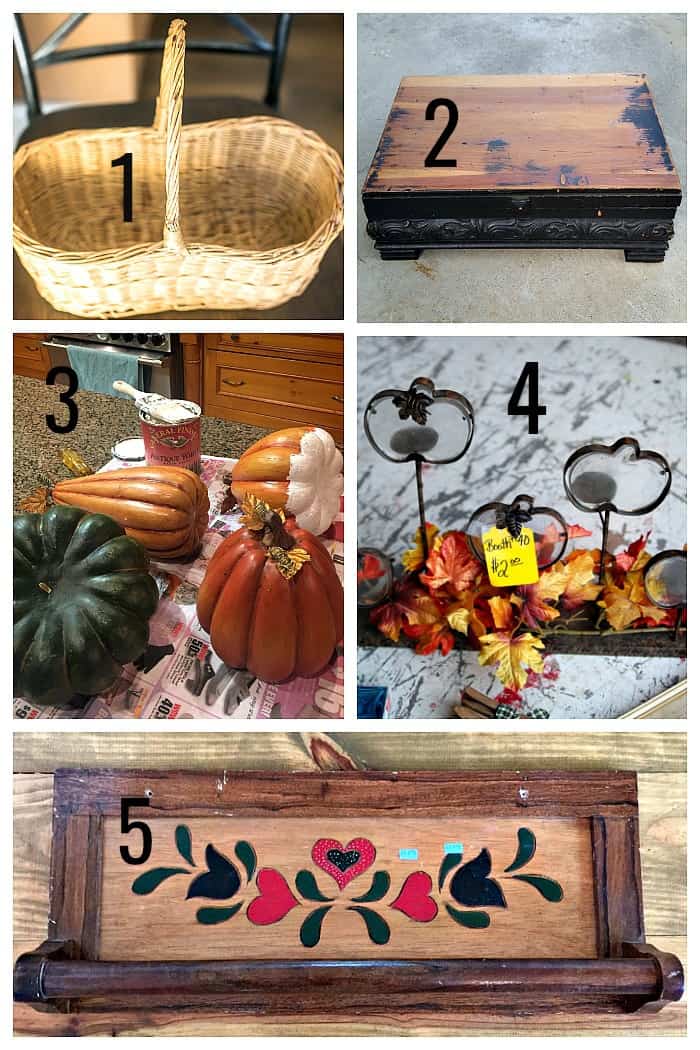
1. – Domestically Speaking
2. – My Repurposed Life
3. – Our Southern Home
4. – Petticoat Junktion
5. – Refresh Restyle
This project first appeared on Petticoat Junktion in 2017. Time sure does fly. Thanks for always being here and have a great day. Kathy


Thank you!
love it!!!
I love this project. I love using copper. Thank you for sharing.