• Skip to primary navigation
  • Skip to main content
  • Skip to primary sidebar
  • About
  • All DIY
  • Tutorials
  • Shop
Petticoat Junktion
menu icon
go to homepage
  • About
  • All DIY
  • Tutorials
  • Shop
    • Facebook
    • Instagram
    • Pinterest
    • Twitter
    • YouTube
  • search icon
    Homepage link
    • About
    • All DIY
    • Tutorials
    • Shop
    • Facebook
    • Instagram
    • Pinterest
    • Twitter
    • YouTube
  • ×

    Home » Spray Paint » DIY Picnic Caddy: Thrifty Repurposed Cardboard Drink Carrier

    DIY Picnic Caddy: Thrifty Repurposed Cardboard Drink Carrier

    This post may contain affiliate links

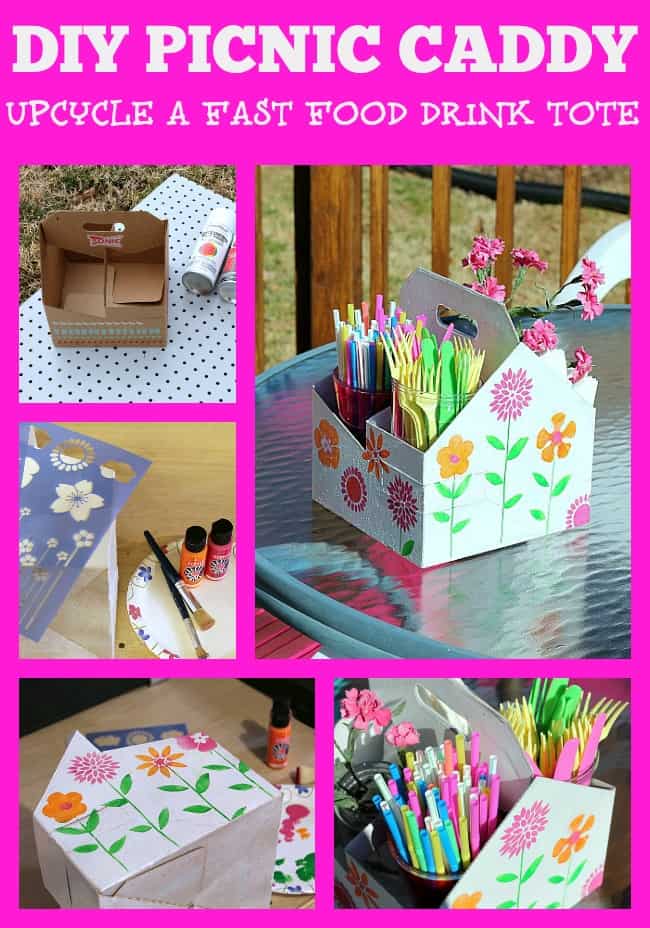
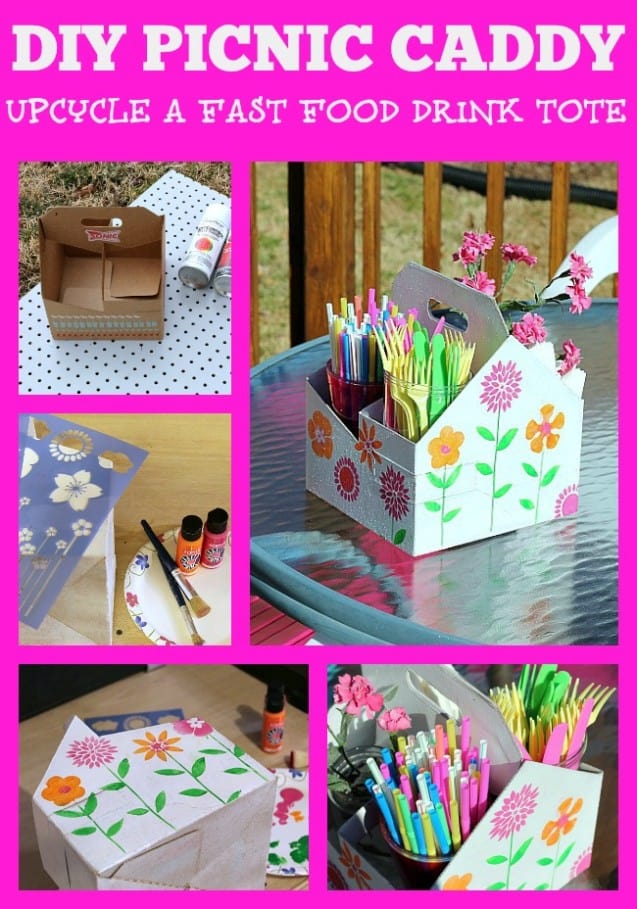
    Today is craft day…..and I made the cutest DIY Picnic Caddy using a thrifty repurposed cardboard drink carrier. You would be surprised at the things you can recycle if you just give it a little though. I have the pleasure of co-hosting a project sharing party today with At The Picket Fence and Uncommon Designs.

    easy picnic caddy craft petticoat junktion

    DIY Picnic Caddy made from a repurposed cardboard drink caddy

    I'm patting myself on the back over this project. It turned out great. Ya’ll know how I love bright colors! The caddy is stenciled and I don't want you to be afraid of stenciling. You just need to know the secret and I have you covered. Read my stencil like a pro post here....Special Stencil Technique Layering Paint Colors

    recycle project using spray paint petticoat junktion

    I’m patting myself on the back because this is how the “caddy” started out. A couple of weeks ago when the granddaughters were at the house for the day…we made a fast food run. Those girls keep us hopping and there’s never time to cook. Anyway, I thought at the time that I would do something fun with the drink tote. It seems a waste to throw it away and I’m all about recycling.

    cardboard box recycle with spray paint petticoat junktion

    I first spray painted the repurposed cardboard drink caddy white. I thought the tote would break down into a flat box, but no, not this one. I spray painted it as is. It took a couple of coats to cover the box. Let the spray paint dry in between coats of paint.

    how to stencil a cardboard box petticoat junktion

    Then came the fun part….adding color. I grabbed a couple of stencils, brushes, and pretty acrylic paints. I went with a floral design but anything graphic would work too.

    recycle a cardboard box using spray paint and stencils petticoat junktion

    Stenciling is so easy and I never worry about it being perfect. I put color over color on some of the flowers and just went with it! Selecting the bold colors and playing around with the colors on the various flower designs was fun.

    Cardboard Drink Carrier DIY Picnic Caddy

    Cardboard Drink Carrier DIY Picnic Caddy

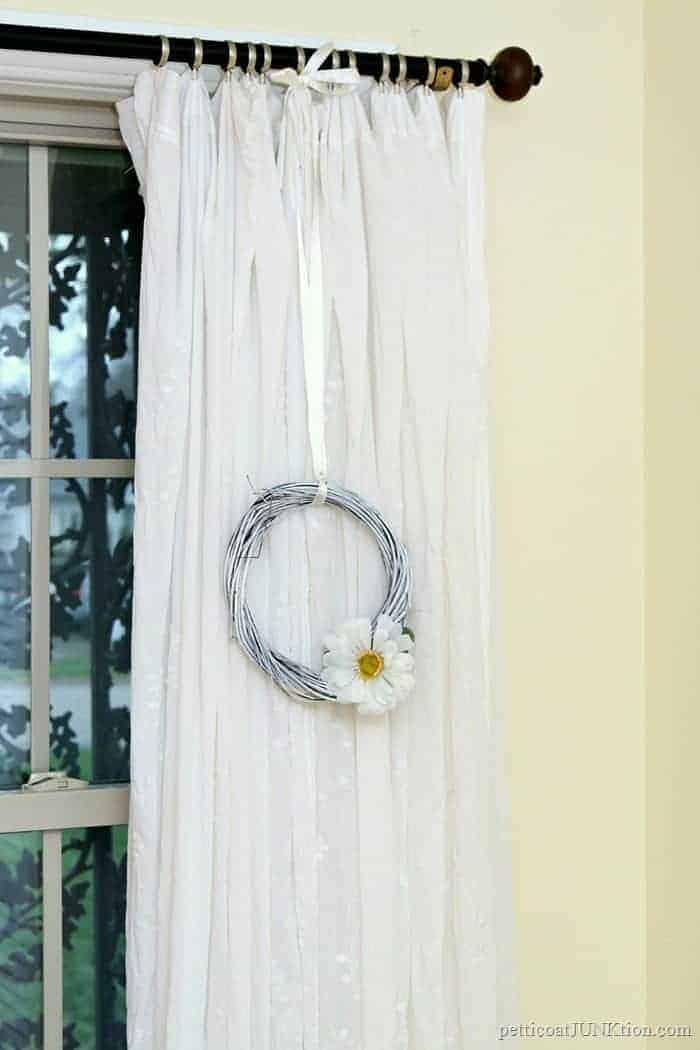
    I gathered some things from the kitchen to fill the caddy. I used plastic drink glasses and mason jars to hold the flatware, straws, and flowers…the napkins were on their own! The flowers are faux but you could totally use real flowers.

    diy picnic caddy petticoat junktion

    I planned to buy some colorful solo cups and paper plates and do a full on display on my patio table but the weather wouldn’t cooperate. I was doing a practice run when I took these photos, not expecting to use them. But I never got another chance to take photos with the sun shining.

    recycle a cardboard drink tote into a picnic caddy easy diy petticoat junktion

    The caddy/tote would also be perfect for holding crayons, pencils, and such. Muli-Purpose.

    I stenciled a metal picnic tote you can see here......Painted Metal Caddy Is Handy For Just About Anything

    Now check out the projects from my party co-hosts....

    Spring tree with flower eggs atthepicketfence.com

    This Spring Tree with Flower Eggs from At The Picket Fence is cute as can be.

    Click the photo or the “pink link” to view the full tutorial!

    bunny applique pillow uncommon designs

    The Bunny Pillow from Uncommon Designs is calling my name.

    Love the tail!!! Same deal, click the photo or the “pink link” to view the full tutorial. It would be awesome if you would leave a comment for my co-hosts after viewing their projects…..and tell them I sent you! Link your Spring projects below in the photo area. I need some inspiration. The full tour listing is below….

    SWING INTO SPRING

    Mantels

    Craftberry Bush

    French Country Cottage

    The Lilypad Cottage

    Recipes

    Marty's Musings

    Atta Girl Says

    My Soulful Home

    Crafts

    At the Picket Fence

    Petticoat Junktion

    Uncommon Designs

    Vignettes

    Worthing Court

    Stone Gable

    Home is Where the Boat Is

    Porches & Wreaths

    The Everyday Home

    Our Southern Home

    Confessions of a Plate Addict

    Similar Posts For You....

    • How To Hydrodip Glass Bottles
    • Best Rustoleum Metallic Spray Paint Colors For Home Decor
    • Spray Paint A Table Top Organizer Tray For The Bedroom
    • Thrift Store Decor: Painted And Distressed CookBook Organizer

    Reader Interactions

    Comments

    1. Alyssa

      April 01, 2014 at 10:32 am

      This is such a cute and clever idea! I just wanted to let you know that I am linking to this post on 4/1 at http://www.simply-creative-living if you don't mind.

      Reply
    2. Christy @ Our Southern Home

      March 25, 2014 at 7:09 am

      Really cute! Love the recycled idea!!! ~Christy

      Reply
    3. kelly

      March 22, 2014 at 9:43 am

      What a clever idea & so cheery! Love it! Looking forward to more & more picnic weather.

      Reply
    4. Marty Walden

      March 22, 2014 at 8:22 am

      That is so adorably cute, Kathy! You have such great paint ideas for just about everything, don't you? Thank you so much for joining us on our tour!

      Reply
    5. Denyse @ Glitter, Glue & Paint

      March 21, 2014 at 2:51 pm

      Kathy! This is so cute. What a bright, cheery addition to your outdoor table.

      xoxo
      Denyse

      Reply
    6. Barb @ The Everyday Home

      March 21, 2014 at 12:50 am

      Kathy - that is absolutely precious and I would have NEVER thought about that. I think I may use this idea for my grandsons to organize their crayons and coloring pencils, etc. Brilliant! That would also mean I would have to make myself go to Sonic. Poor me. 😀
      Thanks so much for joining us and being a co-host for the Swing Into Spring Link Party. xxoo, Barb

      Reply
    7. Tawn

      March 20, 2014 at 9:34 pm

      Kathy,

      I was just going through "stuff" in my craft room and found three of those drinks caddies that I had saved for a future idea to strike me...Well, I have been struck! Thanks for such a cute and creative idea. Bring on the paint.

      Reply
    8. Atta Girl Amy

      March 19, 2014 at 7:33 pm

      Kathy, your picnic caddy is adorable. Just sorry you haven't been having any picnic weather. (Same here!)

      I love your repurposing of the Sonic drink caddy. I may need to make a happy hour run soon to see what kind of craft I can think up using a drink caddy because I'm inspired.

      Hope the weather gets better! And thanks for hosting.

      Reply
    9. [email protected]

      March 19, 2014 at 6:39 pm

      Your caddy is so cute and you were clever to think to upcycle it into something handy to use all spring and summer. Thanks so much for hosting!

      Reply
    10. Jen @ Girl in the Garage

      March 19, 2014 at 3:28 pm

      Thanks for hosting, Kathy! I love your picnic caddy- great idea to repurpose a drink carrier!! Happy spring to you 🙂

      Reply
    11. chris aka monkey

      March 19, 2014 at 12:33 pm

      i can just see the big smile on your face when you were done with this...it is such a good idea and i love when you stencil because you just let the colors rip xx

      Reply
      • Kathy Owen

        March 19, 2014 at 3:24 pm

        Thanks Chris, I do love bright colors!

    12. Vanessa

      March 19, 2014 at 9:35 am

      Ok that is just so clever!! I love it Kathy! I was thinking how fun it would be to have my kids make some and use them in their rooms to hold art supplies, etc. Thanks for the idea and for co-hosting today with me!
      Vanessa

      Reply
    13. Beth

      March 19, 2014 at 8:36 am

      Great idea Kathy!

      Reply
    14. Sonya ~At Home with The Barkers

      March 19, 2014 at 5:51 am

      You are so creative! Super cute!

      Reply
    15. Mary

      March 19, 2014 at 5:17 am

      What a fun and clever idea, I love your blooming caddy! I just recycled one last week, you've inspired me to try this 🙂

      Reply

    Leave a Reply Cancel reply

    Your email address will not be published. Required fields are marked *

    Primary Sidebar

    Hi, I'm Kathy!

    The creator at Petticoat Junktion and I love decorating my home. My decor is an eclectic mix......

    More about me →

    Popular

    • How To Weather Furniture: Painted Sideboard Coastal Or Nantucket Style?
    • The Best Painted Furniture Makeovers of 2022 From The Furniture Fixer Uppers

    Footer

    ↑ back to top

    Get daily tips and tricks for making your best home.

    SUBSCRIBE
    • About
    • All DIY
    • Tutorials
    • Shop
    • Crafts
    • Home Decor
    • Painted Furniture
    • Projects

    As an Amazon Associate I earn from qualifying purchases.

    Copyright © 2023 · PETTICOAT JUNKTION · PRIVACY POLICY

    Receive my furniture painting tutorials by email free! Sign up below....