How To Distress Painted Furniture Using Clorox Wipes
As an Amazon Associate, I earn from qualifying purchases.
Did you know you can use Clorox Wipes to distress paint? It works. I tried the process on the buffet I’m sharing today. I’ve used baby wipes, Simple Green, and plain old water to wet distress painted furniture. I love that there is no mess but sometimes it takes a bit of elbow grease to remove the paint, depending on how long the paint has cured.
")
This is the buffet I bought at a local online auction a couple of weeks ago. The price was $75 plus a 10% buyer’s premium. It is a nice solid wood piece and those are hard to come by these days.
Today is Furniture Fixer Upper Day and you know what that means. My talented friends have projects today too. On that note, I would like to say a few words about my fellow tour mates. I’m amazed every month when I take a look at their projects.
Jen wrote a popular furniture painting book a couple of years ago….Amazing Furniture Makeovers…..and her furniture projects are amazing. Denise is always using bold colors, sometimes adding Woodubend Trim and Dixie Belle Transfers. And Christy has a passion for white, gray, and light blue paint along with Redesign by Prima Graphic Transfers….and decoupaged drawers!
I, on the other hand, haven’t used any of those transfers or wood appliques or written a book. I need to get out of my comfort zone, except for the book thing because I hate to write! Anyway, enough of my rambling. I just wanted to praise my friends a little bit. On to the project.
")
I cleaned it up, removed all of the drawer pulls, and used FrogTape in areas I didn’t want to be painted. I covered the holes where the drawer pulls were on the cabinet doors but later decided to paint the inside of the doors.
")
I always try to cover the screw holes on the inside of the drawers so paint doesn’t leak through. The drawers are a mess on this piece and I plan to cover them with paper or something. Once that is done I will add photos to this post or write another post showing the process.

I like the color of the paint I used on the whitewashed side table last week so I took a sample of the color on a paint stick to Home Depot. I had the custom color mixed in BEHR ULTRA® SCUFF DEFENSE™ INTERIOR EXTRA DURABLE FLAT paint.
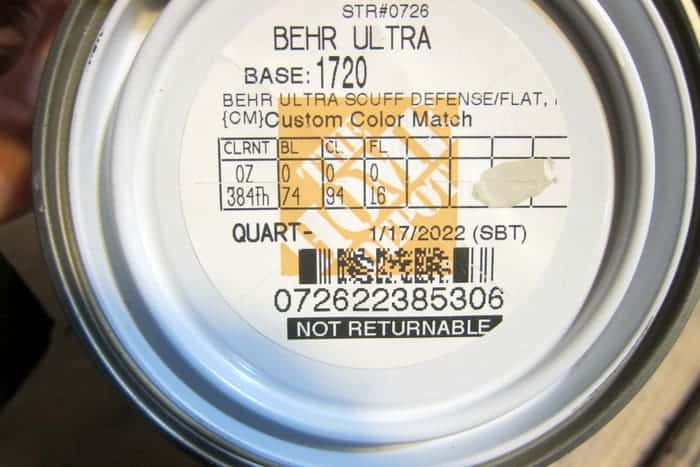
The paint is described as “Flat Paint That’s Too Tough To Scuff”. I’m not sure about the scuffing but I can tell you it’s tough. I found out the hard way when distressing the paint. Some of you have asked for the color so I added the photo above with the custom mix color formula from Home Depot. The color is off-white which tends to a grayish-brown tint. I know….that’s the best I can describe it. Be aware that colors look different on different computers and devices.

The drawer above has one coat of paint on the drawer front. The paint covers very well and this was a light-colored paint over dark wood. I applied a second coat for good solid coverage.

Now comes the fun part….distressing the paint. I thought I would try the Clorox Wipes to distress the paint this time. I’ve used baby wipes in the past and they work great. The areas I distressed with the Clorox Wipes were the raised areas on the drawers and the raised areas on the front of the buffet body.

The process is a simple as rubbing the wipe along the areas you want to distress. I ran the wipe along the raised detail on the drawer a couple of times just wetting the paint. This softens the paint and makes it easier to remove. If the paint has been cured for a while it is a bit tough to remove.
It took me a couple of days to paint the buffet. I painted different parts of the buffet each day. The paint that had been cured for a couple of days took some scrubbing to remove with the wipes. The paint on the parts of the buffet that had been painted less than a day was much easier to remove…..or distress. Tip: When using the wipes if they are more than wet, meaning soaked in a liquid that might be in the bottom of the container, wring them out before using so the liquid doesn’t drip on areas you don’t want distressed.

Next up the drawer pulls. This piece had all the original pulls which is awesome. I had this Rust-Oleum Spray Paint Driftwood color and I thought the color would be the perfect contrast to the furniture paint color.

The Driftwood color is really pretty and would be okay with the light color paint but not with the original stained furniture finish. The furniture finish is too brownish and the Driftwood has a lot of gray to it.

Moving on to spray paint I have in my stash. I tried two different metallic paint colors, one light, and one dark. No go for either.

I headed out to get more spray paint which I don’t like to do. I try to use paint I have on hand. I came home with two colors and decided on the Expresso Rust-Oleum Spray Paint color. It is pretty and shiny but after putting one pull on the drawer…..it was a no-go again.

Moving on to plan 3 or is it 4? I painted the drawer pulls the same color as the buffet then distressed the paint using the Clorox wipes. A winner finally.

As I’ve mentioned numerous times in the past sometimes you have to change plans and that’s okay. Don’t be afraid to give something a try. It’s only painted and can be painted over…..and over.

This project was fun and I love how it turned out. I may have forgotten to tell you the number one reason to wet distress paint instead of sanding with a sander. The reason is that the original stained finish is saved instead of being rudely sanded away. Sanding with sandpaper usually uncovers the raw wood.
Read my tips and tricks for distressing furniture here… What You Should Know About Distressing Painted Furniture And Home Decor

Even though it was a lot of extra work I’m glad I kept working on the drawer pull colors until I was happy with the look. What do you think? Do you like the color of the pulls?

Leave a quick note of you have time before heading off on the tour. I read all of your comments and take your opinions and suggestions to heart. To take the tour just click the text links below the “before” makeovers photo collage….

Furniture Fixer Upper Tour
Painted Desk With Flower Child Transfer – Confessions of a Serial DIY’er
Cactus Painted Side Tables – Salvaged Inspirations
Chalk Painted Soothing Blue Cabinet – Girl In The Garage
Coastal Style Furniture Makeover – Petticoat Junktion (you are here)

As always, thanks for being here, Kathy
Loved everything and especially the way you explained everything to make it easier. Can’t wait to try it. I have never heard of using wet wipes before. Thank for putting this information out there.
Love the finished product! Did you scuff sand or prime before painting? Thank you for your inspiring posts!
No I didn’t. You notice they are distressed and they may get distressed more without sealer but probably not. I don’t think I have every put polyurethane on painted drawer pulls. Thank you for the question.
Just wondering if after you finished the final drawer pull color, looks great by the way, did you put a coat of clear polyurethane over the drawer pull to protect it from wear?
Understood, Kathy, and makes sense to meet your customers’ needs/taste. It is a business, after all! Thanks so much for taking the time to explain. Best, Sandra
Love the colour, haven’t tried the wet distressed technique yet, have wipes going to try it. Also love the distressed hardware!
Yes, it was in good shape. I buy pieces to re-sale and to be honest it is very hard to sell a piece like this one unless it is painted. Nine times out of ten someone will buy this piece in my booth unpainted but will have contracted with the shop owner to paint it before it goes out the door. Thanks for your comment Sandra, Kathy
Honestly, I thought the original piece was gorgeous and unnecessary to change. Now, if it were in bad shape or there’s something else about the finish that I don’t know, that may be something different. The final result looks great…but I worry about the loss of the original good piece. Sandra
Dear Kathy?,
I love the wet distressed finish and the color you used! I love a good gray color, neutral with color! I did like the first drawer pull color, but the one that matches looks great too! I love the differences between you and the other gal’s! You’re all inspiring!
This turned out fabulous, Kathy! I like where the pulls ended up! Funny, I was debating on whether to do metallic pulls for my piece too but went with white lol! XOXO
Wowza!!!! I love it. It looks so stately..Made a good choice with the pulls.
Kathy this turned out so perfectly distressed! That color is a winner, and the drawer pulls ended up just right too. Beautiful work, and thank you so much for the sweet comments! I’m so glad we’re friends. xo
It’s really pretty. The color and finish are beautiful.
It was a Martha Stewart Home Decor Paint they no longer make. I will add a photo of the mix recipe to the blog post. Thanks for asking. The color has a hint of gray and brown. Not sure how to describe it but it tends more to off white with a gray caste.
You can also use baby wipes.
Love it! And I love the way the drawer pulls turned out, it was definitely worth trying out the different paints to arrive at such pretty pulls!!
Wow beautiful
Love love love! Thanks for the explanation of using wipes instead of sanding. I have a stained table I want to distress and will go the wipes route now??
Looking good!
Can you tell me what color paint you “color matched”? Looks great. I’ll keep wet distressing in mind. I want to paint an Ethan Allen bedroom set I’m tired of! Did you use any top coat? Thx.
Yes I’ve used baby wipes to distress furniture and I mentioned that in the post.
Baby wipes do the same thing.
Did you put another finish over the flat paint? I have not used this particular formulation before (I do like Behr paint, though) and wasn’t sure if a top coat was necessary. Thank you for your time.
We all have sani-wipes on hand these days so this is such a great idea to keep the original wood peeking through! I can also relate to plan 1,2,3,4?… sometimes it takes a few times to get it just right. Pinned.?