The Absolute Best Way To Paint Furniture With Missing Veneer
As an Amazon Associate, I earn from qualifying purchases.
You can paint furniture with missing veneer and make it look beautiful. Damaged furniture just needs the right paint technique. Play up the flaws like missing veneer, deep scratches, chewed up wood, etc. I actually like these flaws because they distress beautifully after a nice coat of paint.

Most of the furniture I buy is damaged in some way. Very seldom do I buy a piece in excellent condition. There are two reasons for this. The first reason is that I don’t want to paint furniture that’s in really great condition. I get in trouble for that. The second reason is that my furniture budget is small. I don’t pay much for a piece of furniture because when I resell it I don’t make much of a profit.

This chest of drawers was a mess when I bought it but it’s a beauty now. Paint works wonders. Can you tell that in the photo above the hardware is aqua colored? I’ll tell you how the color came about.

I bought the chest of drawers at a local used furniture store. I don’t remember how much I paid for it but I think about $75. It’s hard to get inexpensive used furniture. See the missing hardware? I have to find a solution for that.
 The missing hardware was nothing compared to the eaten up wood and veneer. The areas around the bottom of the chest were all chewed up and so were some of the drawer fronts.

The first step in the project was to try to smooth out the rough areas or at least remove some of the raw edges from the damaged furniture. I used 80 grit sandpaper by hand to clean up the rough areas. Next I vacuumed the dust and spider webs from the outside and inside of the chest.

There was one missing drawer pull and one without the handle thingie. I searched my hardware stash and actually came up with some pulls that were almost identical to the ones on the chest. Only problem is the screw holes were different. After looking at several options I decided to paint wood knobs and use those on the second drawer.
That means I had to fill one screw hole on each side of the drawer. I do get a little crazy with drawer pull ideas sometimes. I used Elmer’s wood putty to fill the holes and sanded it flush to the drawer once it was dry. If you’ve been holding back on a furniture project because of hardware issues….don’t. You can deal with them. If you need help read my How To Replace Furniture Hardware post here.

Now that the chest of drawers is all prepped it’s time to select the paint. I decided on a flat paint finish just because I’m loving the flat look right now and I also wanted a beachy vibe.
I pulled the Cascade color FolkArt Home Décor Chalk, color Cascade, from my paint shelf and brushed a sample on a paint stick. It was a bit dark for this project so I mixed a bit of White Adirondack Home Décor Chalk with it. The lighter color on the left is the color I went with.

I brushed on two light coats of the paint. The top left photo shows the second coat going on. The second coat is the lighter one because it is still wet. I love the chalk brushes. Whoever thought to create paint brushes like this is a genius. The paint loads so well and brushes on so neatly. You can find the brush on Amazon here.
Once the paint was dry I used 100 grit flexible sandpaper to distress all those areas that were chewed up and damaged. Then I moved on to the edges of drawers and the body of the chest. This is the best way to paint furniture with missing veneer and a bunch of flaws. The damaged areas look awesome distressed. The distressing adds another dimension to the paint finish. Call it character or whatever. I love it.
I haven’t used my electric sander to distress paint in a while but I wish I would have pulled it out for this job. The chalk paint really adhered to the chest….which is good…..unless you are distressing the paint.
Watch The Video I Made On How To Distress Painted Furniture here.……
How To Distress Painted Furniture

Something I noticed with the chalk paint while distressing it is that the white/crazed areas on the paint from distressing go away when wiped down with a damp rag. On latex paint you have to apply wax to get these areas to disappear. Just another reason why this paint is my favorite chalk finish. (we can’t call it chalk paint because Annie Sloan has the copyright to the term)

Paint choice for the hardware was an issue. White hardware was not the look I was going for. Too much of a contrast and not beachy looking. I tried three colors of spray paint, turquoisy blue, aqua, and green sea glass. I ended up using Krylon Colormax in Aqua which was a very pale blue green with a very bright sheen.
The paint finish almost had a metallic look to it. I cut the shine with Howard’s Wax in Walnut. It’s as simple as rubbing it on and letting some of the wax settle in the grooves. After it dries you just shine it up with a dry lint free rag.

Does the chest look beachy to you? Do you like the distressed areas? Do you see what I mean about working with the furniture flaws and all? What about the color of the hardware? I wish you guys could see this piece in person. The photos just don’t do it justice.The colors didn’t want to photograph well or more like……I didn’t know what I was doing.
Find the chalk brush, paints, and supplies used in this project on the Petticoat Junktion Amazon Page here.

I’m very happy with the final finish. What do you guys think? Leave a note and take the Furniture Fixer Upper tour by clicking the pink text links below the “before” photo collage. My friends have some extra great makeovers this month.
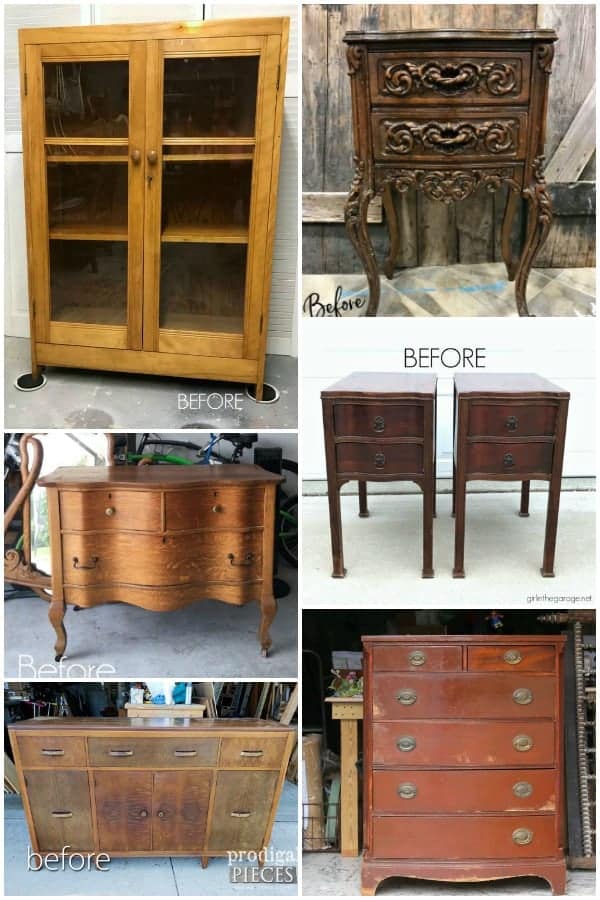
Furniture Fixer Uppers Projects
Nightstands With Layered Paint – Girl In The Garage
Antique Serpentine Dresser Makeover – Confessions Of A Serial Diyer
Art Deco Goes Modern – Prodigal Pieces
Painting Wood Furniture – Just The Woods
Add Charm To Antique Furniture – The Interior Frugalista
Antique Furniture Restoration – Petticoat Junktion (you are here)
Thanks for being here and have a great day, Kathy
I think you are right about the knobs! Thanks for commenting, Kathy
Kathy, the dresser looks many times better than before the paint and distressing. The only thing I might have done differently is to put the two round knobs on the top two drawers instead of the one below. Somehow the larger pulls on the top drawers give a “top-heavy” look to the piece to me. It’s amazing how good the dresser looks, though compared to the way it started out. You did a great job with it.