Tips And Tricks For Using Milk Paint On Furniture
As an Amazon Associate, I earn from qualifying purchases.
The list of 8 milk paint furniture painting tips will get you through a milk paint project without any problems. I get a lot of email and comments from readers about the Miss Mustard Seed Milk Paint. It seems to be a hot topic.

Questions range from “Is it really made out of milk?” to “Do you only use this paint if you want a chippy look?” I admit the paint takes a bit of getting used to. It’s different from other products out there. But different in a good way. The results are amazing.
Every time I use the milk paint I learn a new technique or trick. So I thought I would share what I’ve learned about the paint since I’ve been using it for a few months now.

The Milk Paint Finish
The finish is one–of–a–kind. The unique aspect is that you never know what result you will get! You need to take into consideration the original finish on the furniture. I have found that highly varnished pieces will chip a lot or the paint may crackle instead of chip.

A lacquered surface will chip very, very heavily or chip off completely so you might want to use the bonding agent. The furniture with the fake veneer top that is almost like a Formica countertop will not hold the paint at all.
An older wood piece without any varnish or gloss may not chip. On an unfinished piece of furniture, the wood will soak the paint up and it will not chip. If the furniture piece has a coat of paint, the Milk Paint may crackle instead of chip or it may not chip at all. My advice? Just have fun and go with it. After all, it’s just paint, and the project can be redone.

The milk paint is easy to mix, easy to use, and covers really well. I love how it feels going on. The paints can be custom mixed to make new colors. The bed in the photo above is a custom paint mix by yours truly. You can see the custom mix vintage rose bed project here.
A few milk paint tips and tricks from me….
Furniture Painting Tips Using Milk Paint – How To Paint With Milk Paint

How To Mix The Paint
I prefer a ratio of 1 part milk paint powder to 1¼ parts warm water. Mix it in a fruit jar or something similar with a lid in case you have leftovers. Stir with a paint stick or a whisk. Actually, a whisk works great when stirring any type of paint. You know how paint settles in the can. You may want to pick up a couple of inexpensive ones just for the workshop.

For an average size chest of drawers I would mix about ½ cup of milk paint powder with between ½ to ¾ cup of warm water. After you have done a couple of projects you will get a feel for the proper consistency. It’s easy to mix more paint if you run out. Stir for a couple of minutes, let it set for a few minutes then stir some more. If you have a few small lumps after mixing they should brush out or you can just wipe them off.
Painting With Milk Paint
Brush on a coat of paint and you should be able to put on a second coat within a very short time. Brush on the second coat as soon as possible or it will start chipping as it dries and if the paint chips off and you put a second coat over the flaked-off part it doesn’t look good. I’ve never put on more than two coats.
How To Get The Chippy Finish
When it’s dry and starts chipping, use a putty knife and gently rub it over the piece. If you want a lot of paint off the edges, then scrap a little harder with the putty knife. I love this technique because it looks so much better than distressing with a sander.

Waxing The Milk Paint
After you have it chipped or distressed like you want, use a dark or clear wax to seal it. I’ve also used a clear polyacrylic for a little shine. If you don’t want the paint to chip add the bonding reagent. The paint colors are so intense they look great with just a medium to dark wax over them.
furniture painting tips using milk paint
Painting Furniture Using Milk Paint
Below is the new milk paint color chart (on MMS blog 2021)

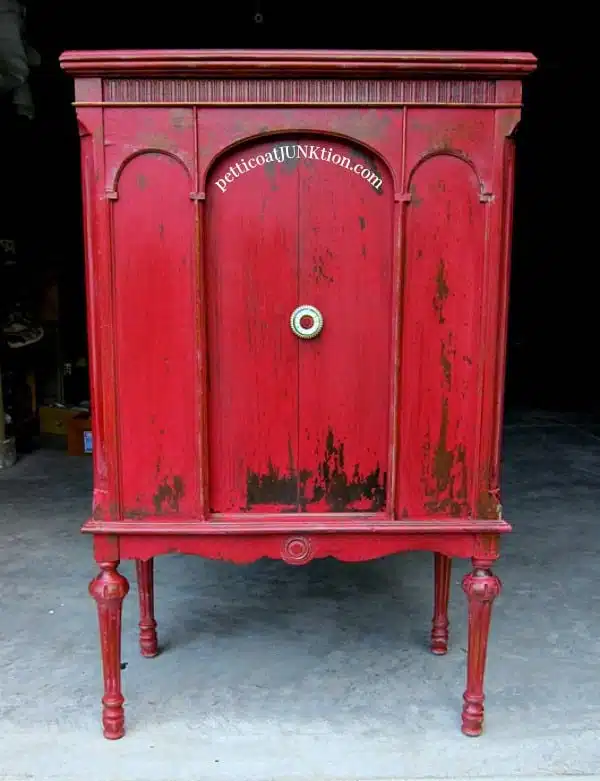
This is my first Milk Paint project. And my favorite so far. The radio cabinet is my personal piece and sits in our living room. I use it to store handmade quilts. See it here….. My Tricycle Red Cabinet…most viewed and pinned of my projects on Pinterest.
Thanks for stopping by, Kathy

Oh wow! You made my day. I think of all of you guys as my friends and try to write like I would talk to you. Thank you so much for your comment.
Thank you thank you. Now I understand what I didn’t know about milk paint. Your blog always brightens my day. You are like a friend that comes to visit!
Thank you Tammy. Yes the mixing takes a bit of time and patience.
Kathy,
I have used MMSP before and have to say I love the “chippy” worn look that it creates. The only part I didn’t care for was the mixing. If anyone can make a mess of it it will be me. Your painted pieces are beautiful!!!!
Can I use milk paint on antique wood that has a varnish on it! Will I get the chippy look? Do I need to use bonding agent for the paint to adhere to a varnished finish on the furniture
Where can i find this paint?
I haven’t Susan, I am pretty good at only mixing what I need so I usually don’t have much left over or any at all!!
Hi there,
I’ve been using paint for a little while, and like it very much. It does state that paint can only be stored for a short period of time in fridge. Have you ever used paint past it’s “allotted time” and if so, what occurred?
Thank you!
no Betsy, you don’t have to wait a month before using your hutch after painting it with MMS Milk Paint! You should be able to use it as soon as the paint and wax or hemp oil is dry. I would suggest using some type of sealer such as wax or hemp oil. Hope this helps
Miss Mustard Seeds milk paint. I bought the bonding agent to put into the paint as well.
How long do I have to let it dry before using the piece? I was told I would have to let the china hutch dry for a month before using it. Is that true? Thanks in advance for your reply!
Kathy,
I have really enjoyed looking at your painted furniture
love the radio cabinets. Makes me want to start a project.
Helping my daughter this weekend on kitchen cabnets and
would love trying the milk paint on them. Do you only
order it on-line? Or can it be picked up somewhere?
Thanks
Tammu
Thanks Barbara, I hope so too
Kathy: All your pieces look wonderful. You are a talented lady. Barbara
I hope I am signed up for everything you have.