How To Paint Damaged Wood Furniture
As an Amazon Associate, I earn from qualifying purchases.
It’s hard to find wood furniture in perfect condition. But that’s okay with me. I love to paint damaged wood furniture because those areas of imperfections distress so beautifully.
If you like distressed paint you’re in the right place! I call myself the queen of distressing and I can show you how to “go to town” when sanding paint. Today I have a short and sweet video on my sanding technique and also a quick look at how I used a toner to antique the paint.

This is one of my favorite blog days……. Furniture Fixer Upper Tour day. My furniture painting friends rock it big time.
 I got to spend a few days with two of my furniture fixer upper friends last week, Denise of Salvaged Inspirations, and Christy from Confessions of a Serial DIYer. We were in Austin for a convention and I finally got to meet Denise in person. She is so sweet and a very talented painter. Christy and I first met several years ago and you guys know all about Christy and her obsession with white paint. It’s always nice to spend time with other creators. Links to all of the furniture fixer upper projects are at the bottom of the post.

Paint Damaged Wood Furniture
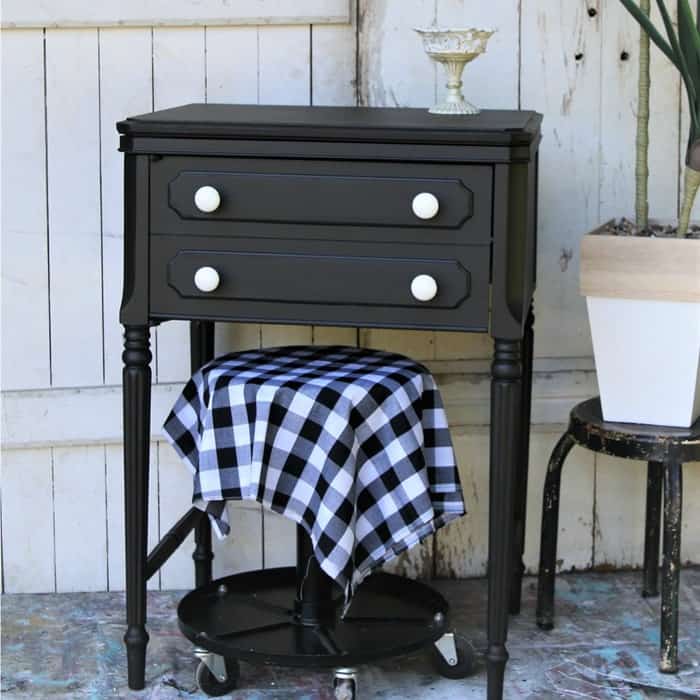
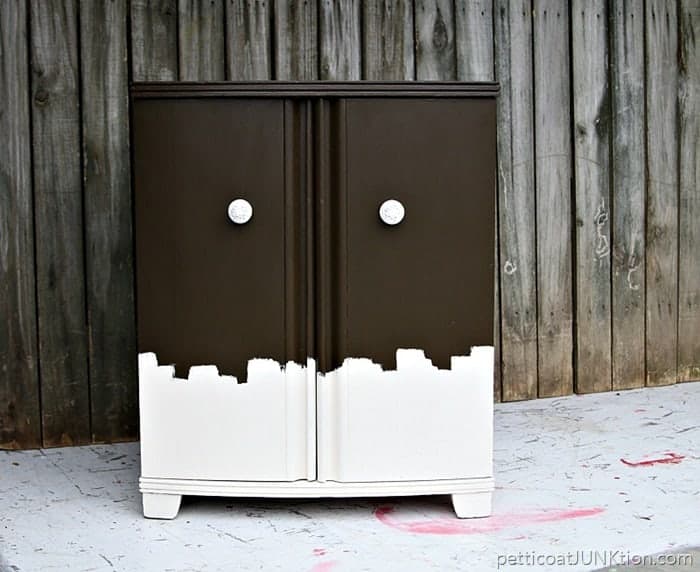
I tried to do justice to this chest of drawers by antiquing the paint. The age of the chest and the style really didn’t lend itself to a clean modern look. Let’s see what we started with.

The price of the chest was $35. Not a deal but not bad. I bought it at a local indoor flea market that’s going out of business.
As you can see it’s a mess. The veneer on the top of the chest was a bit “wrinkled” and you can see the areas on the front where the veneer has peeled off.
Clean And Repair The Furniture

The drawers were solid but the mice had used it as a home at one time or another.

I used the shop vac to clean up the mess inside and out, top to bottom, then I cleaned the entire piece with Simple Green.

Some of the drawer cleats (drawer stops) were missing and the JTS found a box of odd looking things that seemed to do the job. The last time I needed drawer stops I paid something like $9 for a bag of 12 on Amazon. Highway robbery.

The trim piece on the top of the chest was loose and I used my handy dandy brad nailer to make sure there aren’t any problems with it in the future. The brad nailer is my favorite power tool. It sure beats a hammer and nails or a screw and screwdriver.

Since I planned to use the original hardware and paint it the same color as the body of the chest I didn’t plan to remove it. Although that’s on the top of my furniture paint rule list…… always remove the hardware before painting. I’m glad I rethought my first plan because when I removed the drawer pulls there was a lot of fuzz and dirt on the inside of the pulls. Yuk.
Paint The Furniture

My paint choice was Beyond paint in off-white or bone. This paint is an all-in-one product. You don’t have to prime before painting and no waxing at the end!

The paint covers really well but I always do two coats of paint when using any paint. Sometimes I might miss a small inconspicuous area or go a little thin with the paint so the rule of two coats works for me.

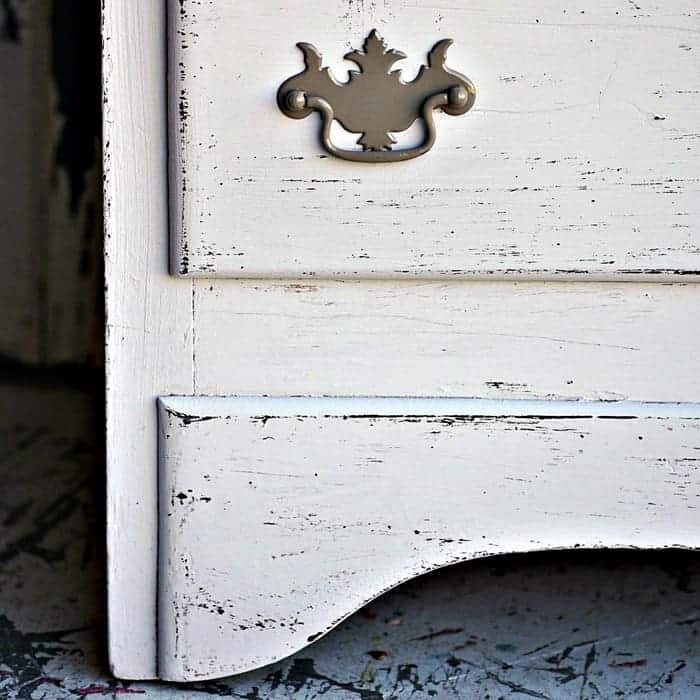
Distress The Paint
Once the paint was dry I did a heavy sanding job using my power sander and 120 grit sandpaper. You can see the whole process on the short video I made.

This is how the chest of drawers looked after I distressed the paint. It was too white and too new looking.

Antique The Paint
I decided to antique or age the paint using Caromal Colours Toner. This product is awesome. I used to sell it on Etsy but that got to be too much trouble. You can find the toner on the Caromal Colours website if you’re interested.

The toner is easy to use. Just wipe it on with a damp rag and wipe it off until you get the perfect look. The toner is dark and I wipe a lot of it off. Once the toner dries it doesn’t have to be sealed. If you want a sheen or glossy look for the final finish then use a sealer over the toner.

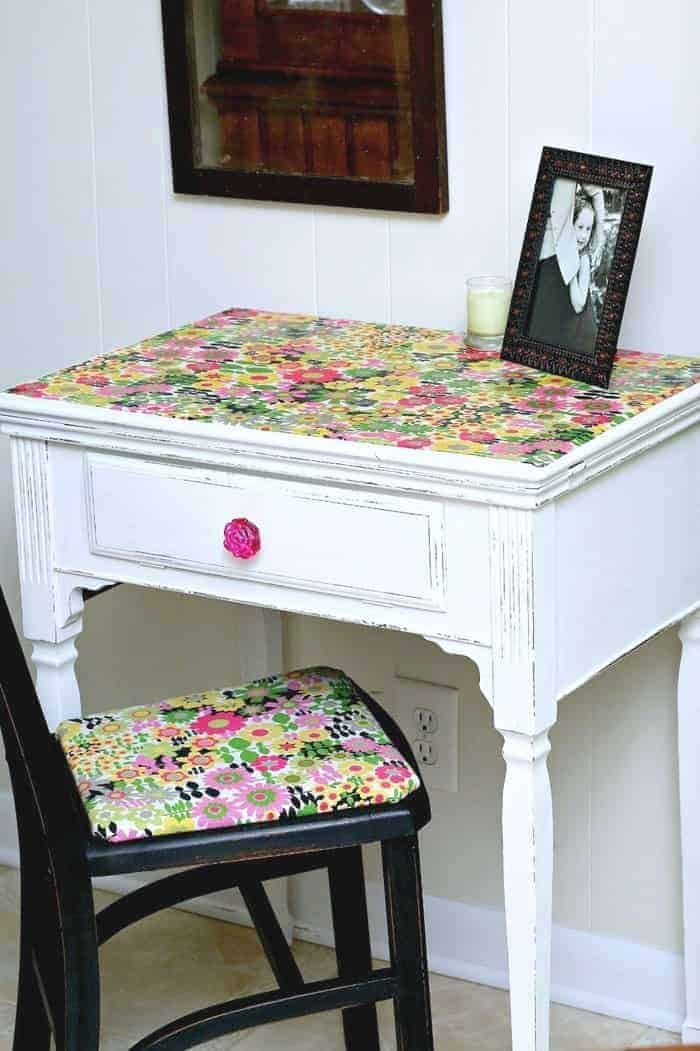
Do you see now why I enjoy working with damaged furniture, especially damaged veneer? The imperfections aren’t imperfections once they are painted and distressed.

The only hardware I changed out was the two small knobs on the top drawer. One of the original knobs was missing and I just went to my knob stash and found these. I dry-brushed a bit of the Beyond paint on the knobs.

The original pulls I painted with the Beyond paint and distressed by hand using a sanding block. Then I “antiqued” them too using the toner.
My video showing how I distressed the paint using a power sander and a quick look at the toner process is below….
How To Sand Paint And Antique Painted Furniture

Do you like the distressed and antiqued look or is this too over the top for you guys? Leave a quick note if you have time.
Next up is the Furniture Fixer Upper Tour. Just click the pink text links below the “before” makeovers photo collage…..

Furniture Fixer Upper Tour
Paint Furniture With Wise Owl Paint– Just The Woods
Pair of Thrift Store Headboards – Confessions Of A Serial Diyer
Repurposed Mid-Century Cabinet – The Interior Frugalista
IKEA Dresser Hack – Salvaged Inspirations
How To Repair Cracked Veneer – Girl In The Garage
How To Paint Damaged Wood Furniture – Petticoat Junktion (you are here)
As always, thanks for being here and have a great day, Kathy
Find all of my favorite DIY products, supplies, and tools here.
Hi, you are amazing. I love your creativity. I would like to now more about the conference. I am learning to paint furniture and you are my inspiration. How can I participate in the meetings so I can meet all of you ladies and learn more. Thank you.
I HAVE A DRESSER JUST LIKE THIS ONE EXCEPT THE LEGS ARE A LITTLE DIFFERENT AND THEY HAVE ROLLERS ON THEM. REALLY LIKE THIS LOOK! I’M DEFINITELY GOING TO TRY THIS PAINT. THANKS FOR THE VIDEO AND SHARING IT WITH US.
We missed you. Wish the whole group could get together in person!
hahaha
You didn’t have to admit that… I thought I was just really sleepy!…lol ?Have a great week Kathy. xo
Kathy, you’ve taught me about a new type of paint. I think this dresser is perfect for the distressed look! I love your boldness. (and I’m a little jealous you all got to hang out in person without me!)
Yes, no waxing for sure. Thanks Marie
Thank you Kathy
Thank you JoAnn!
I love anything chippy and this piece is perfect! You did a great job! I do enjoy reading your posts.
hahaha. I forgot to put the photo in last night so did it later!
Heeey, I left my comment at 6am this morning and didn’t even notice the conference pic so I’m back lol. LOVED meeting you too Kathy. So hoping we can get together again next year. HUGS XOXO
What a charming little dresser and I love what you did with it! My favorite all-time look. I was not familiar with this paint product or the toner. I’m definitely going to have to give them a try. Now, to find a dresser as adorable as this one!
You showed that mouse sander whose boss! Kathy, you definitely are the Queen of Distressing! I always appreciate how you work “with” the imperfections. Love this dresser makeover and you had me at no prep, no waxing!
I love the idea of not fixing every little thing. I will have to try this next time! Total time saver too, I’m sure. xoxo
I like how you didn’t try to hide the broken pieces of veneer. When beautiful pieces of furniture have had a hard life, I think it does it justice to almost highlight the damaged areas. Kind of lets the piece tell its story while at the same time being as beautiful as it can be again. Just think, this is an old piece of furniture, could have been in Granny’s attic and then moved from house to house within a family. Maybe it will end up in someone’s first house or first apartment. It lives on and I think you did it right!
I love it. All the interesting, quirky details are beautifully highlighted.
Umm, not my cup of tea, Kathy, but if we all liked only the same things what a boring world it would be. The hardware is nice and I like the style of the dresser. I can see what caught your eye and impressed you enough to bring it home.
I love the end result of this one, Kathy! The paint and antiquing really brought out so many details that were lost in its before state! It was so fun getting to hang out with you girls at the conference! XO
Hi Kathy: I’m a fan of yours for awhile now. However, this is the first project that I’m not keen on. I’d like it more in a darker color. I don’t mind a little distressing, but not quite so much. Guess I wouldn’t have bought this piece to begin with because of the veneer damage being difficult to repair. Sorry to be a little negative, but you did ask and I think it’s important to know what things people like/not.
I love it! But personally I think I would have tried to fix the veneer a little more…I like the distressed look…but not the “damaged” look. You still did an incredible job and just my 2 cents. Love seeing these makeovers!! 🙂
I’m not sure what happened Sandi but I think if you have an ad blocker it may not show up. You might need to disable the ad blocker for just a short time. I see the video on my end.
I am not finding the link to the video?
Very useful tips Kathy and I don’t think the finished product is over the top. When you have a piece that is not maybe that well made in the first place and you get not the best fitting drawers or doors or whatever a shabby chic finish goes better I think. This is what goes for my orange pine dresser which is a fairly rustic piece of craftsmanship I want to paint. I hope I can fins Beyond Paint here in the UK as that would be ideal.
I love the distressed and antiqued look and this dresser was the perfect project for it! Love that hardware too!! XO