• Skip to primary navigation
  • Skip to main content
  • Skip to primary sidebar
  • About
  • All DIY
  • Tutorials
  • Shop
Petticoat Junktion
menu icon
go to homepage
  • About
  • All DIY
  • Tutorials
  • Shop
    • Facebook
    • Instagram
    • Pinterest
    • Twitter
    • YouTube
  • search icon
    Homepage link
    • About
    • All DIY
    • Tutorials
    • Shop
    • Facebook
    • Instagram
    • Pinterest
    • Twitter
    • YouTube
  • ×

    Home » Painted Furniture » Vaseline Layered Paint Technique Can Be Tricky

    Vaseline Layered Paint Technique Can Be Tricky

    This post may contain affiliate links

    Layering Woes

    I use the vaseline layered paint technique quite often. That doesn't mean it always goes well. Take this project for instance.

    I worked on it forever because I overdid the Vaseline. It happens. I finally achieved the layered paint finish I was going for…..it just happened in a roundabout way. I'll tell you all about it.

    Vaseline Layered Paint Technique Can Be Tricky

    This little boxy nightstand is darn cute after the makeover. Can you see layers of paint? Three colors of paint.

    layered paint finish project before

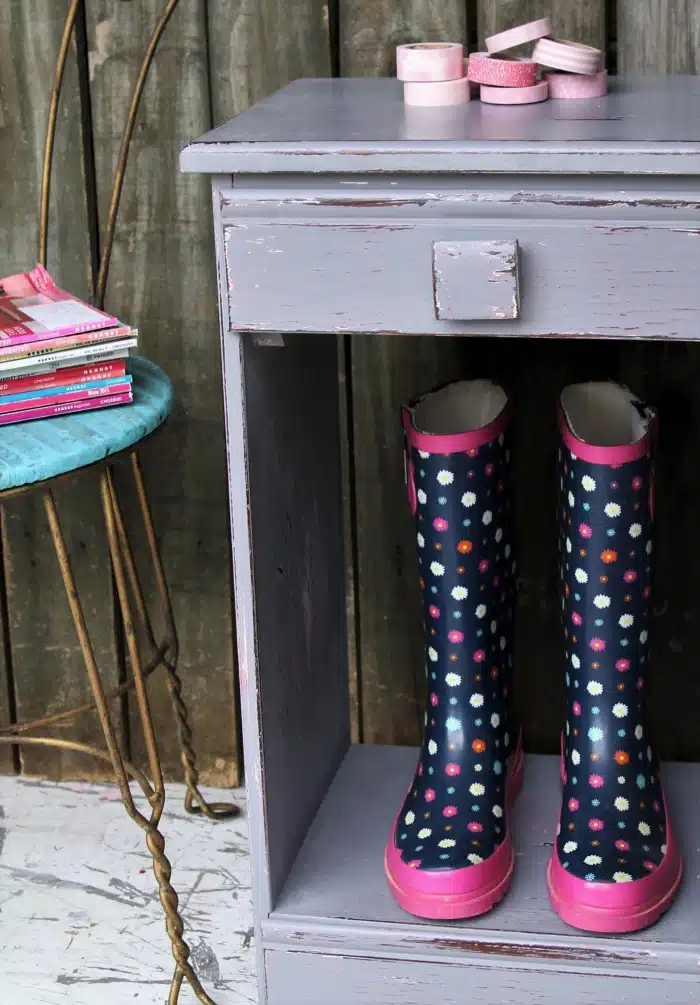
    This is the nightstand/side table the JTS paid $22 for at an auction. Usually my max price for a nightstand is $10 but I really prefer to pay no more than $5.

    When I take the finished piece to the shop to sell I will price it at $35. That’s probably top dollar in my area of the country. Not much profit on this project after you consider the paint and other supplies plus the shop owner gets 10% of the sell price.

    The JTS is new to the buying furniture part of the buy/sell process. He’s usually behind the scenes doing furniture repairs and the not pretty part of furniture makeovers. He's warming up to this whole auction thing though and I love that he wants to buy project pieces for me.

    Layered Paint Finish For Furniture Petticoat Junktion project

    Vaseline Layered Paint Technique

    I started this project with the idea of having three layers of paint….white, pink, and gray. I did accomplish that. But things definitely did not go as planned.

    layered paint finish for furniture makeover Petticoat Junktion

    I'm happy with the layered finish. It almost looks natural, like the piece was painted three different colors over a period of time and the paint distressed naturally over the years. I especially like seeing some of the original wood finish.

    FolkArt milk paint furniture project

    The paint I decided on for the project is FolkArt Milk Paint. This milk paint doesn't chip off like other milk paint. It's more like regular paint but it does need to be waxed or sealed or the finish is flat. The colors are Milky White, Dogwood (pink), and Monument Gray.

    how to use the vaseline paint distress technique

    I brushed on a coat of the white paint not really worrying about full paint coverage. Remember I was going to have 3 coats of paint, 3 different colors.

    how to apply Vaseline petroleum jelly to painted furniture

    Once the paint was dry I put on a pair of gloves and dabbed some Vaseline on the fingertips. As you can see I have a lot of Vaseline on the gloves.

    apply Vaseline to furniture for a layered paint lookThen I rubbed the Vaseline over the painted surface. If you look closely you can see the darkened area to the left of my hand where the petroleum jelly has been applied.

    layering paint on furniture

    No need to wait for the Vaseline to dry.....because it doesn't really dry. I brushed on a coat of the Dogwood color and I could tell immediately that there might be a problem. But me being me I kept painting.

    Things went from bad to worse. See, when the coat of Vaseline is too thick the next layer of paint gets slimy. That's what happened to me. I wiped the Vaseline on too thick to start with.
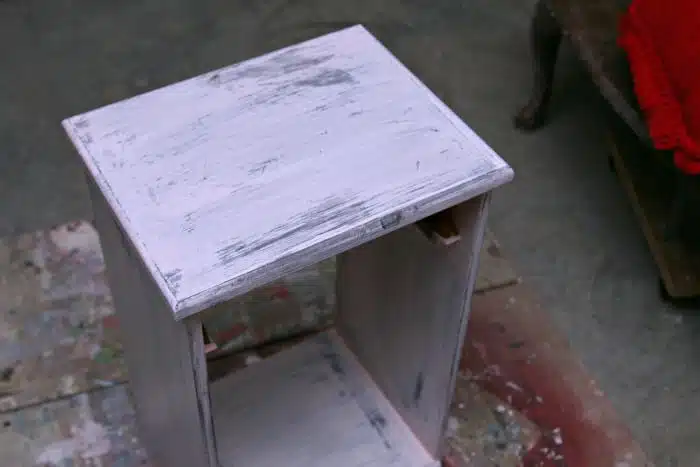
    furniture makeover project with paint layers

    After I applied the pink paint I had a gunky mess. I decided the best thing to do was take a dry rag and start wiping the nightstand down. I wiped off everything that wasn't dry.

    The photo above shows what was left. There were still areas of pink paint and some areas where a little Vaseline remained. My next step was to just paint on the top layer of gray paint. I could have brushed on more pink paint but at this point I was frustrated and just wanted to be done.

    I don't have photos of me wiping off the mess or of me brushing on the gray paint. When I run into problems I start winging it and trying to figure out what to do next. The camera gets put aside.
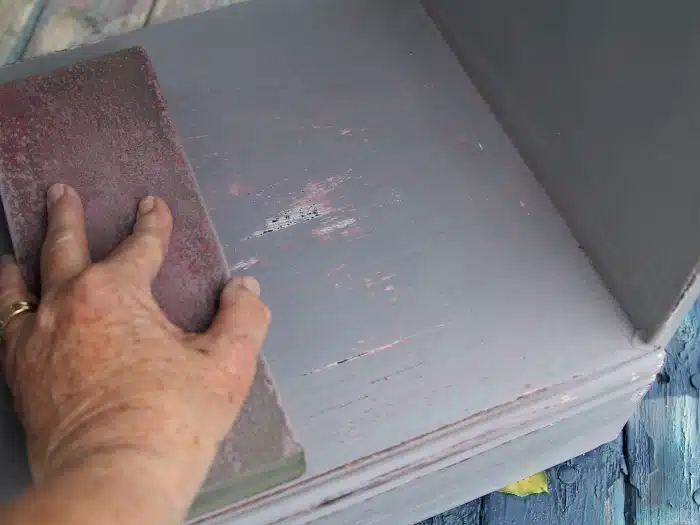
    Vaseline layered paint finish for furniture


    Moving on to when the gray paint dried..... I took a damp rag and rubbed it all over the nightstand and the areas where there was still some Vaseline distressed. And everything was perfect.I can see pink paint and white paint in the distressed areas. Just what I intended.

    I rubbed on a coat of Howard's Wax in Neutral to protect the paint and give it a slight sheen. It takes the wax about 20 minutes to dry then it just needs to be buffed a little. Remember to always use a lint free rag to apply and buff the wax.

    gray nightstand

    The process I went through is definitely not one I want to go through again. I thought by sharing where I went wrong it would help you.  I do things wrong all the time. I usually find a way to make the projects turn out right in the end.

    Vaseline layered paint technique


    If you want to see the proper way to do the Vaseline layered paint technique here is a video I made just for you....

    How To Layer Paint Using Vaseline Petroleum Jelly

    Hope you all have a Happy Thanksgiving. I have so much to be thankful for including you guys. Thanks for being here,  Kathy

    Find my fav DIY products here.

    Similar Posts For You....

    • Try This Whitewash Technique Over Painted Wood Furniture
    • How To Weather Furniture: Painted Sideboard Coastal Or Nantucket Style?
    • Make Whitewash Paint Mixture For Furniture Using Latex Paint
    • How To Make White Furniture Look Distressed And Naturally Worn

    Reader Interactions

    Comments

    1. Dawn Gustafson

      November 27, 2019 at 9:58 pm

      Kathy,
      Your work just keeps getting better and better! I really enjoy your Pinterest pins and pages!

      Reply
      • Kathy Owen

        November 28, 2019 at 5:58 pm

        Thank you Dawn. That makes me feel good!

    2. Lizzy

      November 27, 2019 at 12:10 pm

      I like the way it turned out. It's 100X better than the original. I have a question about this milk paint, though. If it doesn't chip off like other milk paints, is it really any different than other specialty paints? I thought the point of milk paint was the chippiness factor.

      Reply
      • Kathy Owen

        November 28, 2019 at 6:03 pm

        Lizzy, I'm not an expert on milk paint but my understanding is that a lot of milk paints do not chip. I think the colors of milk paint are more saturated too. These are not facts....just my thinking.

    3. Bobby

      November 27, 2019 at 11:57 am

      I'm glad I saw this before I had a go with this technique. Thank you for sharing your problem pieces as well as your successes - this helps us less talented people to learn and is very generous and open of you.

      Reply
      • Kathy Owen

        November 28, 2019 at 6:04 pm

        Bobby, Vaseline or petroleum jelly distressing really works you just have to apply the correct amount of petroleum jelly! You might experiment on some sample boards before working on a big project. Will save some headaches.

    4. SharonFromMichigan

      November 27, 2019 at 7:11 am

      Oh my, pink & gray are always a winner in my book! It came out beautiful! Mistake? What mistake? 🙂

      Reply
    5. Jenny @ Refresh Living

      May 18, 2016 at 6:25 am

      I love how this turned out, even if it didn't quite go as planned! It's always great when you still love the finished product, though. 🙂

      Reply
    6. Judy Gaaskjolen

      May 06, 2016 at 8:15 am

      I could really use some ideas for distressing outdoor decorations. Such as old pails, spreaders, wheelbarrows,etc. I have bought some of these items that have been already painted in awful colors and want to change the look. I spose I would need to purchase outdoor paint. Id like them to look rusty or the old galvanized gray. Any ideas?

      Reply
    7. Loni

      May 05, 2016 at 11:05 pm

      So pretty!

      Reply
    8. Vera

      May 04, 2016 at 9:04 pm

      This piece definitely looks like the original paint is still on it. A tutorial would be so interesting.

      Reply
    9. Dona Deam

      May 04, 2016 at 7:31 pm

      I like the way it turned out. It does look it has been painted different colors over time. Thanks for sharing

      Reply
    10. Michelle singleton

      May 04, 2016 at 11:55 am

      Might not have been easy but whatever you did worked perfectly!! That is a three chocolate and a glass of wine pat on the back piece if ever seen one.Love your fun approach Thanks for making my week

      Reply
    11. Tara

      May 04, 2016 at 8:39 am

      The best Ideas!!!

      Reply
    12. Diana Hanson

      May 04, 2016 at 6:35 am

      PPPPPlease do a tutorial!!!! Piece is gorgeous and I want to learn your technique(s)!!!! Thank you!!!

      Reply
    13. Heidi

      May 04, 2016 at 6:18 am

      Thanks for sharing this piece. It is a great example of the distressed finish. I appreciate that your process didn't go as planned. I just had the same experience with a picture frame project. I bought a plain brown frame from Walmart. I wanted to try the Vaseline technique and layering. It didn't go as I had imagined! I ended up repainting the frame 2 more times and distressing it. I'll post some pics on the FB page. I can say that I learned from this one! 🙂

      Reply

    Leave a Reply Cancel reply

    Your email address will not be published. Required fields are marked *

    Primary Sidebar

    Hi, I'm Kathy!

    The creator at Petticoat Junktion and I love decorating my home. My decor is an eclectic mix......

    More about me →

    Popular

    • The Best Painted Furniture Makeovers of 2022 From The Furniture Fixer Uppers
    • Top 100 Thrift Store Home Decor Makeovers

    Footer

    ↑ back to top

    Get daily tips and tricks for making your best home.

    SUBSCRIBE
    • About
    • All DIY
    • Tutorials
    • Shop
    • Crafts
    • Home Decor
    • Painted Furniture
    • Projects

    As an Amazon Associate I earn from qualifying purchases.

    Copyright © 2023 · PETTICOAT JUNKTION · PRIVACY POLICY

    Receive my furniture painting tutorials by email free! Sign up below....