Vaseline Paint Layering Technique For Furniture: Bed Makeover
As an Amazon Associate, I earn from qualifying purchases.
The Vaseline paint layering technique for furniture can be tweaked to give it a distressed paint look. With this distressing or layering technique, you can layer paint using two colors or multiple colors. For this furniture makeover, I layered three paint colors.
I usually layer two colors only, but I like to try new things, and the three-layer technique worked like a charm. Customize the paint colors to your liking. The color combinations are endless.
Pick your base layer, which will be the color that shows under the distressed areas of the top layer of paint. Then, pick a color for the middle layer and a color for your top layer.

This is the project bed. I spotted it at my favorite junk shop. The bed was a beauty when it was new but now it’s all dinged up. The vintage pineapple bed with carved details is perfect for distressing.
If you’re thinking of trying this paint technique, the more detailed the furniture, the better. Today is the Furniture Fixer Upper Tour, so be sure to check out the other furniture makeovers at the bottom of the post after my project tutorial!

I had to make a few repairs that included gluing a portion of the footboard where the wood had splintered. For most glue or wood filler repairs, I wait overnight for the glue to set. Once the glue was set I cleaned the headboard and footboard with Simple Green.
Vaseline Layering Paint Technique For Furniture
I had a general idea of the color palette I wanted to work with. Sometimes during the process, I change my mind because the colors or something doesn’t look right. And it’s okay to change plans mid-project.
Step 1. Apply the First Layer of Paint.
Apply the first paint color. It doesn’t matter what color it is, but you need to have a plan before you start.
My base layer was going to be pink. I didn’t have the perfect pink in my stash so I combined White Adirondack and Imperial Red FolkArt Home Décor Chalk paints.

I mixed the colors until I got a pink shade that made me happy. If you have a lot of used paint on your shelves try mixing colors instead of buying more paint.

This is how the bed looked after one coat of pink paint. There is no need to cover every square inch of the piece or make the paint finish look perfect. Two more paint colors will be added over this one.
Step 2. Apply A Layer Of Vaseline Petroleum Jelly over the Paint.

This is where the project gets a little tricky. You must apply just the right amount of Vaseline between the paint layers. If the layer of Vaseline is too thick or heavy, the next layer of paint will be slimy, and that isn’t good. If the layer of Vaseline is too thin the paint will not distress.
I tend to have a problem with the amount of Vaseline. I tried something different this time. Instead of applying the Vaseline with a rag I just used my fingers. It’s easier to tell how much petroleum jelly I’m applying to the furniture.
Wipe on a very thin layer in the areas you want to be distressed. Work on detailed areas, edges, and curves. Too much Vaseline and the paint gets gunky and you have to wipe it all off and start over. Voice of experience.

Step 3. Apply the Second Paint Color.
My second layer color choice was gray. I wanted a soft, dreamy look and a flat finish. I mixed my own color once again to get the flat finish and the gray color. I mixed together Charcoal and Wedding Cake colors in Martha Stewart Craft Vintage Décor Paint.
Don’t be afraid to mix paint colors together to create your own custom color. I have a large selection of paints on my shelves, so I hate to go buy more. You can go to the store and buy the paint color for your project, or do as I do and use what you have on hand.

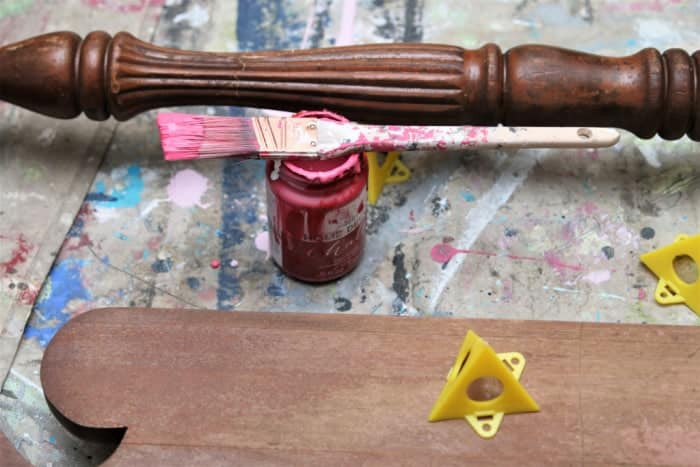
I applied one coat of gray paint over the pink. You may be able to see the little yellow “pyramids” under the headboard. I love these things. I painted both sides of the bed in one shot and laid the bed on the pyramids until the paint dried.

Step 4. Apply a Second Layer of Vaseline.
Now, we need to repeat step 2 and apply the petroleum jelly where we want the paint to come off when distressed.

Step 5. Apply the Third Paint Color To Add More Depth of Color.
For paint color number three, I just added more of the Martha Stewart Wedding Cake color (white) to the gray paint mixture (the second paint color) to make a light gray.

I brushed on the third paint color. In this photo, you can see the difference between the two grays. The headboard hasn’t been painted light gray yet. After this step, the bed has three layers of paint color with two layers of Vaseline…one coat between the pink and dark gray….one coat of Vaseline between the dark gray and the light gray.

Step 6. Distress the Layered Paint.
Now we’re ready to distress the paint. Where the Vaseline has been applied the paint will not bond properly and will come off when distressed with sandpaper.
I used 100 grit 3M flexible sandpaper and sanded really gently. In some areas, the paint was removed down to dark gray and in some to pink. I tried not to sand the paint down to the original finish but did in a few places.

Step 7. Apply Wax To The Finished Paint.
This step is not required. It all depends on the look you’re going for. I used flat paint but wanted to have just a bit of shine so I wiped on a coat of wax.
The photo above shows where I applied the wax to the leg but not to the part of the bed on the left side of the photo. Of course, if you use latex paint with a satin finish, etc. you don’t need to apply wax to get that sheen.
You can use any paint colors and also layer anywhere from 2 paint colors to 4 or 5. The process isn’t hard just a little time-consuming because you need to wait on each layer of paint to dry before wiping on Vaseline and painting the next layer of paint.
There is no waiting after you apply the Vaseline layer. Don’t be afraid to give this technique a try. Believe me, I make a lot of mistakes in my projects but they are easy to correct because it’s just paint!

The paint layering and distressing is very subtle. The deep gray and the pale gray with just a hint of pink underneath is designer worthy.
This vintage bed is a great example of how the Vaseline layering technique can highlight pretty details. For a full breakdown of the method, visit my complete guide to layering paint on furniture with Vaseline—it includes step‑by‑step instructions, FAQs, and several more project ideas.

The bed has a gently worn look. You guys know how I love heavily distressed paint. I tried my best not to go crazy with this project and I think I succeeded.
Time to see what the rest of the Furniture Fixer Upper Team has for us today. Just click the pink text links below the “before” makeovers photo collage…..
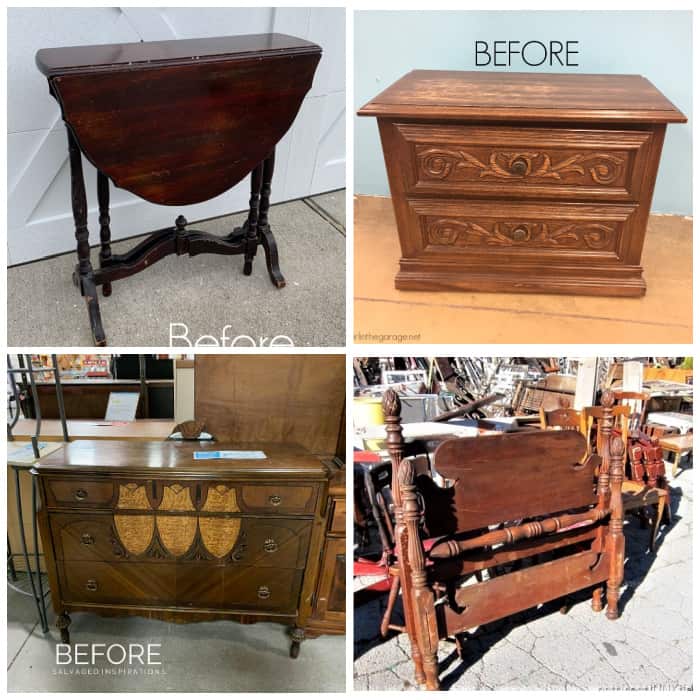
Petite Drop Leaf Table Makeover With Stencil – Confessions of a Serial DIY’er
Blue Chalk Paint Nightstand – Girl In The Garage
Textured Additive For Paint – Salvaged Inspirations
Vaseline Paint Layering Technique – Petticoat Junktion (you are here)
If you try this technique of layering paint, I would love to hear about your experience. and maybe see a photo!
More posts for you….
How To Paint Wicker And Metal Furniture
$5 Table Makeover: No Wax Chock Paint And Whitewash Finish
13 Living Room Table Makeovers: Side tables, End Tables, Coffee Tables
$7 Upcycled Table: Rusty Iron Base And Reclaimed Wood
13 Remarkable Rub On Transfer Furniture Makeovers
As always, thanks for being here, Kathy
I did sell it but I don’t remember the price. Pricing depends on the area of the country you live in too.
HI KATHY,
Love what you did with the twin bed.
I have a set of the same twin beds like this one, wondering if you wold yours.
Wondering how much I should price them for?
Thanks in advance
This is beautiful. I love the colors you used. Fantastic job.
Kathy, I love the colors and layers in this bed set! Beautiful work my friend! xo
I can see why that is your favorite junk shop Kathy… I’d have a heyday there! 😉 Love the vaseline distressing as well. The pink peeking through is charming! Have a great day my friend. XOXO
thanks for the great ideas! if i hadn’t already chopped up my footboard for trim around my cedar chest and a bar to hang my scarfs on, i would have definitely tried this! i’ll find something tho to use this technique on! super cute colors!
I have a complete bedroom set with these same twin beds. Mine is in original condition.
Thanks for the detailed instructions for Vaseline distressing; I’ve wanted to try this but was unsure of how to do it. I can’t wait to tackle something! Love your blog and all your helpful tutorials.
I love this, Kathy! The mix of colors you chose is just perfect! XOXO
Hi Kathy! I love this!! I definitely need to try this layering technique . Thank you!
Thye bed looks gorgeous! I love the colours you chose to go together. The pink was stunning.