How To Paint An Antique Bed Using MMS Milk Paint
As an Amazon Associate, I earn from qualifying purchases.
I want to tell you how to paint an antique bed but first a funny story. I know the neighbors think I’m coo coo. The Junktion Technical Specialist helped me move this twin bed all over our yard so I could get some pictures in natural light. This photography stuff is really, really hard. I find it much easier to use natural light than try to get my DSLR setting just right for indoor lighting.
Custom Mix Formula – Paint Vintage Furniture
At least the weather was nice. We had one neighbor come and chit chat and others just stared as they drove by. It’s going to be a long Spring and Summer with lots of paint projects and photography so they may as well get used to it.
Also, I’m taking pictures and the JTS is chasing a mole around the yard and a mole trap appears in the ground close to the bed….and he says….”is that going to be in the way”….seriously????

bed before paint makeover
I purchased this headboard and footboard at a local thrift shop for $3.00. The bed was minus rails but I was able to find some to fit at a local flea market/antique shop. The bed was manufactured by Berkley and Gay sometime in the 1920’ or 1930’s. It was in pretty bad shape with peeling veneer, missing details, and crackled varnish. I knew I couldn’t restore the bed to it’s original beauty but I could make her pretty with paint.
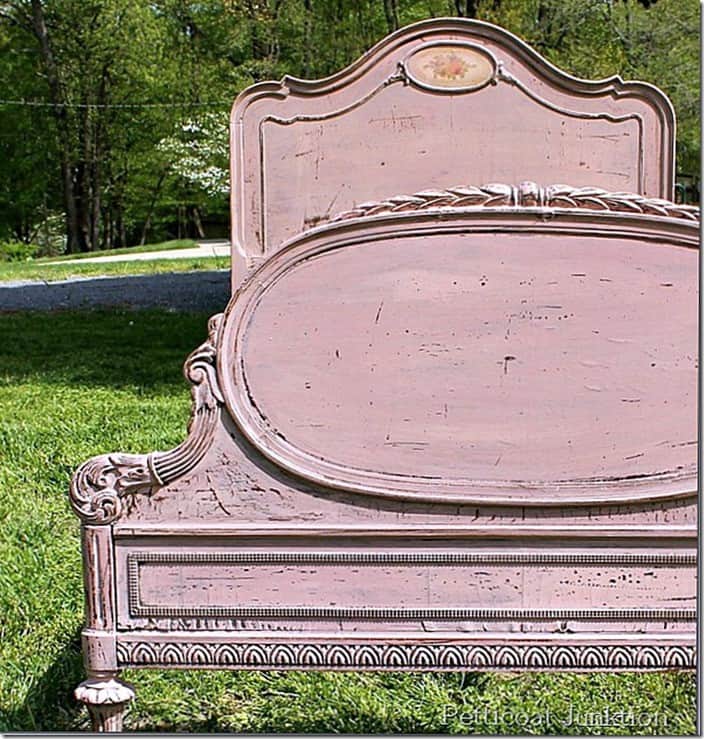
I mixed up a batch of Miss Mustard Seed’s Milk Paint, but not just any color. I mixed Shutter Gray, Tricycle Red, Linen, and Mustard Seed Yellow to get this look. I know, I probably added 2 extra steps because I started the mix with Shutter Gray.
I had some dry powder in a jar and I assumed it was Shutter Gray but it was Grain Sack. Shutter Gray is much darker than Grain Sack. I think I could have mixed the Linen, Grain Sack and Tricycle Red and had a beautiful color too……but we’ll never know now!
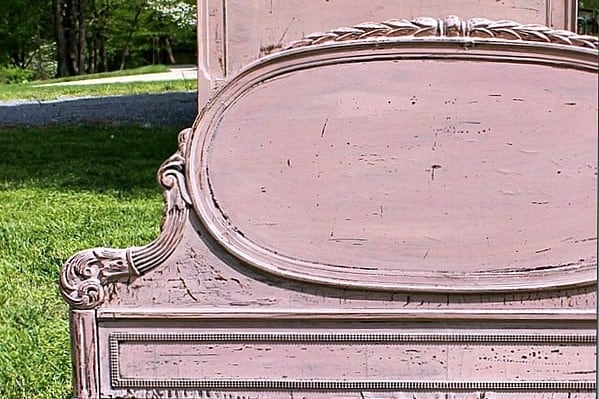
I didn’t want to cover the roses but I did brush over them ever so lightly with the paint.

I always love it when the wood has this cool ageing affect. I don’t know what it’s called, but I like it!

The paint chipped a little, then I did some scraping with the putty knife. This is my favorite part of the MMS Milk Paint experience. The original wood finish is still intact when you use the paint scraper, but if you use a sander to distress you are usually looking at raw wood. I applied a coat of clear wax for protection and to add a little sheen.

Isn’t she stunning. I really love her. This vintage bed painted with milk paint is one of my favorite projects. The foot board is the best part!

Sometimes you have to look past the flaws and picture what can be. Boy, that sounded really profound didn’t it. I can be deep sometimes. What do you think about this project? Better with paint? You can paint vintage furniture too. Give it a try.
See more here…..The 8 Best Miss Mustard Seed’s Milk Paint Projects.
I made a short video showing you how I painted a dresser with milk paint. See it below….
Milk Paint Tutorial Video
Thanks for stopping by. Kathy

It is truly a work of art. I wish you lived near me. I have 5-6 beds like that plus vanities I am gojng to rehab/paint. I’ll try your way. You explained it beautifully. I love your work.
Love this bed. Turned out awesome. These large areas though are very difficult for me to use clear wax. Do you have a favorite brand? I have not tried MMS wax but they say its really good. My waxing always is two toned with some areas darker than others. Hate that.
Fabulous piece and wonderful job
Hi Naomi, I’ll have to check out Marian’s bed. I know it has to be beautiful. I painted over the bed just like it was. Missing veneer and rippled veneer and all!
That is SO gorgeous, Kathy! You know, a while back Marian over at Miss Mustard Seed had an old bed very similar to this and when I saw the photo of it I wanted her to paint it exactly this color. I just knew it would be beautiful. But alas, she chose another color–don’t remember what–which was okay, too. But it wasn’t this color I had imagined the bed in. So this bed that you painted is exactly what I had imagined for the other bed!
I have a question, though. I noticed in the before photo that there was a place on the headboard where the veneer was peeling. What, if anything did you do with that?
I like the how the color came out. It’s a gorgeous piece now that you’ve had your hands on it!
I’m not a real fan of pink, but it works for this piece. I was wondering, tho,’ if you did anything with the veneer that was coming up on the headboard that’s definitely noticable in the ‘before’ pic? In the ‘after’ photo, the footboard is covering that part of the headboard so I couldn’t tell what it looks like after your reformation.
It is lovely! Never in a million years would I imagine it or try to paint it. Can’t tell you how much I admire your creativity and determination! Keep up the good work!
It is gorgeous!
Kathy it looks so great! I have been dying to try milk paint. This may have been the inspiration I needed!
Do you have any tutorials using MMS? I’m new to this paint;) thanks! Stacey
Beautiful rescue! I absolutely love it. I can’t believe you found this for $3. It will make some little girl happy by brightening up her room.
Thanks Christy. I do love this bed. It’s probably in the top 10 of my greatest junk finds!
This is stunning, Cathy!! Found it on your pinboard. Three dollars was a steal! XO XO
The aging effect that you love is called “Alligatoring”, this is what happens when you brush on varnish too thick. The change in temperature causes the thick coat to expand and contract, that’s what causes those thick cracks. These days we love it because it does give our painted furniture an awesome look, back in the day it was not a good thing! Your bed is gorgeous BTW!
Deby, I left the rippled veneer as it was…didn’t peel anything off. If you look closely at the photos you can see I just painted over the rippled veneer.
How did you deal with the veneer that was peeling off?
So awesome!…I love your pieces! Thank you so much for sharing. I wanted to vintage more of my furniture, but the ones I have done in the past just took so darn long and still don’t look as good as yours. Thank you! I am excited to try this paint!
This is absolutely gorgeous. What a steal, if they could see it now! Have a great weekend.
Jeannie
She’s a beauty – love the MMS paint color! I found it over at the Throwback Thursday Party.
Wow – really beautiful bed. You did a fabulous job! I have been using ASCP for awhile now but am looking forward to trying the MMS Milk Paint on some pieces as well. Thanks for the inspiration!
The finish on the bed is gorgeous. Ha, ha about hubby asking “will this (mole trap)be in the way?” :)Thanks for sharing your techniques and colors.
Lori
I just wanted to add my 2 cents, LOVE that BED, you did a
wonderful job on your paint choices
I sure would have picked that up for $3.00 any day if I had found it
good job and lucky find
thanks Suzan for the awesome complement, you do need to try MMS Milk Paint!
Congrats on your feature ( Feathered Nest ) this bed is out of this world Kathy – absolutely GORGEOUS……..
I have to try this paint – seriously I’m so behind jumping on this band wagon.
I think this may just be my all time favorite bed redo evah!!!
Now I’m off to pin it on as many boards as I can!
XOX
Absolutely beautiful! I love the unique color choice, too. (And $3 was a crazy steal–good for you!)
It is beautiful! What a buy to find for $3! Stunning and my neighbors think that about me too….
Nancy
hey Miss Kitty, thanks for letting me know what that type of aging is called. That makes sense, and thanks for stopping by to leave such a nice comment.
Wow, Kathy, that is just too beautiful for words! Congratulations on being featured over “Wow Us Wednesday” blog party. I think I have heard the area of paint you asked about being referred to as “gatoring” is in the back of an alligator…but I am not sure. Just a beautiful peice now…it has a totally new life.
Thanks Nancy, I’ll stop by later and link up too!
Kathy, I just loved this so much I’m including it in some of my favorites from last week’s Project Inspire{d} link party. Thanks so much for sharing it! 🙂
Nancy
thanks Kim, it was a deal!
Wow, I’m still stuck on $3! What a steal and I love the finish.
Wow Kathy, that is one amazing bed! And I love the color choice! What girl wouldn’t love this!
Oh, she is so pretty! GREAT find and I just love the color! Would love for you to hop over and share at AMM…
Blessings,
Cindy
That IS such a stunning bed, Kathy! I cannot believe you found those pieces for $3.00. Love the dusty rose color and the finish that Miss Mustard Seed’s Milk Paint creates.
Hi Kathy
Looks great! Did you work with the mixture tool from the Purple Painted Lady? Feel free to share this with my readers in my link party.
Hugs from Belgium
$3!!! That’s insane! I love what you did with it!
NO WAY….3 DOLLARS??? They might as well have just paid you to remove it! Little did they know how you would make her beautiful again. Very, very nice!
Wow…really love the bed !! You did a great job with it. most of all love the price $3 🙂
ya ya yaaaaa, baby. this looks amazing. the color is so RIGHT NOW. bravo!
michele
hello lovely
Love this project Kathy, and you are so right about the way MMSMP can be distressed without sanding back to raw wood – it’s amazing.
OMG, $3 that’s almost a crime 😉 it is so gorgeous now, what an absolutely fantastic job you did on this bed… I love it! – Susan
Kathy,
Thanks for sharing this gorgeous bed frame on Project Inspire{d} this week!
Hope you have a fantastic weekend 🙂
Nancy
Restore it to its original beauty?! OMG you have well surpassed that! This is absolutely stunning. I haven’t used MMS yet, but I am totally inspired by your project. Going to have to order some!
i love it…i have several antique pieces from my husband’s parents and love them…the cherry sideboard had something spilled on the runner which ruined the finish on it…the entire top almost…this looks like a great idea to breathe new life into it…keep up the good work! ….and sharing!
I love what paint can do. I haven’t tried milk paint. Only chalk paint. Visiting from hickorytrailblog.blogspot.com I’m you newest follower 🙂
She is a beauty indeed. What a wonderful find and stunning makeover. Don’t you just love what chalk paint can do? Blessings to you, Patti@OldThingsNew
come on girl!
I’m stunned…she’s a beauty!
$3 bed? I need to hang out with you. 🙂
I sent an email just in case you don’t get this update. Definitely seal it and I use Minwax Polyacrylic Latex!
$3? Are you serious? I recently bought a twin bed, from the same era. The footboard is curved and the veneer needs to be glued. I’m a little concerned, because the current finish isn’t all that secure. I’m just going to clean it and do a real light sand and give it my best!
Let the neighbors wonder! I bet you aren’t shy and they all know what you’re up too. Probably wish they were you, having all of this fun!
Cheers!,
Barbara
Absolutely gorgeous! $3 ??? OhEmGee!!Unbelievable!
Great piece! Quick question…I just painted my first piece with milk paint, an old wood daybed that will now live on my covered porch. I did sand it a bit before I painted and I expected it to chip and flake where it wanted to, which it did! My question is…if I use poly to finish it, will this stop it from flaking further? Any tips for that final step? And I do want to use poly and not wax because it will be outside. Thanks so much and I love your blog!
I think it’s my favorite makeover now. That changes ever so often
thanks Angie, such a nice comment
yep, if they only knew what went on inside!
thanks Laura, who could pass up a piece like that for $3.00.
$3.00?!? That is a crazy price for that bed! Just beautiful, nice job!
I think it is beautiful! Love the result!
However is was that you got to that color it’s fabulous! so glad you could save the rose inset, makes it all the better, such a great job!
Gorgeous! I have to laugh about the neighbors…between our millions of trips with furniture going in…furniture coming back out AND all of the projects we’ve been doing on this home for 9 years (almost continuously) We always joke that our neighbors much think we are crazy! 😉 We’ve always got a truckload of something or other!
Nancy
Hi Kathy,
The piece is gorgeous!!!!! It would be perfect for a little girl’s room, shabby chic style. Thanks for showing all the steps and I think your pictures and photography of them turned out fantastic!!!
Have a great week, Kristyne
This is a really beautiful piece Kathy, I love the detail on the wood. You are brave, not sure I could pick that color unless I had the perfect room for it.
Gorgeous piece, Kathy! It was pretty before, but now it’s stunning. Thanks for the inspiration! ~ Angie
You NEVER cease to amaze me with your wonderful miracles & painting techniques! This one has to be my favorite so far!