Stenciled Wood Coasters Make Great Gifts
As an Amazon Associate, I earn from qualifying purchases.
Colorful Stenciled Wood Coasters
This project should convince you guys that you can stencil. These stenciled wood coasters are a breeze to make and the stenciled design……perfection as always. Not that I’m patting myself on the back or anything.

How about those beautiful bright colors. Color choice is easy. Deciding how to place the stencils on the coasters is the hard part of the project. You know I can’t just put things on all neat and straight.

Stenciled Wood Coasters
The stenciled coasters are pretty enough to hang on the wall…..or just to sit around. They make me smile.

The paint I used for this project is perfect for stencils. The Martha Stewart Multi-Surface Satin Acrylics come in 80 oh so beautiful colors. The short stencil brushes are some of my favorites. You can find these Martha Stewart products exclusively at Michaels!
 The adhesive paper stencil from Martha Stewart is “Flowers & Butterflies”. All of this new stuff sure makes my projects go smoother. No stencil tape or spray adhesive needed.

How To Stencil Wood Coasters
1. Unfinished Wood Coasters.
2. Cut adhesive paper stencils apart and arrange as desired. Pull backing from stencils and adhere firmly to wood coaster.
3. Pour acrylic colors of choice onto paper plate or palatte. I mixed two colors for the orange flower, Orange and Strawberry, to make a darker orange.
4. Dip stencil brush in paint and then dab almost all of the paint from the brush before starting to stencil.
5. Pat and swirl the stencil brush on the flower design.
6. Lift edge of stencil to check progress. I highlighted the dark orange with the lighter orange by just swirling the brush over the design in various areas. The center of the flower is the darkest part.

Check out the photo above to see how adding more than one color to a design makes all the difference. I first stenciled the design with green paint. The photo on the left shows green only on the design. The green paint is also shaded because I applied it heavy in areas and light in other areas. The right photo shows me adding blue paint to the tips of the design.

What do you think? Amazing right. This process takes literally seconds. You can do it. Remember…..very, very, dry stencil brush…..until you think there is no paint left on the brush….then go.
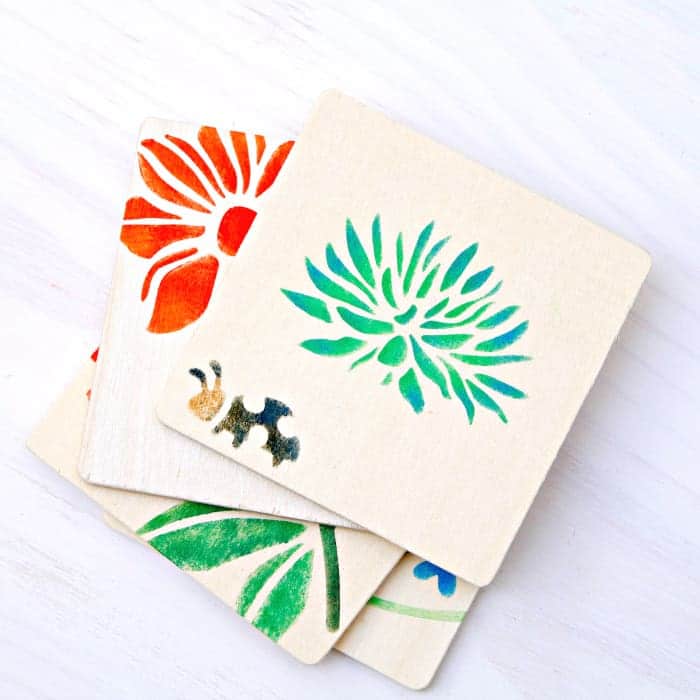
This little creature was the cutest. I had to add him to the mix. I used a color combo that included Navy.

I can’t pick a favorite design. I really like that little creature but then I love the small orange flower bush too. I brushed 3 layers of clear matte Mod Podge over the coasters to protect the wood from water. Always allow the Mod Podge to dry between coats.
The adhesive stencils make a world of difference. No leaking under the stencils. They’re reusable too. The stencil package includes sheets of paper for storing the stencils after use.

Martha Stewart Multi-Surface Acrylic Paint is perfect for all kinds of crafts including family crafts and school projects. You can use the paints on all kinds of things….. wood, terra cotta, ceramic, glass, and tin. I used the satin acrylic for the coasters but the multi-surface acrylic paints include glitter, pearl, metallic, neon, and glow-in-the-dark finishes.
For more diy coaster ideas check out my Confetti Coasters here and my Domino Coasters here.
There are 168 new products in the Martha Stewart line including new silkscreens, which are great for achieving highly detailed designs. I’ve used these silkscreens and they are sooooo easy to use. You get a perfect painted design every time. Find Martha Stewart products exclusively at Michaels!
If stenciled wood coasters aren’t your thing that’s okay. You can stencil just about anything. What ya got? As always thanks for being here and have a great day, Kathy
Disclosure: This post is sponsored by Plaid Crafts as part of the Plaid Creators program. All words, project ideas, and opinions are 100% my own.
Great tutorial on this project Kathy! These coasters are so pretty and fun. I really like how you use multiple paint colors when you stenciled these coasters as you did on your FB live stenciling posts earlier this year.
These coasters are so cute Kathy! Such a great tutorial too!!
Thank you Cathey. If you ever get up to the junk shop let me know. I would love to meet up with you!
Hi Kathy, I am so happy you have demonstrated the correct way to stencil! I learned this technique back in the 80s and it is tried and true. No leaking under the stencil, even if it doesn’t have the adhesive backing, and it turns out perfectly every time. Thank you, thank you, thank you! I enjoy all of your posts and hope someday to get up to your favorite junk shop. I live down here in west Tennessee. Have a blessed day!