How To Prepare Furniture For Painting
It is important to prepare furniture properly before painting. The preparation is the most important part of a furniture makeover. My steps to prep furniture for painting are easy to follow. I will show you the process on a dresser, and then I will have all the paint information for you, too.
Sometimes, I’m asked to quote a price for painting a piece of furniture. And sometimes when I quote the price, I’m met with…“It cost that much to paint it?” Just painting is not all that happens in a furniture makeover. The furniture must be cleaned and sometimes repaired before the painting begins.

How To Prepare Furniture For Painting
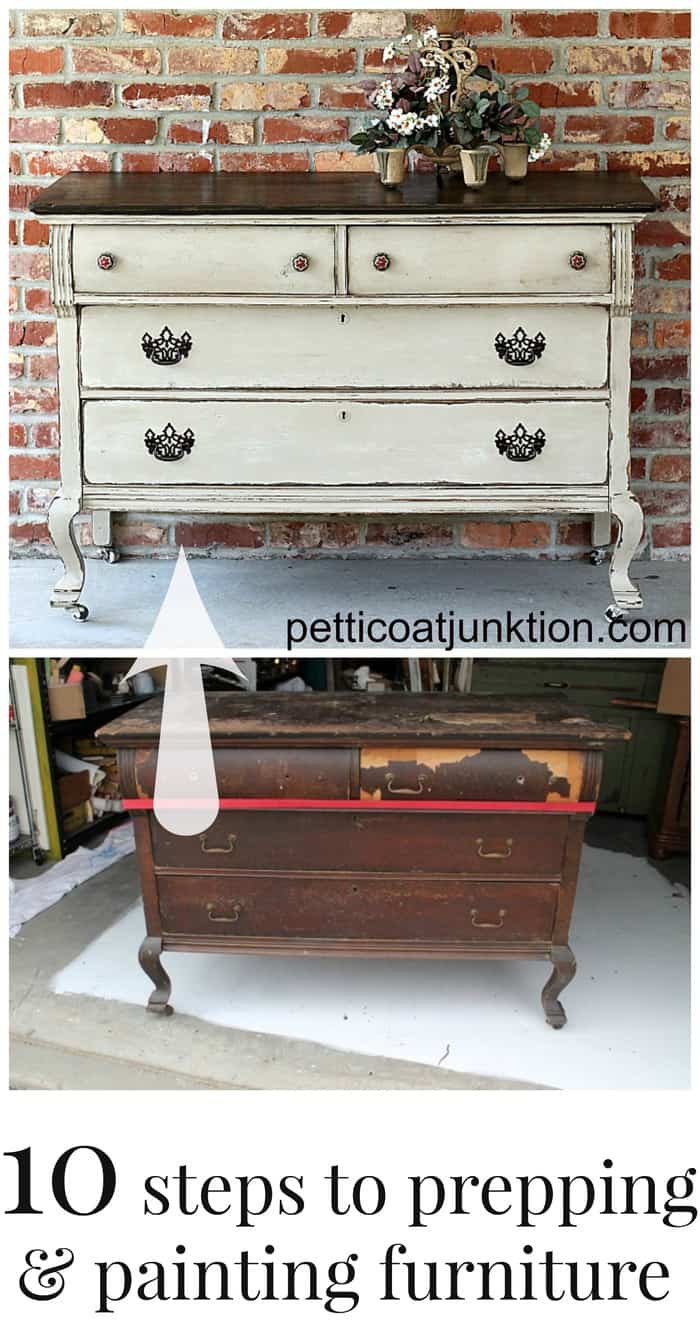
Sometimes, the furniture is in perfect shape and doesn’t need repairs or cleaning, but that doesn’t happen very often. There is more to a makeover than cleaning and repairs. The dresser in the photo above looked like this…..

…..before the makeover. Big difference. In my book there are 10 steps to any makeover and prepping furniture is the most important part.
Step 1. Assess the overall condition of the furniture.
Pull out the drawers to see if they need repairs. Sometimes the sides will need a little glue or the bottom may be loose. Check to see if the veneer is pulling up. Check joints to see if they have pulled away and need gluing. Check to see that the back is firmly attached to the body of the furniture. Tes the legs to see if they are loose.
Step 2. Make necessary repairs.

Examples of repairs: remove or replace veneer, putty holes or gashes, glue loose joints, replace missing wheels or remove all wheels, repair or replace drawer bottoms, reattach or replace drawer runners, add magnets for door closures, nail or glue any loose body parts like the top coming loose from the body, etc. The list of repairs could go on and on.
Step 3. Clean all surfaces.
Use a good all purpose cleaner and wipe all surfaces with a soft damp rag (not wet). Wipe immediately after with a dry rag. I don’t use oil-based products. My favorite cleaning agent is Simple Green.
Step 4. Assess furniture hardware.
Is the hardware missing? Will the existing hardware work with the new paint finish? Do you need to drill or fill holes if replacing hardware?
Step 5. Prepare drawers for the hardware.
Putty and/or drill new holes for hardware if necessary.
Step 6. Sand furniture.
This process may not be necessary depending on the condition of the piece. I very seldom sand before painting. If putty was needed to fill screw holes or dings then sand the putty till flush with the furniture surface.

If someone has written on the piece with permanent marker, painted with nail polish, or used stickers on the furniture then sanding is required. There are some stains that will come through the paint if not removed before painting.
Step 7. Prime furniture and hardware if needed.

A good primer will give you an over all solid color to work with. Often used furniture is splotchy and that will show through the first and sometimes second coat of paint. Start with a solid color surface.
I recommend having the primer tinted gray. Gray is easy to cover. White primer under colors such as red is very hard to cover and gray works much better.
Step 8. Select the paint for your furniture makeover.
There are more decisions to make than the paint color when selecting paint. First decide the overall look you’re going for. Do you want a flat finish, distressed, high gloss, etc. Will the piece see a lot of wear and tear? Once you decide on the look you can select the paint. Use a good quality latex paint on your furniture. Latex paint has improved greatly over the last few years.
Step 9. Paint the furniture.
This is the fun part and usually the easiest. Prepping the furniture takes more time than painting. Start with a good-quality paint brush. The brush makes all the difference. Load the brush with paint and start with the body, drawers, and bottom of the furniture. Save the top for last.
Step 10. Seal or not to Seal
Seal furniture if it will see heavy use. Apply 1 or 2 coats of a good latex polyacrylic sealer. ( I skip this step on most of my makeovers).
So…you see…. there is more than just painting the furniture. I admit that every once in a while there will be a piece I can just paint….but that doesn’t happen very often. But, even if you are just painting…… the hardware and drawer pulls have to come off first, and painter’s tape will need to be applied over screw holes and other areas where you don’t want splashes of paint. Now we are going through the painting and prepping furniture process on the chest of drawers in the photos above.
Painting Furniture – A Complete Makeover Tutorial
This piece needed several repairs before the cleaning and other prep could begin. The back legs of the antique dresser needed to be re-glued to the back bottom wood plate.

The JTS also had to find some drawer stops to replace the missing ones and nail them into place.

The sides were pulling away from each other, and after filling the spaces with wood glue, we strapped the dresser tightly so the pieces would bond as the glue dried.

I decided the best plan for the top two drawers was to strip off all the veneer. It wasn’t very easy. I used the heat gun and tried to loosen it, but the JTS said I didn’t get it hot enough. He used the glue gun and basically burned that stuff off!
I wasn’t around to get photos of that process. There were a few stray bits of veneer, and you can see the JTS with a screwdriver in hand removing the little pieces.

There was also a lot of tacky glue left on the drawer fronts. Instead of trying to remove it, I painted over it…more on that process later.

I wanted to use knobs on the top drawers instead of the pulls, so I filled the original screw holes with Elmer’s Wood Filler…just leaving one hole on each side of the drawer for the new knobs.
Painting The Furniture

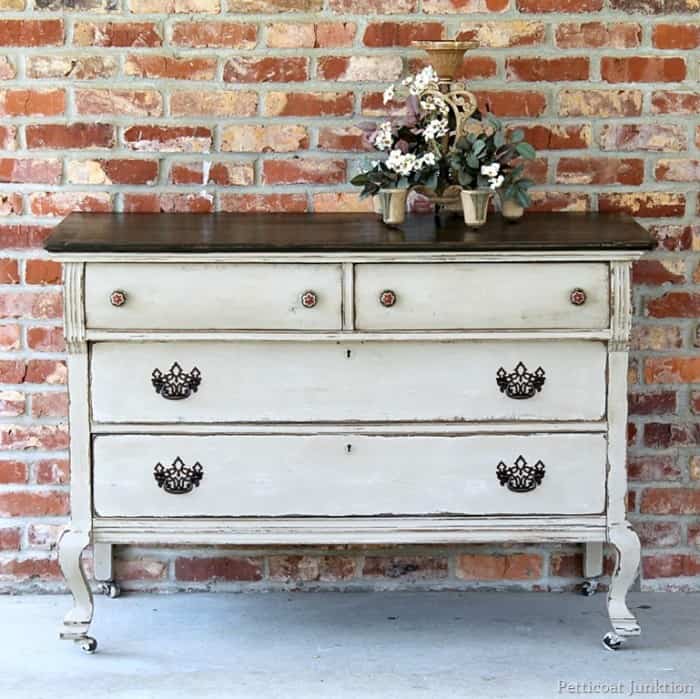
I first painted the bottom of the dresser in Beyond Paint in Off-White. I kept looking at it, thinking there was too much contrast between the off-white and brown top.
I knew the look I wanted, and I just had to change plans a few times to get it! Don’t be afraid to change plans mid-project. It’s paint….paint over it if you don’t like it.
I decided to go with a new Beyond Paint color….Linen. You can see the contrast between the two colors. The linen looks so dark next to the off-white, but if you just look at the painted piece now…you might say it was off-white.
Do you know what I mean? So, the bottom of the chest has two coats of off-white and two coats of linen paint.

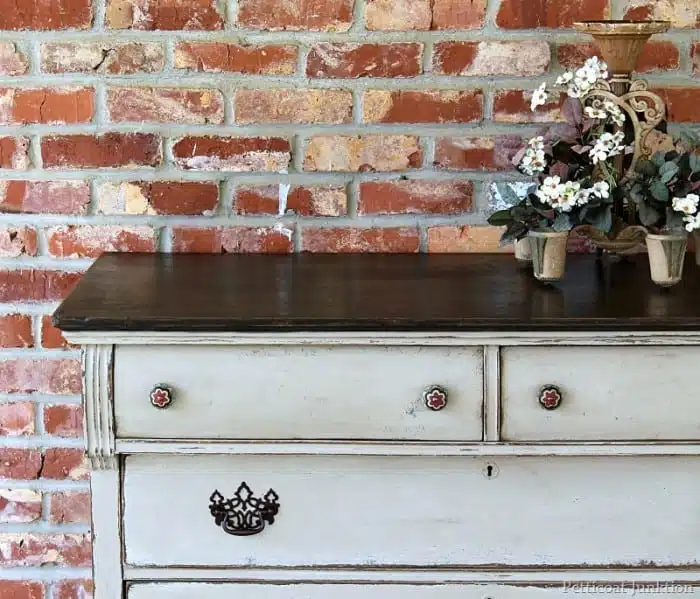
I had a can of brown(?) paint from Habitat Restore, but when I painted it on the top…it had a purple tint. I went to Home Depot and selected the “Espresso Beans” custom mix. You can see the difference in color. Many of you thought the top was stained…nope…just paint.
The brown was still not as dark as I wanted, so I applied a coat of very dark wax on the paint after it had dried. So now I have two coats of brown/purple paint, two coats of brown paint, and one coat of dark wax on the top. My projects often have many twists and turns.

Next came the hardware issues. I spray painted the original pulls and when I put them back on the dresser, they looked so small in contrast to the new knobs from Hobby Lobby. Time to select different hardware.
{note….the paint looks a little darker in this photo because the photo was taken inside under yellow lighting}

I went through my stash of hardware, and these are the only ones that would fit the original screw holes. They were antique gold, as you can tell from the one on the top right.
I spray painted four pulls in a dark metallic brown/gray. They were too dark, so I spray painted four more pulls in a metallic dark brown.
The two different colors are in the photo above, but it’s hard to tell them apart. There was a major difference in color. I went with the dark brown pulls, although in the photos, they look black.

Last but not least I removed the contact paper from the drawer bottoms. I hate when people do that. I replaced the paper with a beautiful brown print wallpaper I picked up at an antique shop.
Forgot to get photos of that. Next time I go to the shop I’ll take a pic and post it here.

Remember the tacky glue on the top drawers…after the first coat of paint…the paint crackled…with that cool aged effect…. and I loved it…but after 3 more coats…it was gone.
Did you know you can use white glue under paint to get that crackled look?
I put off writing this tutorial on how to prepare furniture before painting because it is lengthy and very time consuming as far as editing photos and writing the details. But it’s done now, yea!!
Want to learn how to give paint an antique look? Watch my video below….
How To Antique Painted Furniture
Did you already guess the paint details….did you think the top was stained?
More Tutorials to help with your furniture makeovers!……
How To Replace Furniture Hardware
How To Distress Furniture Using Vaseline
As always thanks for being here. I know you have other things to do. Have a great week, Kathy

Author: Kathy Owen
Kathy Owen is the founder of the home decor blog Petticoat Junktion where she shares tutorials on painting furniture and upcycling thrifty finds into unique home décor. Her DIY projects have been featured on the Home Depot Blog, Plaid Crafts, Behr Designer Series, and in numerous magazines. Kathy’s newest website is HappyHomeDIY.com
Hey Sandra, I accidentally put the link to the tray with the heart handle top. Same tray just different holder thing at the top and def different price! I corrected the link and here it is https://amzn.to/3ABpjjE
OKay, thanks, I’ll check it!
on 4/27/23 you posted a two-tiered tray for $28, but the link took us to one that was priced at $20 more!!!!!!!!!!!
Can you please re-check and re-price? I’m interested in purchasing it for $28. Thanks Sandra
Kathy,
Hugs and Prayers for you and your family. I hope your father will be bounce back, healthy and ready for a New Year!
Dear Kathy,
So sorry to hear that your dad has the virus and that you tested positive.
I will keep you both in my thoughts and wish your dad will recover soon and you’ll be fine.
My sincerest condolences for the passing of your mother.
May you feel some peace soon.
I enjoy your blog and tutorials very much.
Wishing you and your family better times for 2021.
Best regards from France
Hugs and prayers.
Speedy recovery for your dad, and keep safe. Love your blog and tutorials.
Kathy
You are the best blogger ever ! Sending healing thoughts from Canada for a good recovery for you both
Take care
Susan
Prayers for your Dad and family. Always enjoy your articles. Thanks!
Kathy, will be keeping your father in my thoughts and i hope you continue to feel ‘okay’ as well!
thanks for the tutorial, i know they must be time-consuming, but they are much appreciated!
i love the front legs on this piece and the colors!
Beautiful! Have a Merry Christmas!
Kathy, You and your family are in my thoughts and prayers. May the Christmas season bring you healing and Peace.
Praying for your dad and family as you go through this. The dresser is so beautiful! Hard work pays off
Very nice tutorial. Have you ever tried removing veneer with wet cloths overnight?
Somewhere online I read a furniture painter say that when a potential client balks at the price for a custom paint job she says something like, “that price covers cleaning, repairing, puttying, sanding, priming, painting, waxing and/or sealing. I can do it for less, which step would you like me to leave out?” Eyeopening for sure. To do a project well (quality) it takes longer than most people would expect – and I include myself in that statement. There always seems to be some hiccup that I didn’t expect but I learn something on each project and I’m usually pretty proud when done.
Many prayers for you and your family. Stay safe and healthy and may your Christmas be blessed with your Dad’s recovery. Keeping you in my thoughts and prayers.
Along with Bobby a prayer and candle. May he regain his health.
Thinking of you and your Dad at this difficult time. I will light a candle for him.
Love it. My kind of dresser. Yep, thought the top was stained. You are my favorite DIY furniture person.